If you’re here because your cat is having accidents in the house, you’re not alone — and you’re not doing it wrong. Learning how to train a cat to use a litter box is one of the most common struggles new cat owners face, and the frustration is real. You’ve tried many tricks. Nothing is working. Your cat REFUSES to use it.
Sound familiar?
“just brought home this girl 2 weeks ago and i can not get her to use the litter box!! she is approximately 3 months old and no matter what she will only go 🚽 under my bed. i have tried many tricks and techniques but she will not budge. any tips??”
That message, posted in a cat owner community, captures exactly what so many people feel. The good news? This guide uses The Instinct-First Method — a framework built on one core truth: cats already want to bury their waste in soft, quiet spots. Your job isn’t to teach them something new. It’s simply to create the right conditions for their instincts to kick in. Follow these steps tonight, and most cats respond within days.
Knowing how to train a cat to use a litter box is easier when you work with your cat’s natural instincts, not against them — this is the foundation of The Instinct-First Method.
- Setup matters most: Box size, litter type, and location are the three variables that cause 80% of litter box problems.
- Positive reinforcement works: Reward your cat within 3–5 seconds of elimination to build the habit fast.
- Special cases exist: Kittens, strays, and senior cats each need a slightly different approach — covered in Step 5.
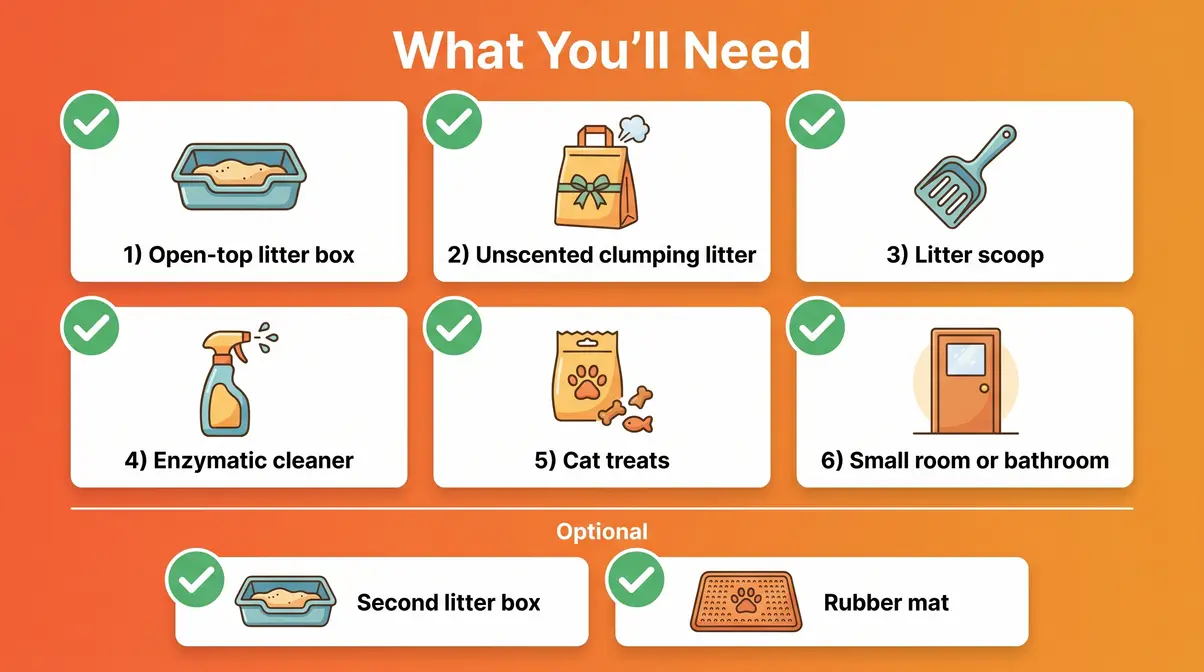
What You’ll Need Before You Start
Estimated Time: 1-4 weeks
Before your cat takes their first step toward the litter box, gather these supplies. Having everything ready saves time and prevents interruptions during the critical first 24 hours.
- Essential supplies:
- Litter box (uncovered, appropriately sized — more on this in Step 1)
- Unscented clumping clay litter (the most universally preferred type)
- Litter scoop
- Enzymatic cleaner (a cleaning product that breaks down the proteins in cat waste to fully eliminate odors — regular cleaners leave traces that draw cats back to the same spot)
- Cat treats (small, soft treats your cat already enjoys)
- A small room or bathroom for the confinement method (optional but highly effective)
- Optional but helpful:
- A second litter box (recommended for multi-cat households — the rule is one box per cat, plus one extra)
- A rubber mat to place under the box to catch stray litter
Step 1: Set Up the Right Litter Box and Location

The most common reason cats avoid the litter box has nothing to do with stubbornness. It’s almost always a setup problem. The box is too small, the litter is wrong, or the location feels threatening. Fix the setup first, and you solve the problem before it starts.
Choose the Right Box Size and Type
The box must be big enough for your cat to turn around, crouch, and dig comfortably. The AAHA/AAFP Feline Life Stage Guidelines recommend a box that measures at least 1.5 times the length of your cat from nose to tail tip. Most commercial litter boxes sold in pet stores fall short of this standard — a large plastic storage container with a low cut-out entry often works better.
Box type matters too. Cat owners consistently report that open-top (uncovered) boxes are accepted far more readily than covered ones. Covered boxes trap odors inside — and your cat’s nose is 14 times more sensitive than yours. What smells mild to you is overwhelming to them.
| Box Type | Best For | Common Problem |
|---|---|---|
| Open-top, standard | Most adult cats | May be too small |
| Open-top, large storage tub | Large breeds, seniors | Entry may need cutting low |
| Covered/hooded | Owners who dislike visibility | Traps odor; often rejected |
| Self-cleaning litter box | Busy owners with trained cats | Noise can startle cats; not ideal for training phase |
| Low-sided open box | Kittens, senior cats | Litter scatter can increase |
Skip the covered box during training. Once your cat is reliably using the box, you can experiment with other styles. During the learning phase, open and simple is best.
What draws a cat to a litter box?
Unscented, fine-grained clumping clay litter is the starting point recommended by virtually every veterinary institution — including the VCA Animal Hospitals litter box training guide. The fine texture mimics the soft soil cats instinctively seek outdoors, which is the core of The Instinct-First Method. Scented litters, while appealing to humans, frequently trigger scent aversion in cats and cause them to avoid the box entirely.
Litter depth is specific: Fill the box to 2 inches deep. This gives your cat enough material to dig and cover, but not so much that it feels unstable. The Cornell Feline Health Center notes that inadequate depth is a surprisingly common reason cats eliminate just outside the box — they dig to the bottom, hit hard plastic, and associate the box with an unpleasant sensation.
Primarily two things draw a cat to a litter box: the texture that triggers their digging instinct, and the absence of strong artificial smells. Keep litter unscented, keep the depth consistent, and your cat’s instincts will do the rest.
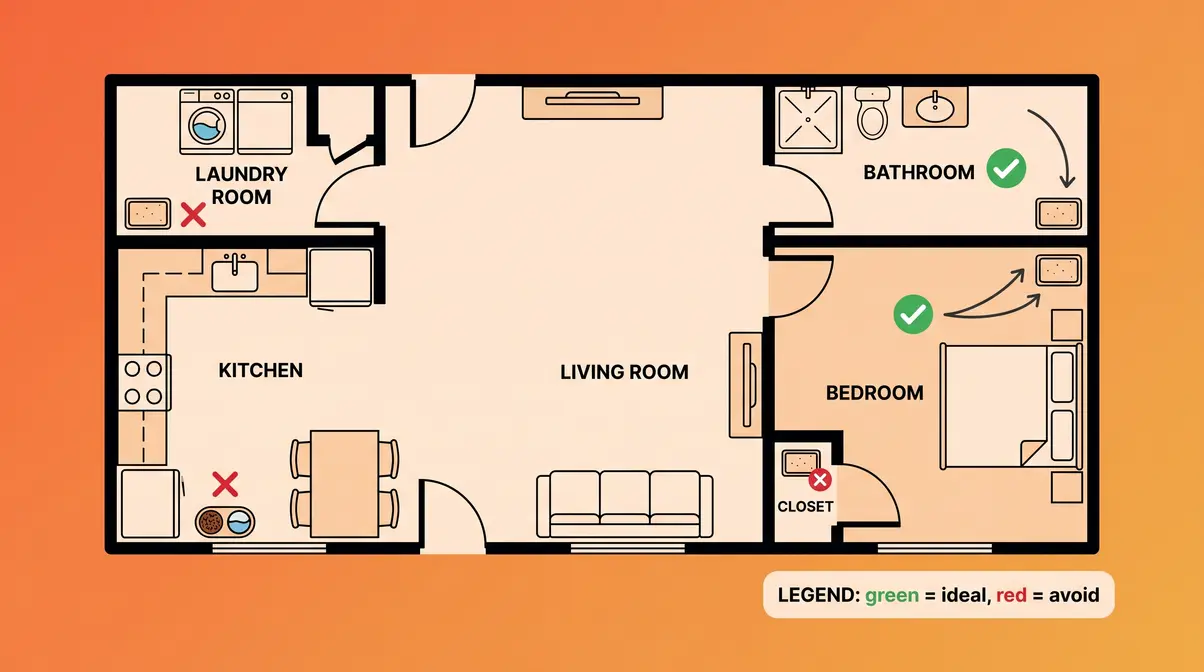
Where should you not put a litter box?
Location is the variable most beginners overlook. Your cat needs to feel safe and unhurried while using the box. Place it in a quiet, low-traffic area with at least two open sides — this gives your cat an escape route if they feel startled, which is a hard-wired safety need.
- Where NOT to put the litter box:
- Next to the food and water bowls (cats strongly avoid eliminating near their eating area)
- In a high-traffic hallway or near a loud appliance like a washing machine
- In a room that’s sometimes closed off — your cat needs 24/7 access
- In a dark corner with only one exit
- Where to put it:
- A bathroom, spare bedroom, or laundry room corner (when the washer isn’t running)
- A quiet spot in the living room if your home is small
- On each floor of a multi-story home (one box per floor, minimum)
The Animal Humane Society’s litter box guidance confirms that most cats require very little formal training when the box, litter, and location are all correct — because cats have a natural desire to dig and bury their waste. The Instinct-First Method works precisely because it removes the barriers that block that instinct. For multi-cat households, optimizing your cat’s litter box setup is crucial to preventing territorial disputes.
✅ Step 1 Checkpoint: Box is the right size (1.5x your cat’s body length), filled with 2 inches of unscented clumping litter, placed in a quiet spot with two open sides, away from food and water.
Step 2: Introduce Your Cat to the Litter Box
Once the setup is right, the introduction itself is straightforward. For more details, see our step-by-step guide to litter training a cat. The key is timing and calm energy. You’re not forcing a behavior — you’re showing your cat where the right spot is and letting their instincts take over.
The First 24 Hours
Bring your cat directly to the litter box when you first arrive home. Set them gently inside, let them sniff, and step back. Don’t hold them in the box or move their paws — this creates negative associations. Most cats will sniff around, possibly scratch, and may or may not use it right away. That’s completely normal.
- Repeat this introduction at key moments:
- Right after your cat wakes up from a nap
- Within 15 minutes of eating
- Any time you notice sniffing, circling, or crouching behavior (more on these cues in Step 4)
Cat owners consistently report that kittens placed in the box right after waking up use it within seconds — because the urge to eliminate is strongest immediately after sleep. This timing trick alone shortens the training window significantly.
One important reframe: cats can be litter trained at any age. Whether you have a young kitten, an adult rescue, or a senior cat that has suddenly stopped using the box, the process is the same. The instinct to bury waste is present throughout a cat’s entire life.
The Confinement Method
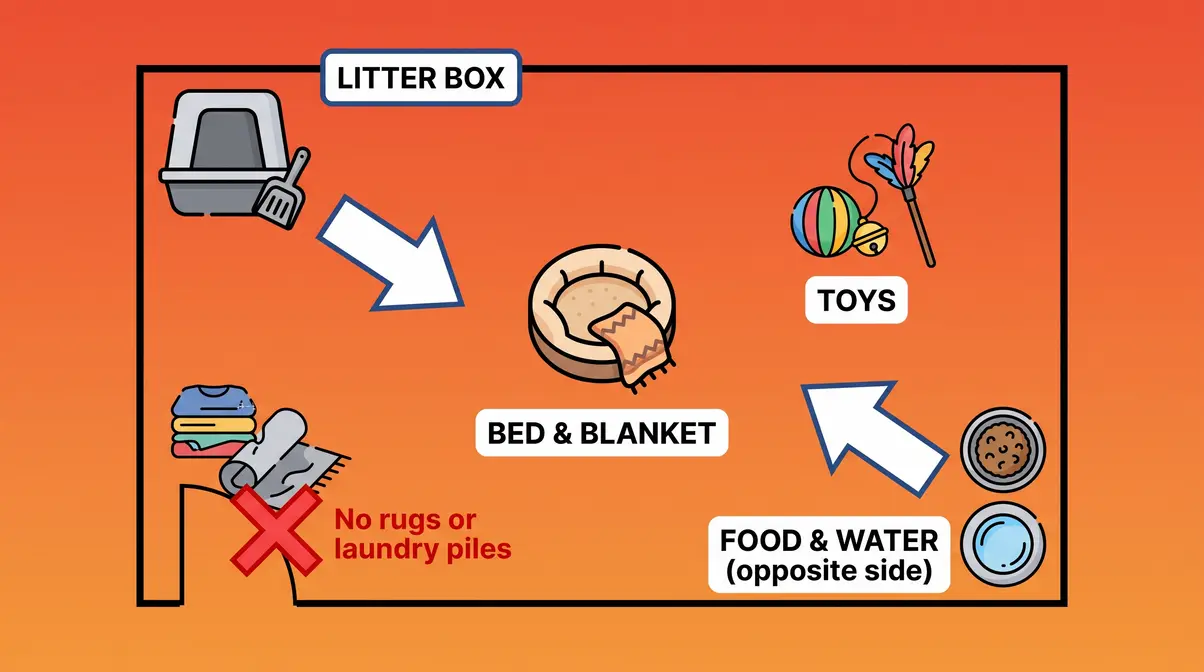
If your cat is having accidents all over the house, this method is the fastest reset available. Confine your cat to one small room — a bathroom or spare bedroom works perfectly — with everything they need.
- What goes in the room:
- The litter box (placed in a corner, away from the food area)
- Food and water bowls (on the opposite side of the room from the box)
- A comfortable bed or blanket
- A few toys
- A scratching surface
- What to exclude:
- Piles of laundry or soft rugs (cats may eliminate on these instead)
- Hiding spots under furniture where your cat can avoid the box
Keep your cat in this room for 3–7 days, visiting regularly for play and affection. With fewer options, their instinct to use the soft, designated digging spot kicks in reliably. Once they’re consistently using the box, gradually expand their access to the rest of the home — one room at a time.
✅ Step 2 Checkpoint: Cat has been placed in the litter box after waking and after meals. If accidents are frequent, confinement room is set up with box, food, water, and bed in correct positions.
Step 3: Use Positive Reinforcement Every Time
Positive reinforcement (rewarding a behavior immediately after it happens to encourage repetition) is the engine behind fast litter training. Cats respond far better to rewards than to corrections. Punishment — including scolding or rubbing their nose in an accident — causes anxiety and actually makes litter box avoidance worse.
When to Reward Your Cat
Reward your cat within 3–5 seconds of finishing elimination. This tight window is not arbitrary. A cat’s brain connects a reward to whatever they were just doing — and after 5 seconds, that connection fades. Wait too long, and the treat is just a treat. Time it right, and it becomes a powerful signal: using this box leads to something good.
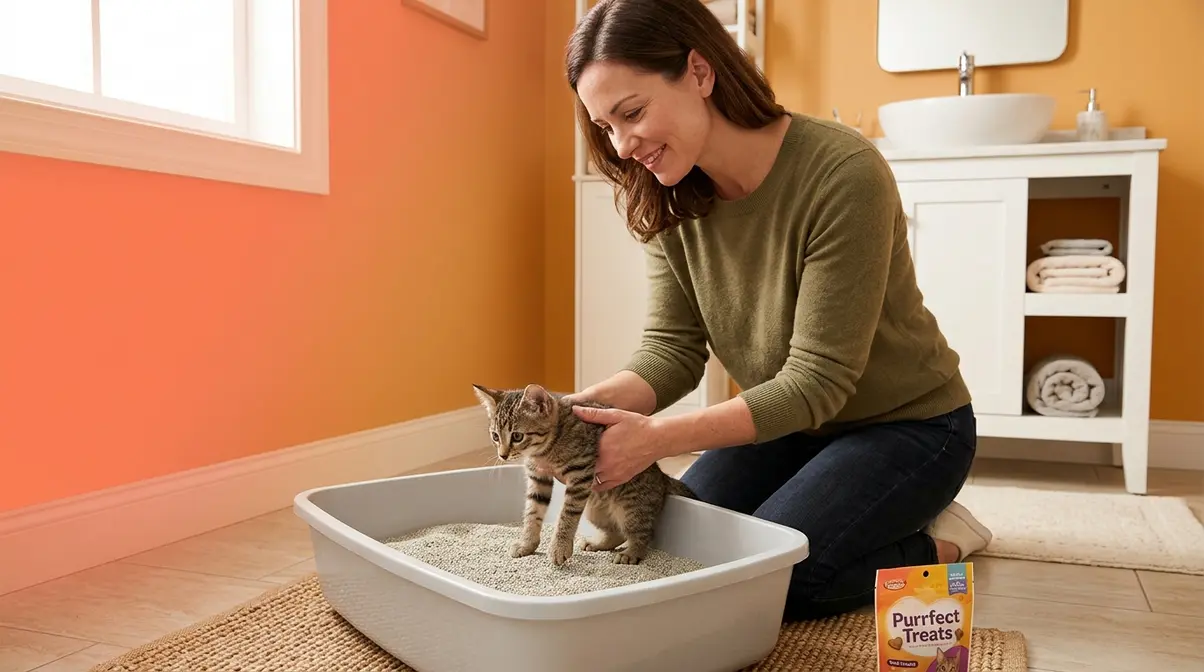
Keep a small container of treats near the litter box at all times during the training phase. The moment your cat steps out of the box after doing their business, offer a treat with a calm, warm voice. You don’t need to be loud or excited — quiet praise and an immediate reward is enough.
- What this looks like in practice:
- Cat enters the box
- Cat eliminates and begins to exit
- You immediately offer a treat and say “good job” in a soft, calm tone
- Cat associates the box with a positive outcome
- Cat returns voluntarily next time
Repeat this consistently for the first two weeks. After that, you can taper rewards to every other visit, then gradually phase them out as the habit solidifies.
Effective Rewards to Use
- Effective rewards:
- Small soft treats (pea-sized pieces work best — you may be rewarding 3–4 times per day)
- Verbal praise in a warm, calm tone
- A quick petting session immediately after box use (if your cat enjoys being touched)
- Avoid these common mistakes:
- Scolding or punishing accidents — this creates fear, not learning
- Ignoring successful box use — missed rewards slow progress
- Using treats that are too large (your cat will fill up quickly and lose interest)
The ASPCA’s guidance on litter box problems confirms that behavioral treatments — including consistent positive reinforcement — are highly effective for litter box issues when the underlying cause is behavioral rather than medical.
Here’s a reframe that helps many frustrated owners: litter training is not about teaching a cat a new behavior. Research and veterinary consensus confirm that eliminating in soft, diggable material is instinctive for cats. Positive reinforcement simply points your cat to the right location for that instinct. You’re not training them to do something unnatural. You’re rewarding them for doing what they already want to do in the right place.
✅ Step 3 Checkpoint: Treats are positioned near the litter box. You have successfully rewarded your cat within 3–5 seconds of box use at least once. No punishments or scolding have occurred.
Step 4: Build a Consistent Daily Routine
Consistency is the difference between a cat that reliably uses the box and one that occasionally “forgets.” Cats are creatures of habit — their stress response is triggered by unpredictability. A steady routine removes uncertainty and makes the litter box the obvious, comfortable choice every single time.
Watch for Behavioral Cues
Learning to read your cat’s pre-elimination signals lets you guide them to the box before an accident happens. These cues are subtle but consistent.
- Watch for:
- Sniffing the floor — your cat is searching for a suitable spot
- Circling — they’re preparing to crouch and eliminate
- Crouching low and moving slowly — elimination is imminent
- Scratching at carpets or soft surfaces — the digging instinct has activated
- Suddenly leaving a play session — often signals an urgent need
When you spot any of these signals, calmly pick up your cat and place them in the litter box. Don’t rush, don’t startle them. Just move them gently and step back. Even if they don’t use it that time, repeated gentle redirection builds the association.
- Routine timing that works for most cats:
- First thing in the morning
- 15–20 minutes after each meal
- Right after any nap
- Before bedtime
Litter Training Timeline
Most cats are reliably using the litter box within one to four weeks — but the timeline depends on their background and age.
| Cat Type | Typical Training Timeline |
|---|---|
| Kitten (under 6 months) | 1–2 weeks with consistent routine |
| Adult cat (new to home) | 2–4 weeks, faster with confinement method |
| Stray or rescue cat | 4–6 weeks (adjustment period applies — see Step 5) |
| Senior cat (new setup) | 1–3 weeks with correct box type |
Is it hard to learn how to train a cat to use a litter box? Honestly, it’s one of the easier aspects of cat ownership — when the setup is correct. Across cat behavior communities, the consistent feedback is that most litter box problems disappear once the box size, litter type, and location are fixed. The training itself is simple. The setup is where most people need help.
✅ Step 4 Checkpoint: You can name at least two pre-elimination behavioral cues your cat shows. You have a consistent daily schedule for placing your cat in or near the box (after meals, after naps).
Step 5: Kittens, Strays, and Senior Cats
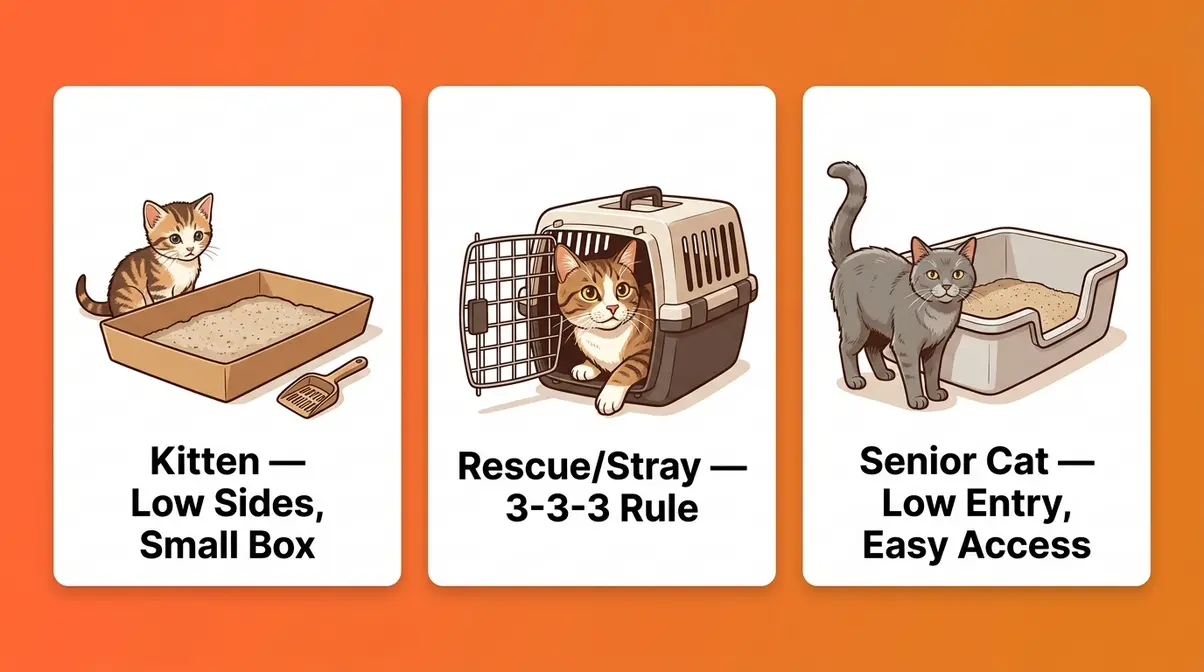
The Instinct-First Method works for every cat — but the specifics change depending on your cat’s age and background. This section covers the three situations most cat owners struggle with.
Training a Kitten
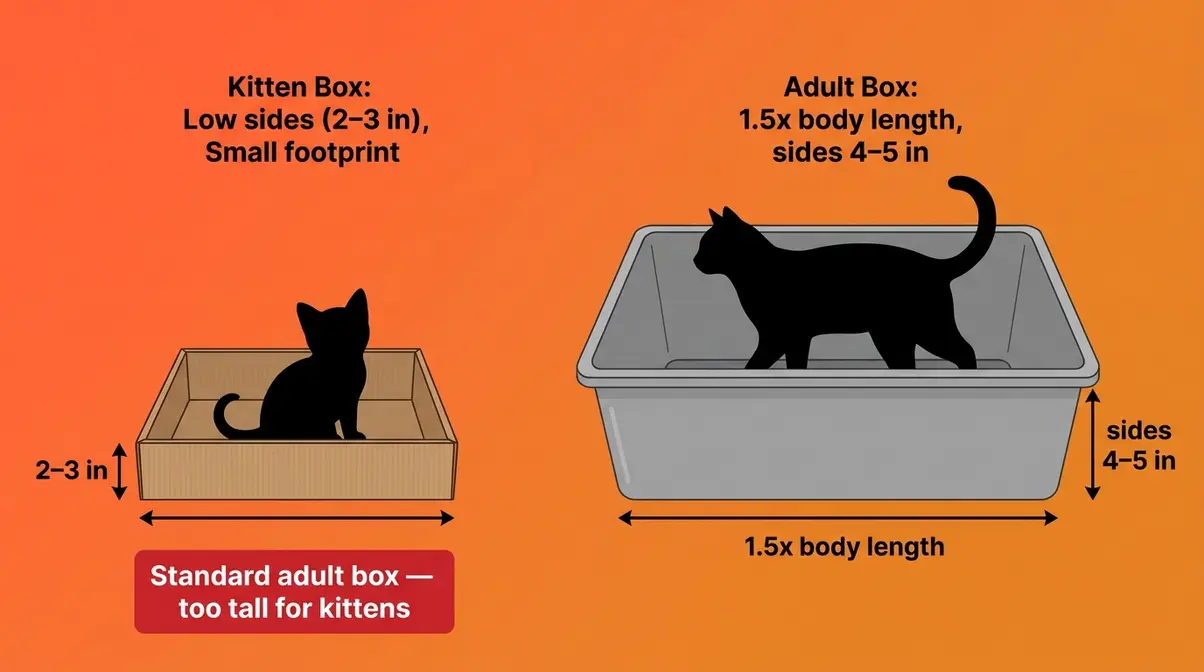
Kittens under 12 weeks old have two challenges: small bladders (meaning frequent, urgent elimination) and limited motor skills (meaning high box sides are a genuine physical barrier). A standard adult litter box is too big and too tall for most kittens.
- Kitten-specific setup:
- Use a shallow box with sides no higher than 2–3 inches — a cut-down cardboard box or a baking tray with low sides works perfectly for the first few weeks
- Place the box in a very small area initially — kittens can’t “hold it” long enough to travel far
- After placing your kitten in the box, gently take one of their front paws and make a light scratching motion in the litter — this mimics what their mother would have shown them and activates the digging instinct
- Expect to redirect your kitten to the box 4–6 times per day during the first week
Expect accidents during the first week. Clean them immediately with an enzymatic cleaner. This removes the scent signal that would otherwise draw your kitten back to the same spot. Unscented white vinegar diluted in water also works in a pinch, though enzymatic cleaners are more thorough. For a deeper dive, check out these expert tips for litter training kittens.
Is there a 3-3-3 rule for cats?
If you’ve taken in a stray or adopted a rescue cat, standard litter training timelines don’t apply. Your cat isn’t just learning a new habit — they’re recovering from significant stress and adjusting to an entirely new world. This is where the 3-3-3 Rule becomes essential to understand.
The 3-3-3 Rule describes the typical adjustment timeline for rescue and stray cats:
| Phase | Timeframe | What’s Happening | What to Do |
|---|---|---|---|
| Overwhelmed | First 3 days | Cat is scared, may hide, may not eat or use the box | Confine to one quiet room; don’t force interaction |
| Settling in | First 3 weeks | Cat begins to explore, personality emerges, routines form | Establish consistent feeding and box placement; begin gentle positive reinforcement |
| At home | First 3 months | Cat feels secure, full personality shows, habits solidify | Gradually expand access to the home; maintain the same box location |
During the first 3 days, your stray cat may not use the litter box at all — or may eliminate in corners out of stress. This is normal. Don’t punish it. Keep the confinement room setup (from Step 2) in place and give your cat quiet, calm time to decompress.
A critical tip for strays: If your cat was living outdoors, they’re used to eliminating in soil or sand. Adding a small amount of plain dirt or sand to the litter box during the first week can bridge the gap between what they know and what you’re offering. Gradually reduce the dirt and increase the litter over 7–10 days.
The Best Friends Animal Society’s guidance on litter box problems notes that patience during the adjustment period is the single most important factor for rescue cats — rushing the process creates the anxiety that causes avoidance. Read more about introducing and training a rescue cat.
Training a Senior Cat
A senior cat (typically age 10 and older) that suddenly stops using the litter box is almost always experiencing a physical problem, not a behavioral one. Before assuming it’s a training issue, see your veterinarian — arthritis, kidney disease, and hyperthyroidism are common in older cats and can all cause litter box avoidance.
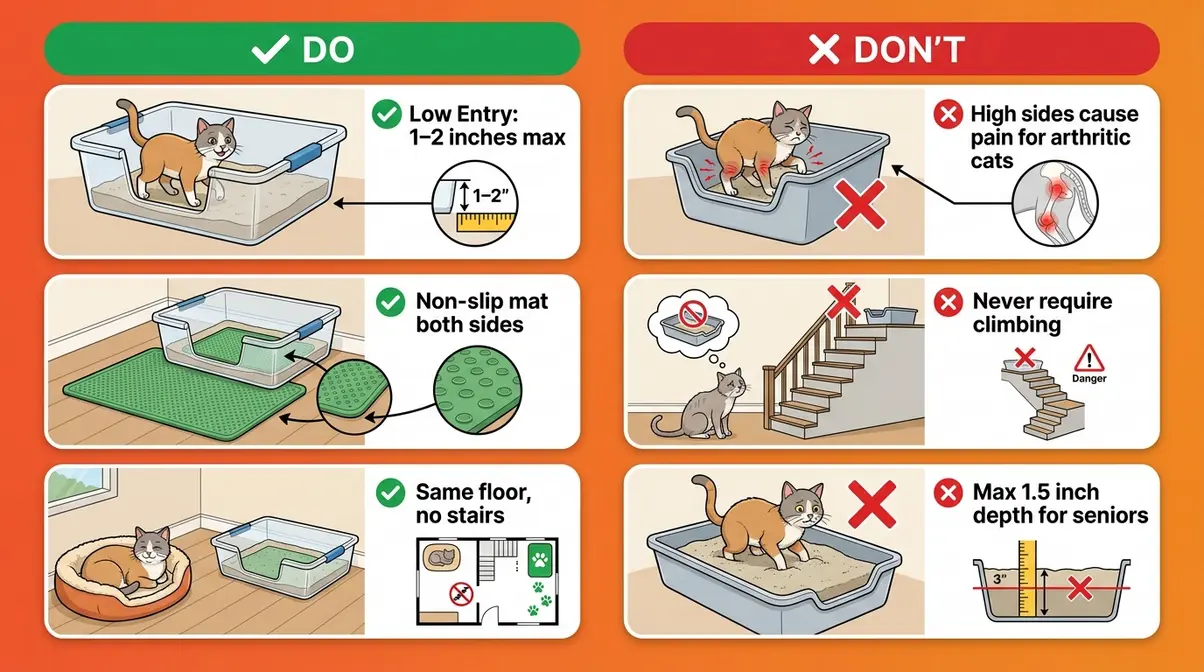
If your senior cat has been cleared medically, the fix is usually a box modification. The PMC article on AAFP Feline Senior Care Guidelines specifically list a low-entry, easy-access litter box as essential for senior cats with mobility issues. A cat with stiff joints cannot comfortably step over a box with 5-inch sides.
- Senior cat litter box setup:
- Box size: at least 1.5x the cat’s body length (nose to tail) — per AAHA/AAFP guidelines, most commercial boxes are too small for senior cats
- Entry height: 1–2 inches maximum — cut a low entry into one side of a larger storage container if needed, and smooth any sharp edges with tape
- Litter depth: slightly shallower (1.5 inches) — deep litter is harder to walk through for arthritic cats
- Placement: on the same floor where your cat spends most of their time; don’t require them to climb stairs to reach the box
- Number of boxes: increase to one per room where the cat regularly rests
One practical tip: Place a non-slip mat both inside and just outside the box. Senior cats may have reduced grip strength, and slipping while using the box causes avoidance.
✅ Step 5 Checkpoint: You’ve identified your cat’s category (kitten / stray / senior / adult). You’ve applied the category-specific adjustments above. If your cat is a senior, you’ve consulted or plan to consult your vet to rule out medical causes.
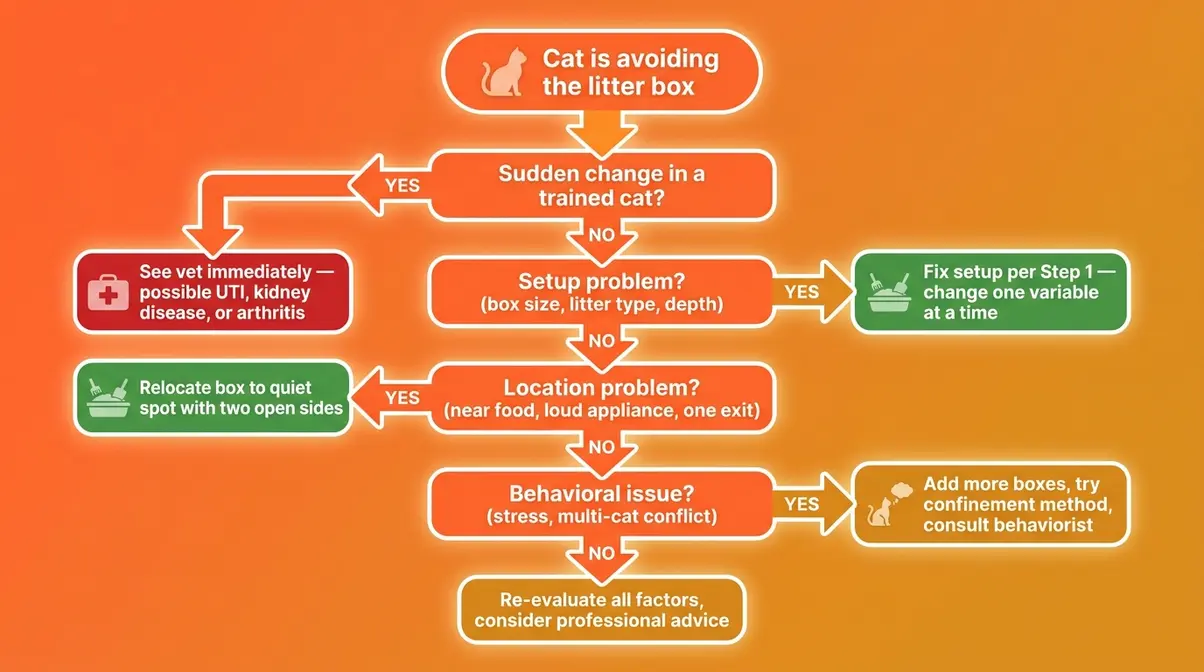
Troubleshooting Litter Box Avoidance
Even with a perfect setup, some cats need additional troubleshooting. Here’s a diagnostic approach to the most common problems — and what to do about each one. If problems persist, explore our guide on troubleshooting common litter box issues.
Common Pitfalls
Pitfall 1: Changing multiple things at once
When a cat avoids the box, most owners change the litter, move the box, AND buy a new box simultaneously. This makes it impossible to know what fixed the problem — or what made it worse. Change one variable at a time, wait 3–5 days, and observe.
Pitfall 2: Using scented litter or scented cleaning products
Cats have an estimated 200 million scent receptors (compared to 5 million in humans). What smells “fresh” to you smells chemically overwhelming to your cat. The ASPCA specifically warns against scented cleaners for the same reason — they leave a residue cats develop strong aversions to. Stick to unscented litter and clean accidents with an enzymatic cleaner.
Pitfall 3: Not cleaning the box often enough
A dirty litter box is the number-one reason cats eliminate outside it. Scoop at minimum once per day — twice is better. Empty and scrub the entire box with hot water and unscented soap once per month. Cats who avoid a dirty box are not being difficult — they’re being hygienically rational.
Pitfall 4: Punishing accidents
Scolding, spraying with water, or rubbing a cat’s nose in an accident doesn’t teach them where to go. It teaches them to be afraid of you — and sometimes to hide their elimination even more. Across cat behavior communities, the consistent feedback is that punishment-based approaches extend the problem rather than solve it.
Pitfall 5: Assuming it’s behavioral when it’s medical
Sudden litter box avoidance in a previously trained cat is a veterinary red flag. Urinary tract infections (UTIs), bladder stones, kidney disease, and diabetes can all cause a cat to avoid the box or eliminate in unusual places. If your cat’s avoidance is sudden, urgent, or accompanied by straining, blood, or crying — this is a vet visit, not a training problem.
When to Choose Alternatives
If your cat consistently eliminates in one specific spot (like under the bed), try placing a litter box directly in that spot. Once they’re using it reliably, gradually move the box a few inches per day toward your preferred location.
If your cat seems to prefer a different litter texture, offer a second box with a different litter type alongside the first. Many cats prefer unscented silica gel crystals or natural wood pellets over clay. Let your cat vote with their paws.
If you have multiple cats and one is avoiding the box, the problem may be inter-cat conflict. One cat may be guarding the box. The solution is to add more boxes — the AAHA/AAFP guideline of one box per cat plus one extra exists precisely for this reason.
You might also consider electronic cat doors for outdoor access. If you choose this route, be sure to read about installing a cat flap for outdoor toileting.
When to See a Vet
- See your veterinarian if:
- Litter box avoidance is sudden in a previously trained cat
- Your cat is straining, vocalizing, or producing very small amounts of urine
- You notice blood in the urine or stool
- Your cat is drinking significantly more water than usual
- The problem persists after 4–6 weeks of consistent training with correct setup
The ASPCA’s litter box problem guidance emphasizes ruling out medical causes before pursuing behavioral interventions — especially for adult and senior cats.
Frequently Asked Questions
Is it hard to train a cat?
Litter box training is one of the easier aspects of cat ownership when the setup is correct. Cats have an instinctive drive to bury their waste in soft, diggable material — you’re working with a built-in behavior, not teaching something new. Most cats with the right box, litter type, and location figure it out within one to two weeks. The difficulty people experience almost always traces back to a setup problem: wrong litter type, box that’s too small, or a location that feels unsafe to the cat.
What is the 3-3-3 rule for cats?
The 3-3-3 rule describes the adjustment timeline for newly adopted or rescue cats. According to animal welfare experts, in the first 3 days, the cat is overwhelmed and may hide, refuse to eat, or avoid the litter box entirely. Over the first 3 weeks, the cat begins to settle, establish routines, and show their personality. By 3 months, the cat feels fully at home and habits are solidified. For litter training, this means keeping a stray or rescue cat confined to one quiet room with a box during the first 3 days, then gradually expanding access as they settle in.
What smell do cats absolutely hate?
Cats have an extremely powerful sense of smell and are strongly averse to citrus, strong mint, vinegar, and artificial perfumes. This is directly relevant to litter box training — scented litters and scented cleaning products near the box often cause cats to avoid it entirely. According to the ASPCA, even scented soaps used to clean the litter box can create a scent aversion that persists. Clean accidents with an enzymatic cleaner (which neutralizes odors completely) rather than pine-sol, bleach, or scented sprays, which cats find repellent.
Stopping floor accidents
First, rule out a medical problem — especially if this is a sudden change in a previously trained cat. A UTI, digestive issue, or arthritis can all cause floor elimination. If your cat gets a clean bill of health, the most effective fix is the confinement method: place your cat in a small room with a correctly set-up litter box and limit their access to the rest of the house for 3–7 days. Clean every accident spot thoroughly with an enzymatic cleaner. If your cat returns to one specific spot repeatedly, place a litter box directly on that spot temporarily, then gradually relocate it.
Saying “hi” in cat language
The slow blink is the most recognized friendly signal in cat communication. When you make eye contact with your cat and slowly close and open your eyes, you’re signaling calm, non-threatening intent — the feline equivalent of a relaxed hello. Many cats will slow-blink back. You can also try turning your body slightly sideways when approaching a nervous cat, which reduces the visual impression of a direct threat. These signals matter during litter training — a cat that trusts you is a cat that’s more likely to relax and use the box in your presence.
Training an older cat
Yes, older cats can easily be trained to use a litter box. Because burying waste is a deeply ingrained instinct, age is rarely a barrier to success. The most important adjustment is providing a low-entry box to accommodate any potential joint stiffness, along with unscented clumping litter.
Sudden litter box avoidance
Sudden changes in litter box habits often signal a medical issue like a UTI or kidney problem. Always consult a veterinarian first when a previously trained cat starts having accidents. If they are cleared medically, evaluate recent stressors or changes to the box setup, such as a new litter brand or a moved box.
How often to change litter
Scoop the litter box at least once or twice daily. Completely empty the box, wash it with mild unscented soap, and replace all the litter every two to four weeks. This timeline depends heavily on the type of litter you use and the number of cats sharing the space.
When Training Alone Isn’t Enough
The Instinct-First Method works for the vast majority of healthy cats. However, some situations fall outside the scope of any training approach.
When Training Won’t Work
Medical conditions: Urinary tract infections, bladder stones, feline idiopathic cystitis (FIC — chronic bladder inflammation with no identified cause), hyperthyroidism, diabetes, and cognitive dysfunction in senior cats can all cause litter box avoidance that training cannot fix. If your cat’s behavior changed suddenly, or if they’re straining to urinate, the litter box is not the issue — their body is.
Territorial marking (spraying): Cats that spray urine on vertical surfaces are not failing at litter training — they’re communicating. Spraying is a separate behavior driven by stress, territorial conflict, or hormones. Spaying or neutering resolves spraying in approximately 90% of cases (ASPCA data). A litter training protocol will not address this behavior.
Severe anxiety or trauma history: Some rescue cats with significant trauma histories may need more than patient training. Veterinary-prescribed anti-anxiety medication, pheromone diffusers (like Feliway, which releases synthetic calming cat pheromones), or a consultation with a certified animal behaviorist may be needed alongside the steps in this guide.
When to Seek Expert Help
See a veterinarian if litter box avoidance is sudden, if your cat is straining or vocalizing during elimination, or if you notice blood in the urine or stool. These are medical emergencies, not training problems.
Consult a certified animal behaviorist (look for IAABC or CCBC certification) if your cat has been medically cleared but continues to avoid the box after 6+ weeks of consistent training with a correct setup. Behaviorists can identify environmental stressors and inter-cat dynamics that aren’t visible in a general guide.
For most cat owners, the steps in this guide — correct setup, calm introduction, consistent positive reinforcement, and a routine built around your cat’s natural elimination cues — are everything needed to solve the problem. Cats that learn how to train a cat to use a litter box through The Instinct-First Method aren’t learning a trick; they’re simply being given the right conditions for their instincts to work. The AAHA/AAFP guidelines, the ASPCA’s behavioral research, and the lived experience of cat owners all point to the same conclusion: setup is 80% of the solution.
Start tonight with Step 1. Get the box size right, fill it with 2 inches of unscented litter, and place it somewhere quiet with two open sides. Most cats respond faster than their owners expect — because they were never refusing. They were just waiting for the right conditions.
If you’ve worked through every step and your cat is still struggling, make that vet appointment. Some problems are medical, and catching them early is the kindest thing you can do for your cat.
Dave King
Cat owner and writer at Mad Cat Man.