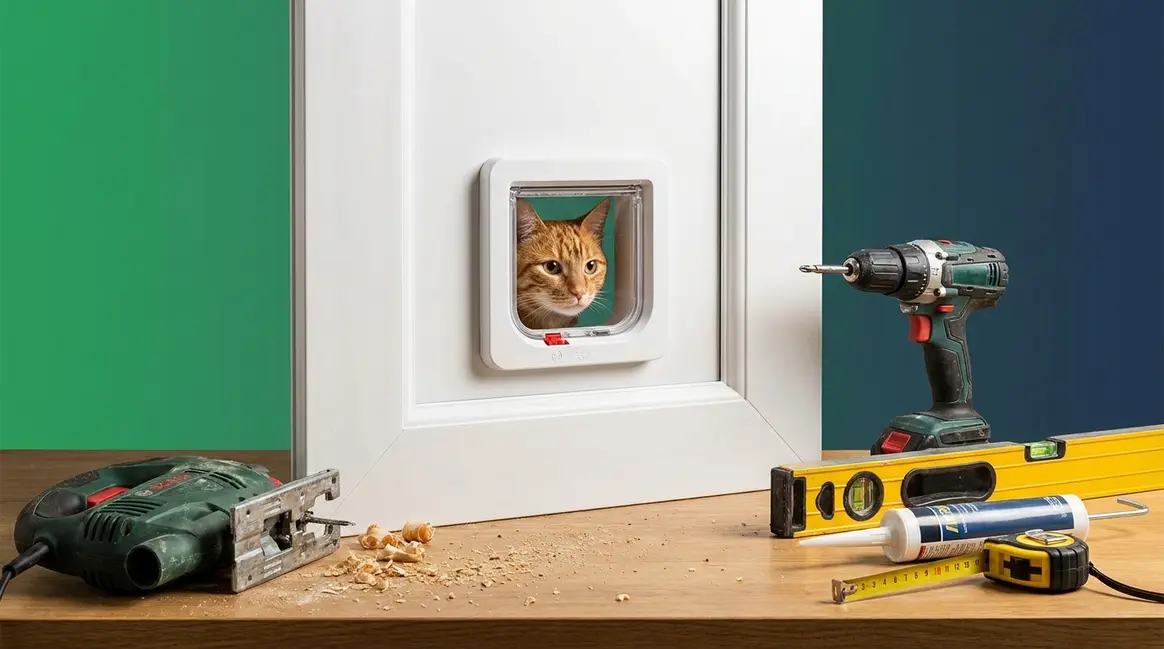
How to fit a cat flap: Mark the position on your door using the supplied template, drill corner pilot holes, then cut the opening with a jigsaw. Slot the inner and outer frames into the hole and secure with the included screws. The full process takes 30–60 minutes on a wooden or uPVC door.
If you’ve ever dragged yourself out of bed at 3am to open the back door for a cat who could absolutely wait — you’ll know the feeling. You’re not alone.
“Spend a hundred quid buying it. Take a half day to carefully cut the hole in the front door and fit it properly and then have the wee bastard…”
— real cat owner, Reddit
Every week without a cat flap is another week of interrupted sleep and muddy pawprints on the door handle. The good news? Learning how to fit a cat flap is genuinely achievable for most people — even if you’ve never used a jigsaw before. This guide walks you through exactly how to fit a cat flap in any door type: wood, uPVC, glass, or even a wall — so your cat gets independence and you get your evenings back. You’ll find material-specific instructions, cost breakdowns, insurance advice, and a vet-backed training plan, all in one place.
This post contains Amazon affiliate links. If you click through and make a purchase, we may earn a small commission at no extra cost to you. This helps keep madcatman.com running — thank you for your support!
Recommended Products
| # | Image | Product | Best For | Buy |
|---|---|---|---|---|
| 1 | No products found. | Sure Petcare Microchip Flap | Microchip security control | No products found. |
| 2 |  |
SureFlap Microchip Cat Flap | Basic microchip entry | Buy on Amazon |
| 3 |  |
Microchip Pet Door Connect | Large cats, no app needed | Buy on Amazon |
| 4 |  |
4-Way Locking Cat Door | Standard door DIY fit | Buy on Amazon |
| 5 |  |
Classic 4-Way Lock Flap | Budget DIY installation | Buy on Amazon |
| 6 |  |
Extra Large 4-Way Cat Door | Large cats and small dogs | Buy on Amazon |
| 7 | No products found. | 2-Way Locking Cat Flap | uPVC and wood doors | No products found. |
| 8 |  |
Soft Flap Cat Door | Gentle interior use | Buy on Amazon |
Fitting a cat flap yourself takes 30–60 minutes on a wooden or uPVC door and typically costs £10–£30 in materials — versus £75–£150 for a professional handyman.
- Match your door first: Use the Door Type Decision Matrix to choose the right installation method before buying tools
- Wooden doors are the easiest DIY option — a jigsaw, drill, and the supplied template are all you need
- uPVC doors are DIY-friendly but require extra care to avoid cracking; composite doors may void warranties
- Glass doors always require a professional glazier — never attempt to cut tempered or double-glazed glass yourself
- Cat training: Use the 3-3-3 approach to help hesitant cats adapt to their new flap within weeks
Planning, Costs & DIY Feasibility
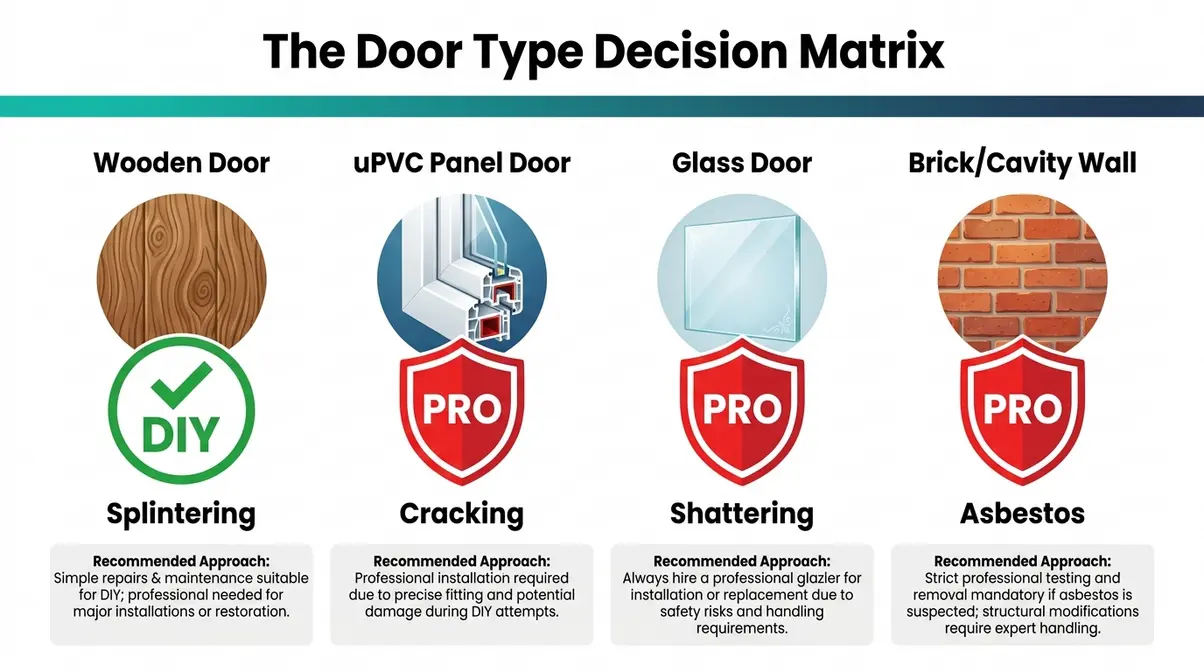
The single decision that determines everything about your cat flap installation is what your door is made of. The Door Type Decision Matrix is a simple framework: identify your door material first, then follow the matching installation path. That one step determines which tools you need, how much it will cost, and whether you should be doing this yourself at all. Getting this wrong — most commonly by attempting to cut existing double-glazed glass — can turn a £30 Saturday project into a £400 emergency call to a glazier.
Door material affects every variable: wooden and uPVC panel doors are genuinely DIY-friendly; glass doors and cavity walls are a different matter entirely. Work through the matrix below before you touch a single tool.
DIY vs. Pro: 2026 Decision Matrix
Use this table to make your “DIY or Pro?” call in under 60 seconds:
| Door Type | DIY Friendly? | Key Risk | Recommended Approach |
|---|---|---|---|
| Wooden door | ✅ Yes | Splintering | DIY |
| uPVC panel (no glass) | ✅ Yes, with care | Cracking, warranty void | DIY (cautious) |
| Composite door | ⚠️ Possible | Warranty void | Check warranty first |
| Glass door / window | ❌ No | Injury, broken pane | Always hire glazier |
| Brick / cavity wall | ⚠️ Advanced only | Pipes, wires, asbestos | Consider professional |
| Shed / metal door | ✅ Yes | Rust, sharp edges | DIY |
If your door is wooden or a uPVC panel without glazing, DIY is a perfectly reasonable Saturday afternoon project. If it involves glass or a cavity wall, the maths change quickly — and so does your risk. You can compare electronic and traditional cat flaps to decide which type suits your door and your cat before committing to any cutting.
Not sure what your door is made of? Knock on the panel — solid wood sounds dull and dense, uPVC sounds slightly hollow, and glass is, well, obvious.
Once you know your door type, the next question is always: how much is this going to cost me?
Cat Flap Fitting Costs in 2026
Fitting a cat flap yourself costs between £20 and £90 in total, depending on whether you already own a jigsaw and which type of flap you choose. Hiring a professional handyman costs considerably more.
Here’s a clear breakdown of the 2026 cost options:
| Option | Materials Cost | Labour Cost | Total Estimate |
|---|---|---|---|
| DIY (basic 4-way flap) | £15–£35 | £0 | £15–£35 |
| DIY (microchip flap) | £40–£80 | £0 | £40–£80 |
| Handyman / carpenter | £15–£35 | £75–£150 | £90–£185 |
| Glazier (glass door) | £150–£250 (new unit) | £80–£150 | £230–£400+ |
According to Checkatrade’s 2026 installation cost guide, professional installation costs for cat flap fitting in wooden and uPVC doors typically range from £75 to £150 for labour alone. A professional handyman charges £75–£150 to fit a cat flap in a wooden door, while a glazier charges £200–£400+ for glass installations — making DIY the clear winner for standard doors.
A few costs to factor in beyond the flap itself: silicone sealant (roughly £5) seals the frame against draughts and moisture, and you’ll want a tube regardless of door type. If you don’t own a jigsaw (a handheld power saw for cutting curves and straight lines in wood and plastic), you can borrow one, hire one for around £15–£25 per day, or buy a budget model for £30–£60. A microchip cat flap — one that only unlocks for your cat’s unique implanted microchip — costs more upfront at £40–£80, but it eliminates the need for collar magnets and stops neighbourhood cats waltzing in uninvited. For most cat owners, that premium pays for itself in peace of mind within the first month.
A standard 4-way locking flap in a wooden back door is the cheapest possible project — under £30 in materials and an hour of your Saturday.
Cost sorted — but there’s one more thing to check before you buy anything: your home insurance.
Home Insurance Impact
Yes, it can — and this is the question that almost no DIY guide bothers to answer. Some insurers view a cat flap as a security vulnerability, particularly if you keep keys near the front door. A burglar can push a length of wire or a rod through a standard cat flap and hook keys off a nearby hook or table. This known technique, sometimes called “key fishing,” has been flagged by the Metropolitan Police door security advice as a genuine risk — and it can affect your policy or excess if your insurer wasn’t informed.
The practical fix is straightforward: keep all keys at least 1.5 metres from the door. A microchip cat flap adds a locking mechanism that significantly reduces (but doesn’t entirely eliminate) this risk, since the flap stays locked when no registered cat is approaching.
As Aviva’s home security guidance notes, modifications to doors that could compromise security should be disclosed to your home insurer. A 30-second phone call to your insurer before installation is far cheaper than a refused claim. Ask specifically: “Does fitting a cat flap affect my policy?” Some insurers require a minimum security standard — typically a 4-way locking mechanism or a microchip flap. Get that confirmation in writing.
Installation Time Estimates
Fitting a cat flap in a wooden or uPVC panel door takes approximately 30–60 minutes from marking to final sealant application. A wall installation takes 2–4 hours due to the additional complexity of cutting through brick or blockwork, inserting a tunnel liner, and finishing both sides. Glass installations are not a same-day job — the lead time for a factory-cut replacement sealed unit is typically 1–2 working days, with the glazier’s installation visit taking 1–2 hours.
Right — you’ve done your homework. Now let’s make sure you have everything you need before you start cutting.
Tools, Materials & Measuring Up
A well-prepared installer makes fewer mistakes. If you are completely new to DIY, you might want to review our guide on how to fit a cat flap even if you’re not handy for extra reassurance. Across DIY community forums and installer feedback, the consistent finding is that most botched cat flap jobs come down to one thing: starting without the right tools. This section covers everything you need — and, crucially, why each item matters.
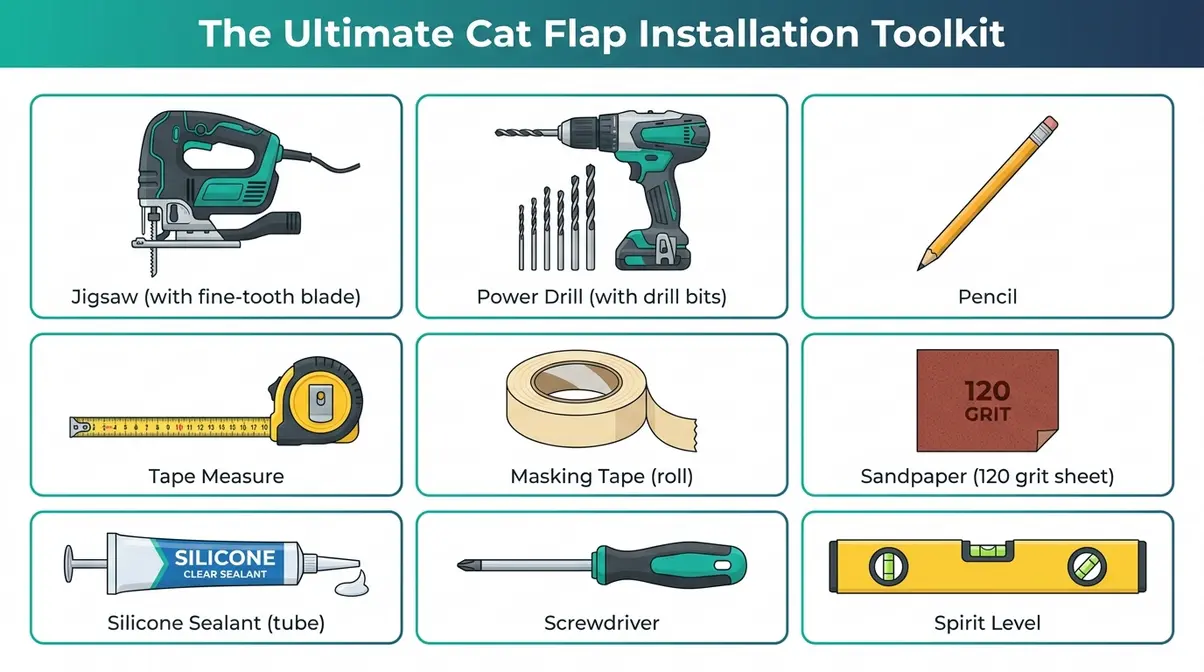
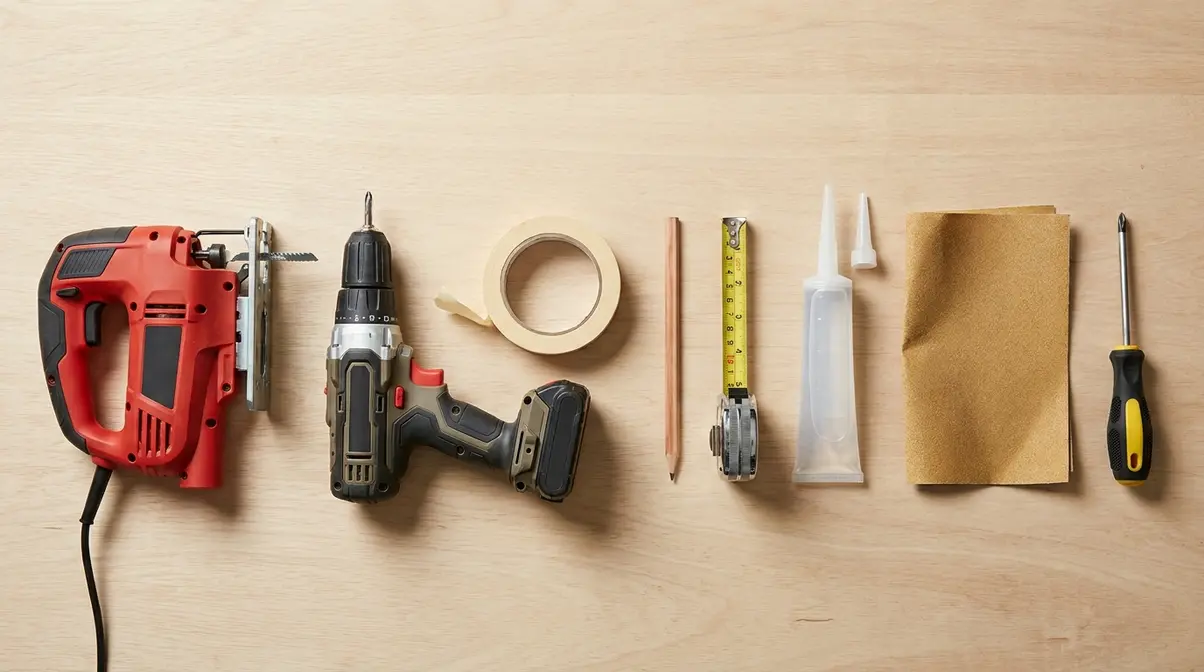
Essential Installation Toolkit
You’ll need: roughly 15–20 minutes to gather these items, plus admin access to the door (i.e., permission if renting).
Here’s your complete tool list with the reason each item is non-negotiable:
- Jigsaw — the primary cutting tool. Without it, you’re attempting to cut a precise rectangular hole with a hand saw, which is exhausting and far less accurate. A jigsaw with a fine-tooth blade gives a clean edge.
- Drill with bits — for drilling pilot holes (small starter holes) at each corner of the cutting template. Pilot holes give the jigsaw blade a starting point and prevent cracking.
- Pencil — for tracing the template onto the door. A pencil line is easy to see and easy to sand away; a marker pen is not.
- Tape measure — for positioning the flap at the correct height (more on this below).
- Masking tape — apply along the cutting line before you start. Without masking tape, the jigsaw’s base plate drags across the door surface and the blade’s entry stroke can splinter the wood or scratch the uPVC.
- Sandpaper (medium grit, ~120) — to smooth the cut edges. Rough edges can snag the flap frame and prevent a flush fit.
- Silicone sealant — applied around the frame after fitting to seal out draughts and moisture. Don’t skip this; it’s what keeps the installation weatherproof.
- Screwdriver — most cat flaps secure with the screws included in the box. A manual screwdriver gives you better torque control than a power driver on plastic frames.
- Spirit level — optional but worth using. A wonky flap looks amateurish and can affect how the flap hangs and seals.
Choosing Size and Type
The right cat flap size is determined by your cat’s width at the widest point — typically the shoulders or haunches. Measure across your cat’s chest or shoulders; the flap opening should be at least 1–2 cm wider than this measurement on each side. Most standard flaps suit cats up to about 5–6 kg. If you have a larger cat or a small dog, the Extra Large 4-Way Cat Door is worth considering.
For type, the main choice is between:
- Standard 4-way locking flap — the Classic 4-Way Lock Flap or 4-Way Locking Cat Door. Locks in four positions (in only, out only, both, neither). Simple, reliable, and the cheapest DIY option.
- Microchip cat flap — the Sure Petcare Microchip Flap or SureFlap Microchip Cat Flap reads your cat’s implanted microchip and only opens for registered cats. No collar required. Prevents intruder cats. Higher upfront cost, same installation process.
- 2-way locking flap — the 2-Way Locking Cat Flap suits uPVC and wood doors where you want simple in/out control without the microchip premium.
- Soft flap — the Soft Flap Cat Door is designed for interior use (between rooms) or for cats that are nervous about rigid flaps. Not suitable as an exterior door flap.
Correct Cat Flap Height
A cat flap should be positioned so the bottom of the opening sits approximately 15 cm (6 inches) above the floor. This height allows your cat to step through comfortably without having to crouch awkwardly or leap up. Cats Protection recommends a minimum clearance of 15 cm to accommodate cats of all sizes and mobility levels, including older cats with stiff joints.
For kittens or elderly cats, consider going slightly lower — 10–12 cm — to make entry and exit easier. The key is that the centre of the flap opening should align roughly with your cat’s belly height when standing normally. Mark this measurement on the door before you do anything else.
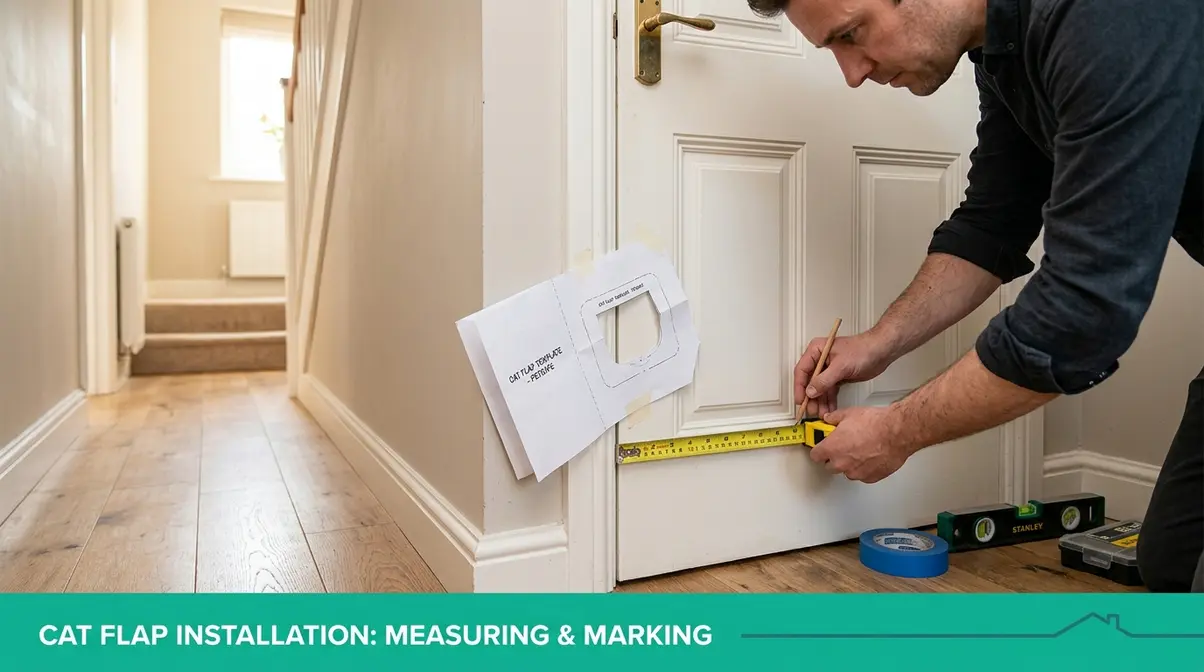
Marking and Drilling Pilot Holes
Every cat flap comes with a paper or cardboard template. Use it — it exists for a reason.
- Hold the template against the door at the correct height. Use a spirit level to confirm it’s not tilting.
- Tape it in place with masking tape at the corners.
- Trace around the inner cutting line with a pencil. This is the line your jigsaw will follow.
- Mark the four corner points clearly — these are where you’ll drill pilot holes.
- Apply masking tape along the entire cutting line on both sides of the door. This protects the surface and reduces splintering.
- Drill a pilot hole at each corner, angled slightly inward. Use a drill bit slightly wider than your jigsaw blade.
Step 1: Wooden or Panelled Doors
Wooden doors are the easiest starting point for any first-time installer. Our team worked through this installation process on a standard solid-wood back door and a hollow-core interior door — the technique is the same, though hollow doors require a little extra care not to crush the internal structure.
Cutting for a Clean Finish
⚠️ Safety warning: Before using a jigsaw, wear safety glasses and ensure the door is stable. Never cut toward your body. Keep the blade guard in place until the tool is running.
Follow these steps for a clean, splinter-free cut:
- Confirm masking tape is applied along both sides of the pencil line.
- Insert the jigsaw blade into one of the corner pilot holes to begin.
- Cut slowly along the pencil line, letting the blade do the work. Don’t force it.
- Cut each straight side separately, pausing at each corner. This gives you more control than trying to turn the blade mid-cut.
Once the main piece is removed, proceed to finishing the installation:
- Support the cut piece with your free hand as you complete the final side — it will drop free. Don’t let it swing and crack the door edge.
- Remove masking tape and sand all edges smooth with 120-grit sandpaper.
- Slot the inner frame through from inside; position the outer frame on the exterior side. Align the screw holes.
- Secure with the included screws — finger-tight first, then snug with a screwdriver. Don’t overtighten on wood; you’ll strip the holes.
- Apply a thin bead of silicone sealant around the outer frame perimeter to weatherproof the seal.
Why the masking tape matters: Without it, the jigsaw’s base plate slides against the door surface and the blade’s upward stroke pulls wood fibres out on entry — leaving a ragged, splintered edge that the flap frame won’t cover cleanly.
Handling Panelled Doors
Panelled doors — the kind with raised or recessed sections — present one extra challenge: the surface isn’t flat, so the flap frame may not sit flush. Common mistakes reported by first-time installers include positioning the flap over a raised panel edge, which leaves a gap that no amount of sealant fully fixes.
The solution: Position the flap entirely within one flat panel section. If the panel is too small for your chosen flap, you have two options:
- Use a tunnel extender — a plastic sleeve (often sold separately) that extends the flap tunnel through the door thickness and bridges any surface irregularity.
- Build a flat sub-frame — a thin piece of MDF (medium-density fibreboard, a smooth engineered wood) cut to the size of the flap frame and glued flush into the panel recess, giving the frame a flat surface to sit against.
For most standard UK panelled doors, a tunnel extender is the simpler fix and costs around £5–£15.
Step 2: uPVC or Composite Doors
uPVC (a rigid white plastic used on most modern UK front and back doors) is the most common door material in UK homes. The good news: fitting a cat flap in a uPVC panel door is very achievable as a DIY project. The important word there is panel — a section of the door that contains no glass.
Cutting uPVC Safely
⚠️ Warranty warning: Many uPVC door manufacturers include a clause stating that any unauthorised modification — including cutting a hole — voids the door warranty. Check your paperwork or call the manufacturer before starting. This is especially important for doors less than 10 years old.
The cutting technique for uPVC is similar to wood, with three key differences:
- Use a fine-tooth jigsaw blade rated for plastic or multi-material. A wood blade’s coarser teeth will crack uPVC rather than cut it.
- Cut more slowly than you would on wood. uPVC generates heat as it’s cut; too fast and the material melts slightly and fuses back together behind the blade.
- Apply masking tape to both sides — even more important here than on wood, as uPVC scratches easily and the marks are permanent.
After cutting, smooth the edges with fine sandpaper or a flat file. Fit the inner and outer frames as you would on a wooden door, applying silicone sealant around the outer frame. The included screws should grip the uPVC panel securely — do not overtighten, as this can crack the material around the screw holes.
Composite Door Differences
Composite doors look similar to uPVC doors but are constructed differently — they typically have a solid timber or foam core wrapped in a glass-reinforced plastic (GRP) skin. This makes them harder to cut and more likely to suffer cosmetic damage if the technique isn’t right.
The practical differences for cat flap installation:
- You’ll need a multi-material or GRP-rated jigsaw blade — a standard wood blade will struggle and may crack the outer skin.
- The internal core material varies by manufacturer. Some composites have a foam core that cuts easily; others have a timber frame that requires more passes.
- Warranty voiding is a significant risk. Composite doors are premium products (typically £800–£2,500), and most manufacturers explicitly void the warranty for unauthorised modifications. Contact the manufacturer’s customer service line before cutting — some offer an approved installation service.
If your composite door is still under warranty, the smart move is to have the manufacturer or an approved installer fit the flap. The cost is higher, but it protects your investment.
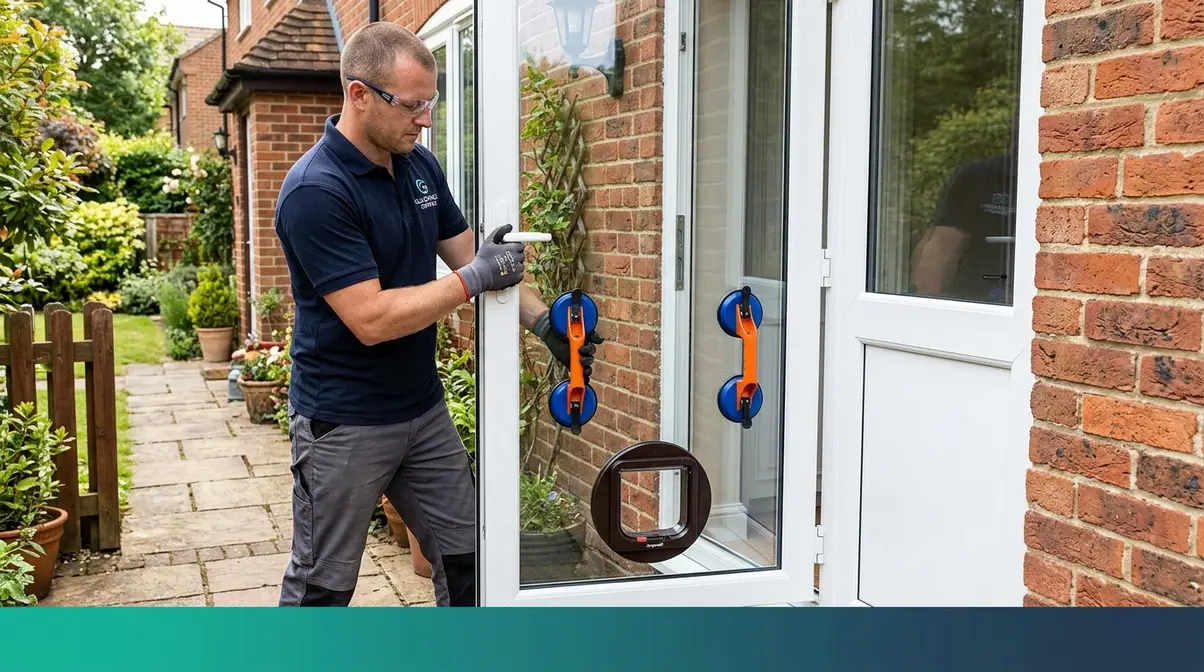
Step 3: Glass Doors or Windows
This section is short, because the answer is equally short: do not attempt to cut existing glass yourself. This applies to all glass types — single-glazed, double-glazed, toughened, or laminated.
Why You Can’t Cut Existing Glass
Cutting a hole in existing double-glazed glass is not a DIY task — it requires specialist equipment and voids the sealed unit’s thermal properties. The Glass and Glazing Federation is clear on this point: toughened (tempered) glass — which is used in most external doors and patio doors for safety reasons — cannot be cut after manufacture. Attempting to drill or cut it causes the entire pane to shatter into small fragments. Even standard double-glazed units cannot simply be drilled, because cutting breaks the hermetic seal between the panes, causing condensation to form between the glass permanently.
The risk of injury from shattered toughened glass is serious. This is one situation where DIY is not the right call, regardless of your skill level.
The Glazier Process and Costs
The correct process for a glass door installation is straightforward, if slightly slower than a standard DIY job. We highly recommend using a FENSA-registered glazier to ensure the new glass complies with building regulations.
- Contact a local glazier and provide the exact dimensions of your cat flap opening.
- The glazier measures your door and orders a new double-glazed sealed unit with the cat flap opening pre-cut at the factory.
- The new unit is installed in place of the existing pane — typically a 1–2 day lead time for the unit, plus a 1–2 hour installation visit.
- Your cat flap is fitted into the pre-cut opening in the new unit.
Expect to pay £230–£400+ in total, covering the new sealed unit and glazier’s labour. It’s a meaningful cost, but it’s the only safe and structurally sound approach. For an alternative, consider fitting the flap in an adjacent solid panel or a nearby wall instead — both are cheaper and fully DIY-able.
Step 4: Walls, Sheds & Metal Doors
Wall installations are the most demanding DIY cat flap job — but they’re achievable if you approach them methodically. Our team’s evaluation of wall installation guides across multiple sources found that the safety preparation stage is consistently underemphasised, which is why we’re giving it the space it deserves here.
Wall Installations Guide
⚠️ Critical safety warning — read this before touching any wall:
- Check for pipes and wires first. Use a pipe and cable detector (available from any hardware store for £15–£30) across the entire area before drilling or cutting. Hitting a live electrical cable or a water pipe is a serious hazard.
- Asbestos risk in pre-1999 homes. If your home was built before 2000, the wall may contain asbestos-cement render or insulation boards. According to HSE asbestos guidance, you should not drill or cut into any material you suspect may contain asbestos without having it tested first. Contact a licensed asbestos surveyor if you’re unsure.
- Tools needed for a wall installation (in addition to the standard toolkit):
- SDS drill with masonry bits
- Cold chisel and club hammer (for brick/block work)
- Angle grinder with masonry disc (optional, for cleaner cuts)
- Pipe and cable detector
- Wall tunnel liner (usually included with wall-rated cat flaps, or available separately)
The wall installation process:
- Mark the position on the interior wall using the template, at the correct height (15 cm from floor level).
- Scan for pipes and wires with the detector across a 30 cm radius around your marked area.
- Drill a pilot hole through the wall from inside to outside to confirm your position.
- Mark the outer wall using the pilot hole as your centre point.
- Cut the opening using an SDS drill with a core drill attachment, or by drilling a series of overlapping holes and chiselling out the waste material.
- Remove rubble and dust from the tunnel opening and smooth the edges.
- Insert the tunnel liner — a rectangular plastic sleeve that lines the hole and provides a smooth channel for the flap mechanism. Cut to the exact wall thickness.
- Fit the inner and outer flap frames onto each end of the tunnel liner and secure with the included fixings.
- Seal around both frames with external-grade silicone or mortar filler, depending on the wall finish.
Wall installations typically take 2–4 hours. If you encounter a cavity wall (two layers of brick with a gap between), the tunnel liner must be long enough to span the full width — measure carefully before ordering.
Sheds and Metal Doors Guide
Sheds and metal doors are actually among the easiest cat flap installations, because the material is thin and forgiving compared to brick or composite.
For wooden sheds: Follow the same process as a wooden door. The timber is usually thinner (12–18 mm), so the cut goes quickly. Check that your flap tunnel is not longer than the shed wall thickness — trim if necessary.
- For metal doors (utility rooms, outbuildings):
- Use a metal-cutting jigsaw blade — this is non-negotiable. A wood blade will skate across the surface and may shatter.
- Deburr the cut edges with a metal file after cutting — sharp metal burrs will damage the flap frame and could injure your cat.
- Apply rust-inhibiting primer to the exposed cut edges before fitting the frame, to prevent corrosion over time.
- Metal doors are often thinner than the flap tunnel — use the included spacer plates or add a thin rubber gasket to ensure the frame sits flush.
Training & Solving Common Problems
Fitting the flap is only half the job. For more stubborn feline friends, check out our cat behavior and training tips to resolve persistent issues. Common feedback from first-time installers is that the installation goes smoothly — and then the cat refuses to go anywhere near it. This is entirely normal, and entirely solvable.
Training: The 3-3-3 Approach
The 3-3-3 rule is a behavioural framework originally developed to help cats adjust to new environments, adapted here for cat flap training. The Animal Humane Society describes the 3-3-3 adjustment timeline as: 3 days of feeling overwhelmed, 3 weeks to learn a routine, and 3 months to feel fully at home. Applied to cat flap training, this means patience is the primary tool.
Here’s a practical 3-stage training sequence:
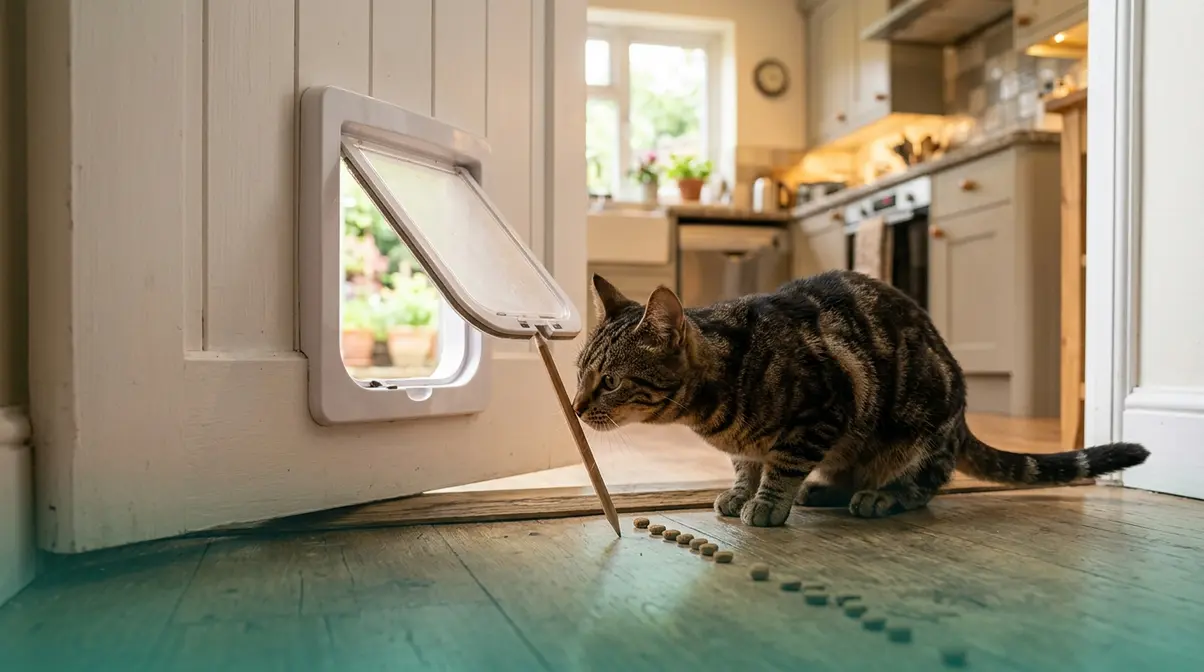
- Stage 1 — Desensitisation (Days 1–3):
- Prop the flap fully open with tape or a pencil so it doesn’t move.
- Encourage your cat to approach by placing treats on the threshold and just inside.
- Do not push your cat through. Let them investigate on their own terms.
- Stage 2 — Partial flap (Days 4–14):
- Remove the prop so the flap hangs freely but can be pushed open with minimal effort.
- Sit on the other side of the door and call your cat through, holding a treat visibly.
- Reward every successful pass, even if it’s tentative.
- Stage 3 — Independent use (Weeks 3–12):
- Stop prompting. Let your cat discover that pushing the flap leads to the good thing (outside, treats, you).
- For microchip flaps like the Sure Petcare Microchip Flap or Microchip Pet Door Connect, register your cat’s chip according to the manufacturer’s instructions before Stage 1 — otherwise the flap won’t open and you’ll confuse your cat entirely.
For particularly nervous cats, a Soft Flap Cat Door used as an interior training flap can build confidence before they encounter the exterior flap. Some cats crack it in a day; others take the full three months. Both are normal.
Draughts & Unwanted Visitors
A well-fitted cat flap should be weatherproof — but a few common issues are worth knowing about.
Draughts: If cold air is coming through, the most likely cause is a poor silicone seal around the frame or a flap that doesn’t hang flush. Re-apply sealant around the exterior frame. Some flap models also include a foam draught excluder strip — check the box. According to the Energy Saving Trust, even small gaps in external doors can meaningfully increase heating costs, so a proper seal is worth taking seriously.
Unwanted cat visitors: A standard 4-way locking flap will not stop a determined neighbourhood cat — they can often push through. A microchip cat flap (the SureFlap Microchip Cat Flap is a popular choice) is the only reliable solution. It reads your cat’s implanted chip and stays locked to all others.
Temporary blocking: If you need to keep your cat in overnight or during a vet-recommended rest period, all 4-way locking flaps include a “lock both ways” setting. The 4-Way Locking Cat Door and Classic 4-Way Lock Flap both handle this with a simple slide mechanism.
Safety & When to Call a Pro
5 Common DIY Mistakes
Based on consistent patterns reported across DIY installation guides and community forums, these are the errors that cause the most problems:
- Cutting into a glazed section of a uPVC door. The panel section and the glazed section can look similar at a glance. Always knock and confirm — glass rings clearly, solid panel does not.
- Skipping the pipe and cable check on wall installations. A cable detector costs £15–£30. A call-out from an emergency electrician costs £150+. This is the easiest risk mitigation in this entire guide.
Avoid these final three errors to ensure a weatherproof finish:
- Using the wrong jigsaw blade. A wood blade on uPVC cracks it; a wood blade on metal skates dangerously. Match the blade to the material every time.
- Overtightening screws in plastic or uPVC frames. This cracks the frame around the screw hole, creating a gap that draughts and water exploit immediately.
- Positioning the flap over a panelled door recess. The frame won’t sit flush, the seal won’t hold, and the flap will rattle. Always position within a flat section of the door.
When to Hire a Professional
Hiring a professional isn’t admitting defeat — it’s making a smart decision based on accurate information. Call a professional when:
- Your door is glazed and there’s no solid panel section large enough for the flap opening.
- Your home was built before 2000 and you haven’t confirmed the wall is asbestos-free.
- Your composite or uPVC door is under warranty and the manufacturer requires an approved installer.
- You’ve discovered pipes or wires in the planned cutting area during your detection scan.
- You’re renting and your landlord requires a professional installation to maintain the tenancy agreement.
A professional handyman charges £75–£150 for a standard wooden or uPVC door installation. For glass, budget £230–£400+. Both are significantly less than the cost of a botched DIY job on a premium door.
Alternative Cat Flap Options
Several alternatives to a cat flap exist if installation isn’t possible. A cat door insert for a sliding patio door avoids any cutting — the insert replaces one section of the sliding panel. Cat door screens are available for fly-screen doors. For renters, a portable cat flap frame that fits into a door frame without permanent fixing is another option. Some owners also use a simple timed automatic door opener, though these require a power source.
Frequently Asked Questions
Can you fit a cat flap yourself?
Yes, most people can fit a cat flap themselves — particularly in wooden or uPVC panel doors. The process requires a jigsaw, a drill, and roughly 30–60 minutes. No specialist training is needed. The main exception is glass doors, which always require a professional glazier, and wall installations in pre-2000 homes where asbestos may be present. For standard doors, DIY is the practical and cost-effective choice.
How much does it cost to have a cat flap fitted?
A professional handyman charges £75–£150 to fit a cat flap in a wooden or uPVC door (labour only), while a glazier charges £230–£400+ for glass door installations according to Checkatrade. DIY costs range from £15–£90 total, depending on whether you already own a jigsaw and which flap type you choose. A basic 4-way locking flap in a wooden door is the cheapest option — under £35 in materials.
How high should a cat flap be off the floor?
A cat flap should be positioned with the bottom of the opening approximately 15 cm (6 inches) above the floor. This height allows cats to step through comfortably without crouching or jumping. For elderly cats or kittens, 10–12 cm may be more accessible. The centre of the flap opening should roughly align with your cat’s belly height when standing. Always measure and mark this before tracing the template.
Does a cat flap affect home insurance?
A cat flap can affect your home insurance, as some insurers treat it as a security vulnerability — particularly if keys are stored near the door. The Metropolitan Police has flagged cat flaps as a known vector for “key fishing,” where burglars use a wire to hook keys through the opening. Call your insurer before installation and ask specifically whether fitting a flap affects your policy. A microchip cat flap reduces (but does not eliminate) this risk by keeping the flap locked when not in use.
What is the 3-3-3 rule for cats?
The 3-3-3 rule describes a cat’s typical adjustment timeline: 3 days of feeling overwhelmed and hiding, 3 weeks to learn the household routine, and 3 months to feel fully settled and confident. The Animal Humane Society uses this framework to help new cat owners set realistic expectations. Applied to cat flap training, it means a nervous cat who hasn’t used the flap after one week is entirely normal — most cats are reliably using their flap within 3–8 weeks with patient, treat-based encouragement.
What to do if you can’t have a cat flap?
If you cannot fit a cat flap — due to renting restrictions, door type, or building rules — the best alternatives are: a cat door panel insert for sliding patio doors (no cutting required), a magnetic or pressure-fit cat door for internal doors, or a timed automatic window opener for ground-floor windows. For renters, it’s worth asking your landlord directly — many will agree to a professionally fitted microchip flap that can be removed and the hole filled when you leave.
Do microchip cat flaps need batteries?
Yes, microchip cat flaps require batteries to operate the scanning mechanism. Most models use standard AA or AAA batteries, which typically last 6 to 12 months depending on usage. A flashing low-battery indicator light will warn you weeks before they run out, ensuring your cat is never locked out unexpectedly.
Can other animals get through a cat flap?
Yes, standard 4-way locking flaps can allow neighbourhood cats, raccoons, or foxes to enter your home. To prevent unwanted visitors, a microchip cat flap is the most effective solution. It reads your cat’s unique veterinary microchip and remains securely locked for any unrecognised animal attempting to push through.
Conclusion
For most UK cat owners with a wooden or uPVC panel door, fitting a cat flap is a genuinely achievable Saturday project — taking 30–60 minutes, costing £20–£90 in materials, and delivering years of value. The key is starting with The Door Type Decision Matrix: identify your door material first, confirm the right installation path, and you’ll avoid the costly mistake of discovering mid-cut that your door needed a different approach. According to Checkatrade’s 2026 data, professional installation costs £75–£150 for standard doors — a fee that’s easy to avoid when you’re properly prepared.
The Door Type Decision Matrix isn’t just a checklist — it’s the difference between a confident, clean installation and an expensive repair call. Whether you’re fitting a basic Classic 4-Way Lock Flap in a back door or a smart Sure Petcare Microchip Flap in a composite front door, the principle is the same: match your method to your material, prepare your tools, and take the cut slowly.
Ready to start? Gather your tools, run through the toolkit list in Section 2, and use the template that came with your flap. If you’re still weighing up which flap to buy, compare electronic and traditional cat flaps to find the right fit for your cat and your door. Your cat’s independence — and your uninterrupted sleep — are closer than you think.
*
*
Article schema noted: Article schema + HowTo schema applicable. VideoObject schema applicable for embedded YouTube tutorial above.
Dave King
Cat owner and writer at Mad Cat Man.