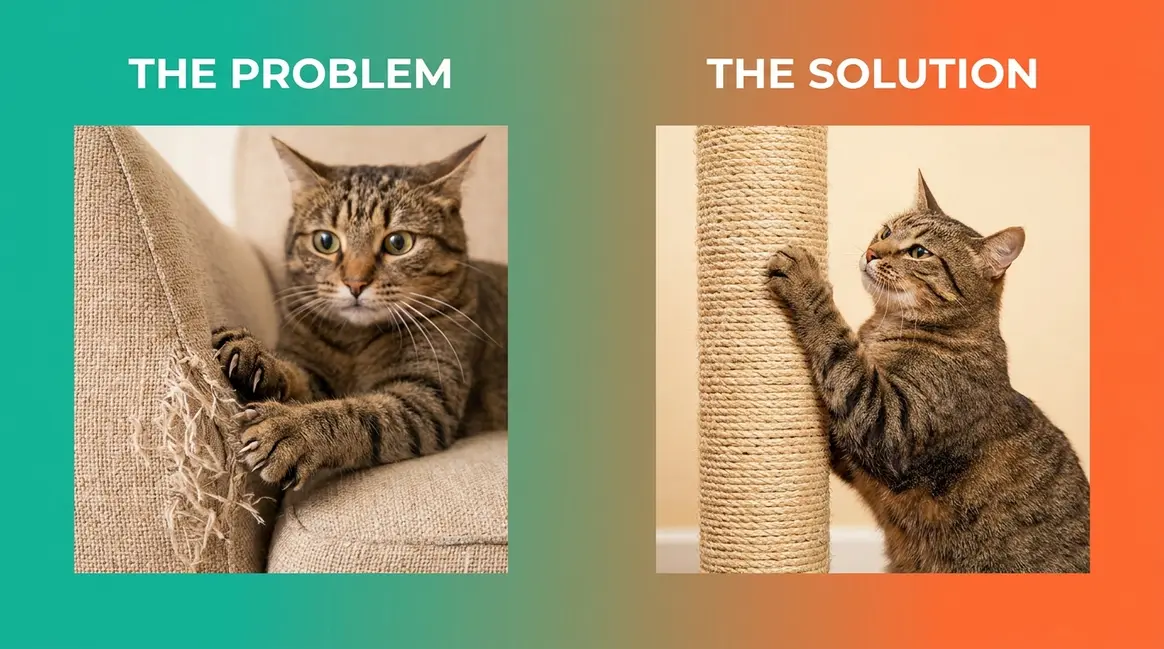

Your new sofa has claw marks running down the arm. Your cat strolls past the scratching post without a second glance. You’ve tried saying “No,” clapping your hands, even spraying water — and nothing has worked. You’re at your wits’ end.
“I’m at my wits end with my 7 mo old male kitty using everything but the scratching posts to do his scratching.”
— shared by a cat owner in an online community
The damage gets worse every week. One uninterrupted scratching session can ruin upholstery that costs hundreds of dollars to repair or replace. But here’s what most advice misses: the problem isn’t your cat. It’s the approach. How to stop cat scratching furniture isn’t about punishment — it’s about redirecting a hardwired biological drive with the right tools, placement, and a little consistency.
In this guide, you’ll get a complete 6-step system backed by veterinary behavioral science — covering the right scratching post, where to put it, DIY deterrent sprays, furniture protection by material, positive reinforcement training, and claw maintenance. Your couch can survive this.
Recommended Products
| # | Image | Product | Best For | Buy |
|---|---|---|---|---|
| 1 |  |
SmartCat Pioneer Post | Most cats, most homes | Buy on Amazon |
| 2 |  |
Amazon Basics Large Sisal Post | Budget-friendly tall post | Buy on Amazon |
| 3 |  |
MECOOL 34-Inch Tall Post | Adult indoor cats | Buy on Amazon |
| 4 |  |
Large Cat Sisal Scratch Post | Large cats, furniture savers | Buy on Amazon |
| 5 |  |
MECOOL 22-Inch Kitten Post | Small cats and kittens | Buy on Amazon |
| 6 |  |
Zakkart L-Shape Cardboard Scratcher | Wall and couch protection | Buy on Amazon |
Learning how to stop cat scratching furniture requires redirecting an instinct, not eliminating it — cats that have 3 appropriate scratch surfaces are significantly less likely to target furniture.
- Scratching is natural: Cats scratch to stretch muscles, shed dead claw layers, and mark territory — punishment won’t stop it.
- The 3-Surface Rule: Provide at least 3 scratch surfaces (vertical sisal, horizontal cardboard, angled) to match your cat’s preference.
- Placement is critical: Posts placed next to targeted furniture outperform posts placed in corners or spare rooms.
- DIY deterrents work: A simple water-and-citrus-oil spray makes furniture unappealing while you redirect your cat.
- Consistency beats intensity: 2–4 weeks of daily positive reinforcement produces lasting behavior change.
Why Does My Cat Scratch Furniture?
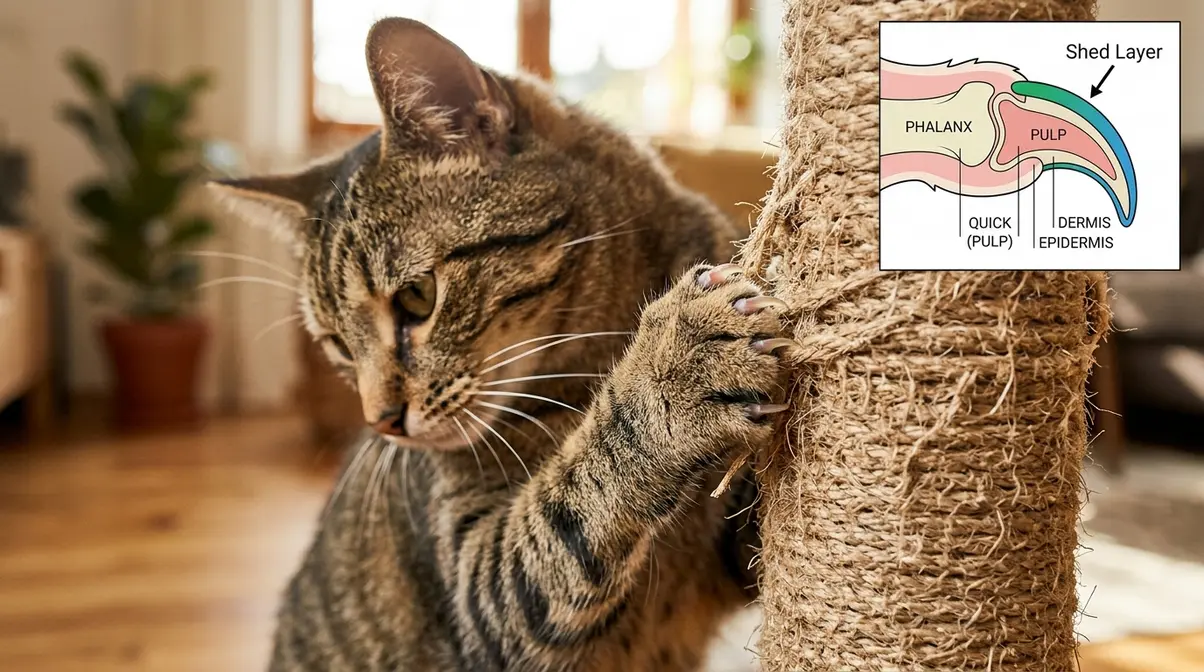
Cat furniture scratching is not a behavioral problem — it is a biological drive. To fully understand why cats scratch furniture, you must recognize it as a hardwired instinct. According to the Cornell Feline Health Center, scratching serves three hardwired functions: claw conditioning, muscle stretching, and territory marking via scent glands in the paws. Because these drives are instinctive, they cannot be trained away — only redirected. Understanding this is the first step toward actually solving the problem.
Is furniture scratching a behavioral issue?
Furniture scratching is a biological drive, not a behavioral problem. According to the Cornell Feline Health Center, cats scratch to condition their claws, stretch their muscles, and deposit scent marks from glands between their toe pads. These functions are hardwired — they cannot be eliminated, only redirected. Calling it a “behavioral issue” implies the cat is doing something wrong; the reality is that the cat is doing something entirely normal in the wrong location.
The 3 Real Reasons Cats Scratch
First: claw conditioning. Cats’ claws grow in layers. Scratching strips away the dull outer sheath and reveals a sharper claw underneath. Your cat isn’t sharpening his claws the way you’d sharpen a knife — he’s shedding them. You’ll often find little crescent-shaped claw husks near a favorite scratching spot.
Second: full-body stretching. When your cat digs into the arm of your sofa and pulls downward, he’s using the resistance to stretch his spine, shoulders, and leg muscles. This is why cats almost always scratch right after waking up — it’s their version of a morning stretch.
Third: territory marking. Cats have scent glands between their toe pads. Every scratch deposits an invisible chemical signature that says “I live here.” PAWS Chicago, a leading animal welfare organization, notes that this marking behavior intensifies when cats feel anxious — which explains why newly adopted cats often scratch more in their first three months as they settle into a new home.
“Cats scratch to condition their claws, stretch their muscles, and leave scent marks — it’s a biological drive, not a behavior problem.” (Cornell Feline Health Center)
This is also why the 3-Surface Rule — which we’ll cover fully in Step 1 — is such an effective framework. It works with your cat’s biology rather than against it.
Punishment Approaches Backfire
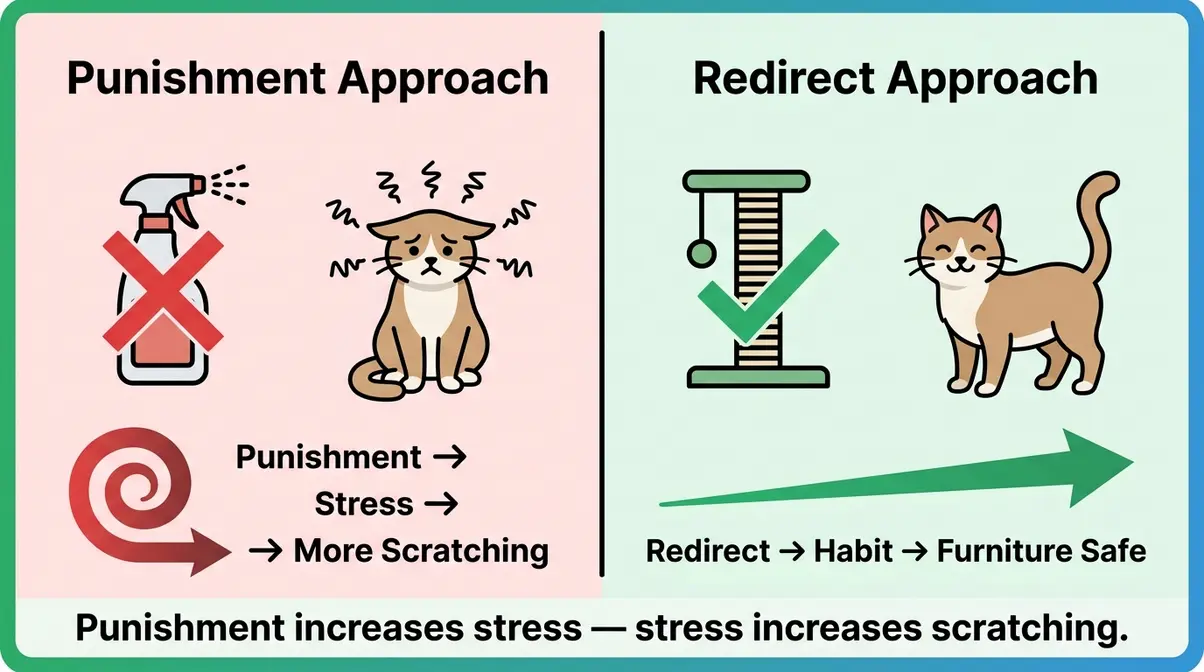
Shouting, clapping, squirting water, or covering furniture with aluminum foil as a surprise deterrent are all instinctive human responses. Unfortunately, they all make the problem worse. Punishment increases your cat’s stress levels, and stress is one of the primary triggers for increased scratching. You create a cycle: punishment → stress → more scratching → more punishment.
Cat behavior consultants consistently note that punishment-based approaches also damage the trust between owner and cat, making the positive reinforcement training in Step 5 significantly harder to implement. Save the energy. Redirect instead.
What You’ll Need Before You Start
Before diving into the steps, gather these items. Having everything ready prevents mid-process delays that break your cat’s training momentum.
- You’ll need:
- At least 2–3 scratching posts (one tall sisal post, one horizontal cardboard scratcher — see Step 1 for specifics)
- High-value cat treats (small, soft, and smelly — your cat should go wild for these)
- Double-sided sticky tape (Sticky Paws brand works well) or furniture corner guards
- A small spray bottle
- Lemon or orange essential oil (food-grade)
- White vinegar
- Nail clippers designed for cats (or nail caps/Soft Paws if trimming feels daunting)
Estimated time to set up: 30–45 minutes for initial placement and deterrent application. Behavior change takes 2–4 weeks of consistent daily reinforcement — but you’ll often see improvement within the first week.
Step 1: Provide Legal Scratching Alternatives
The single most effective thing you can do to stop cat scratching furniture is give your cat something better to scratch. This step alone solves the problem for many cats — but only if you choose the right post and place it correctly.
How to Choose the Right Scratching Post
When choosing the best scratching posts, cat behavior consultants recommend a post that meets three criteria. Most cats ignore cheap scratching posts for a simple reason: the posts are too short, too wobbly, or covered in the wrong material.
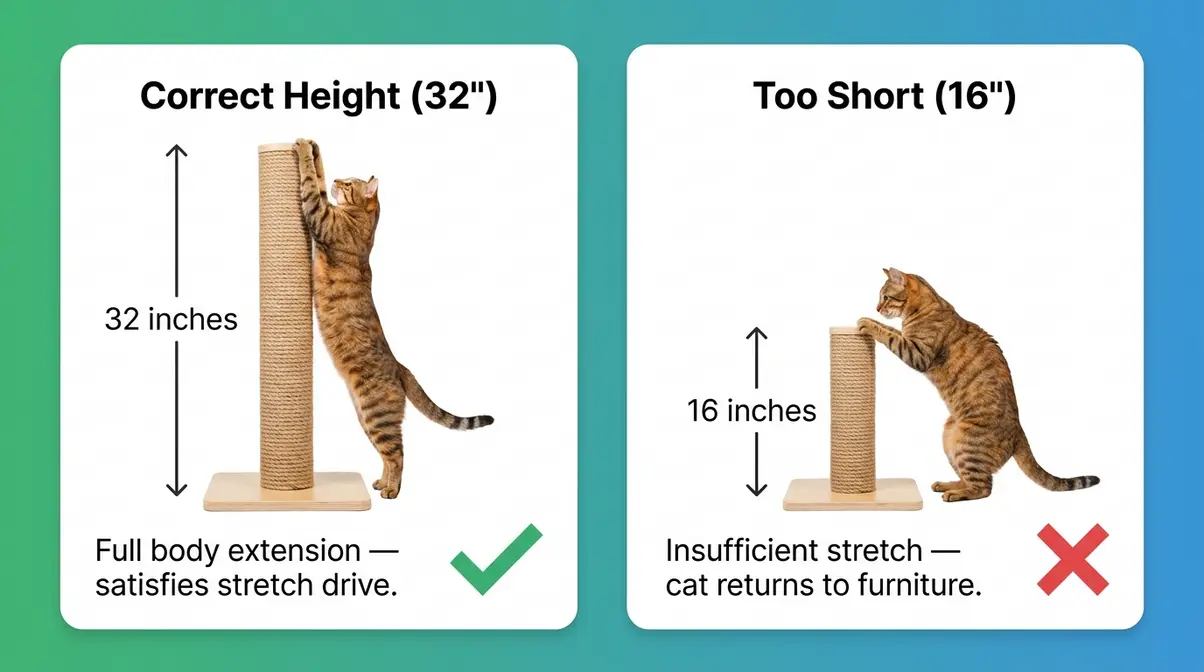
Height: The post must be tall enough for your cat to fully extend — at least 28–32 inches for an average adult cat. When a cat stretches against a post, the resistance is the whole point. A short post that only reaches your cat’s shoulders won’t satisfy the stretch drive, so your cat will go back to the sofa.
Stability: If the post wobbles when your cat pushes against it, he’ll stop using it immediately. A heavy, wide base is non-negotiable. The SmartCat Pioneer Post and the MECOOL 34-Inch Tall Post are both well-regarded for their stability and appropriate height for adult cats.
Material: Sisal (a rough, rope-like natural fiber cats love to dig their claws into) is the gold standard for vertical posts. Avoid carpet-covered posts — carpet is too similar to the texture of rugs and flooring, which can confuse cats about what’s acceptable to scratch.
Best Scratching Materials for Cats
Different cats prefer different textures and orientations. This is where The 3-Surface Rule comes in — a simple framework based on the three surface types that cover the vast majority of cat scratching preferences.
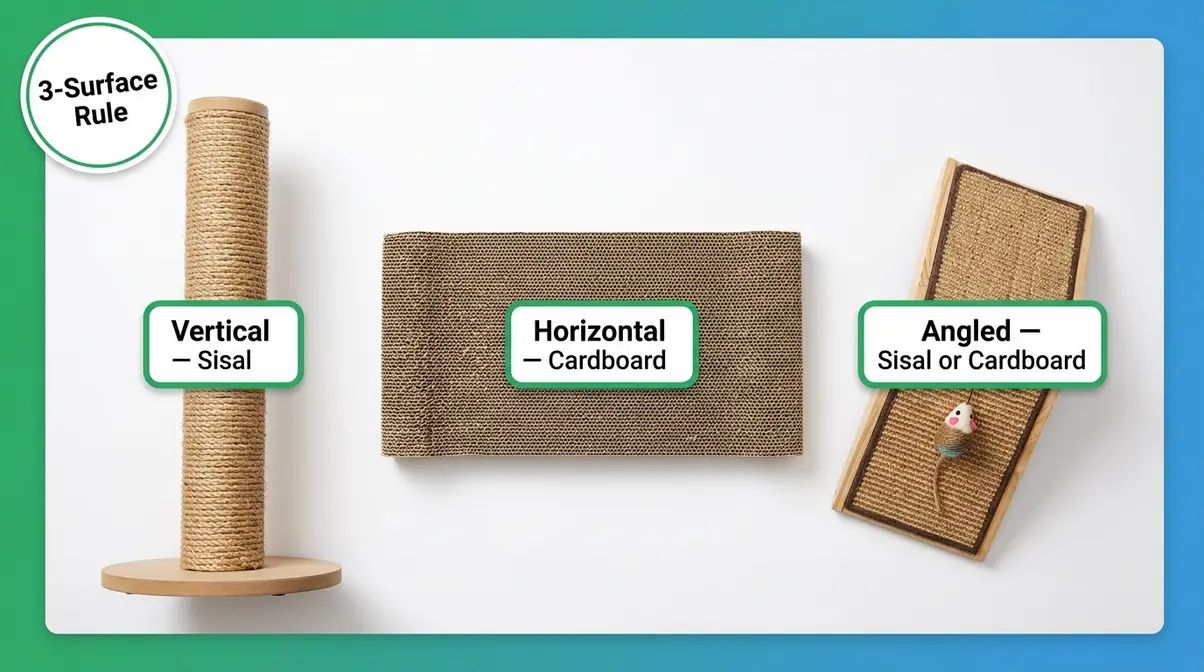
The 3-Surface Rule: Provide at least three distinct scratching surfaces in your home — one vertical sisal post, one horizontal cardboard scratcher, and one angled or alternative surface (rope, wood, or carpet-covered ramp). Research from the Ohio State University Indoor Pet Initiative confirms that environmental enrichment — including varied scratch surfaces — is one of the most reliable ways to reduce stress-related destructive behavior in indoor cats.
| Surface Type | Best Material | Example Product | Cats Who Prefer It |
|---|---|---|---|
| Vertical (wall-mounted or freestanding) | Sisal rope or sisal fabric | SmartCat Pioneer Post, MECOOL 34″ | Most adult cats; territory-markers |
| Horizontal (flat on floor) | Corrugated cardboard | Zakkart L-Shape Cardboard Scratcher | Cats who scratch rugs or floors |
| Angled (45°) | Sisal or cardboard | Various ramp-style scratchers | Kittens; cats who scratch chair legs |
The Zakkart L-Shape Cardboard Scratcher is particularly useful because it can be positioned against a wall or the side of a couch — physically blocking the targeted furniture while offering an immediately appealing alternative.
You should now have: At least one scratching post ordered or in hand, with a clear understanding of why height, stability, and material determine whether your cat uses it.
Step 2: Place Scratching Posts in the Right Spots
Buying the right post is half the battle. Placing it in the wrong location means your cat will still ignore it. Post placement is the step most owners get wrong — and it’s why so many “expensive scratching posts” gather dust in a corner.
The Golden Placement Rule
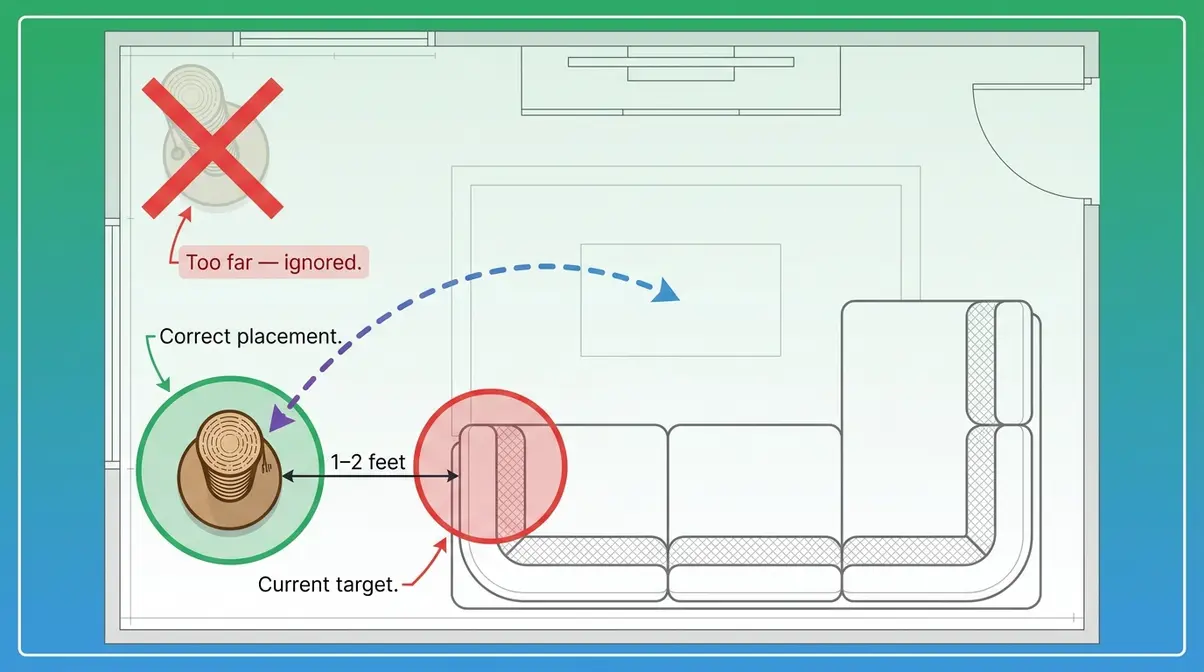
Place every new scratching post directly next to the furniture your cat currently targets. Not across the room. Not in the hallway. Right next to it — within one or two feet.
Here’s the logic: your cat scratches the sofa because it’s in a prominent spot where the scent mark will be noticed. A post in a back bedroom satisfies none of that drive. The ASPCA explicitly recommends placing posts near the furniture being scratched during the transition period, then gradually moving them (a few inches per day) toward your preferred location once your cat is using them consistently.
How Many Posts Does Your Cat Need?
The general guideline from cat behavior consultants is one post per cat, plus one extra — so a single-cat household needs at least two posts. For a multi-cat home, under-resourcing scratching surfaces is a common trigger for territorial anxiety and increased destructive scratching.
Apply The 3-Surface Rule across your home: one post in the living area (where your cat spends the most time), one near sleeping areas, and one near any secondary furniture being targeted. This isn’t about filling your home with posts — it’s about making sure your cat always has an acceptable surface within easy reach.
You should now have: At least two scratch surfaces positioned next to your cat’s current target furniture, with a plan to add a third in a secondary area.
Step 3: Make Your Furniture Less Appealing
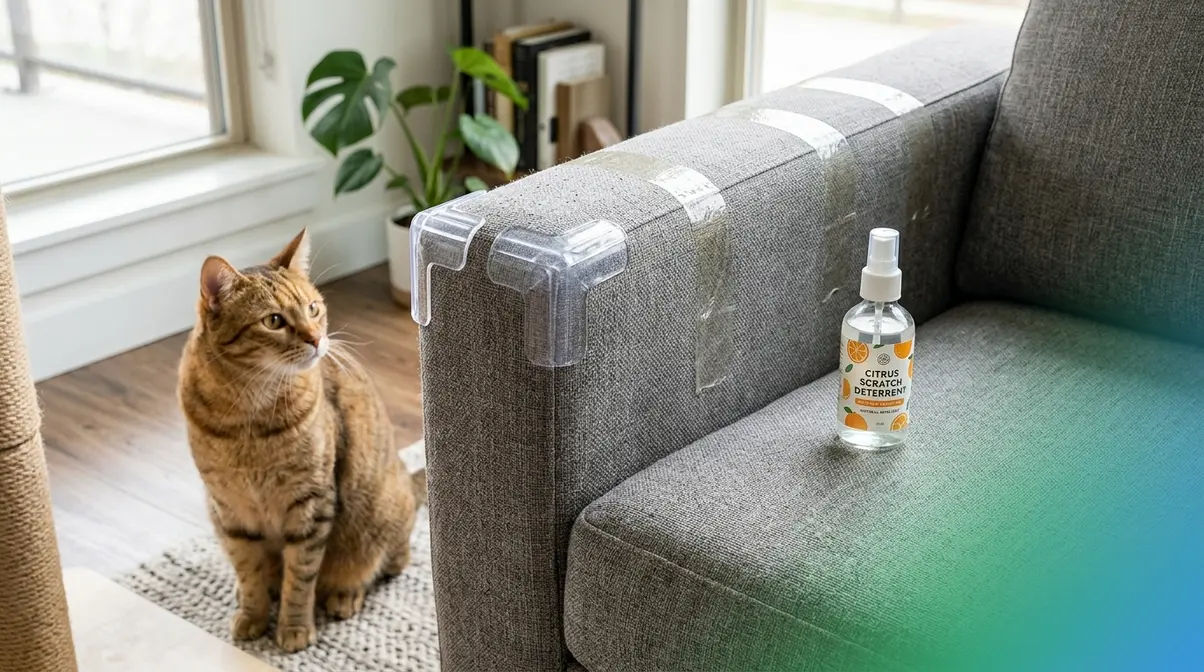
Posts and placement redirect your cat toward the right surfaces. If you want to know how to stop cat scratching furniture, deterrents make the wrong surfaces less rewarding. Used together, they work significantly faster than either approach alone. For more comprehensive strategies, explore effective deterrents and repellents for scratching to protect your home.
What can you spray to stop cats scratching furniture?
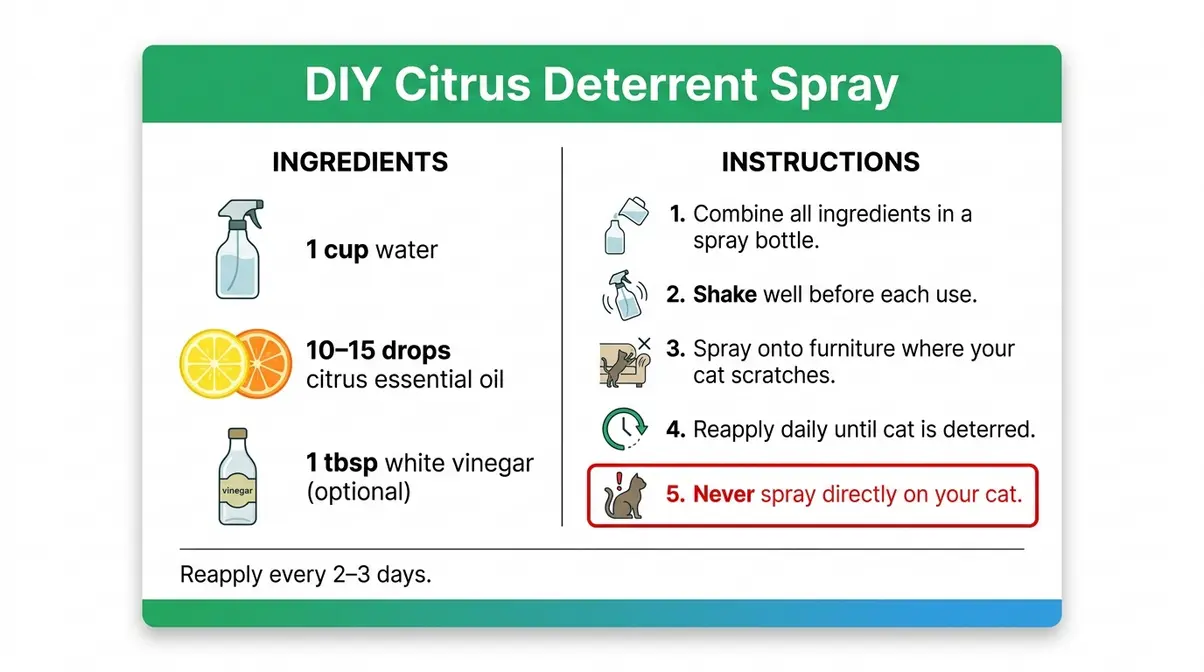
A DIY citrus spray made from water and lemon or orange essential oil is the most accessible option. Mix 1 cup of water with 10–15 drops of food-grade citrus essential oil (add 1 tablespoon of white vinegar for extra effect), shake well, and spray lightly on targeted surfaces every 2–3 days. Commercial deterrent sprays like Feliway or Nature’s Miracle Deterrent Spray are also effective, particularly for stress-related scratching. Always test on a small, hidden area of fabric first to check for any surface reaction.
DIY Citrus Deterrent Spray Recipe
Cats have a highly sensitive sense of smell — roughly 14 times stronger than a human’s. Citrus scents (lemon, orange, grapefruit) trigger an aversion response in most cats. This makes a simple citrus spray one of the most accessible and affordable deterrents available.
- DIY Citrus Deterrent Spray — What You’ll Need:
- 1 cup water
- 10–15 drops lemon or orange essential oil (food-grade)
- 1 tablespoon white vinegar (optional — amplifies the deterrent effect)
- Small spray bottle
- Instructions:
- Combine water, essential oil, and vinegar in the spray bottle.
- Shake well before each use.
- Spray lightly on furniture surfaces your cat targets — armrests, chair legs, sofa corners.
- Reapply every 2–3 days, or after the furniture is cleaned.
- Never spray directly on your cat. Apply only to surfaces.
Important note: Test on a small, hidden area of fabric first. Essential oils are generally safe on most upholstery but can affect some delicate finishes.
Sticky Tape and Furniture Guards
For immediate protection while you establish good scratching habits, physical deterrents are highly effective. Double-sided sticky tape (such as Sticky Paws) applied to the surfaces your cat targets creates an unpleasant texture that cats strongly dislike. Most cats stop returning to a taped surface within a few days.
Clear plastic corner guards attach to the corners and arms of sofas and chairs, creating a smooth surface that offers no purchase for claws. They’re nearly invisible on most furniture and can be removed once your cat reliably uses the scratching posts.
The key is to use physical deterrents at the same time as you introduce the scratching post — not as a standalone fix. The tape says “not here.” The post says “here instead.”
Pheromone Sprays for Stress
If your cat scratches heavily in specific spots — particularly near doorways, windows, or after any household change — stress may be a contributing factor. Pheromone sprays (synthetic versions of the natural calming pheromones cats produce) can reduce anxiety-driven scratching. Products like Feliway Classic spray work by mimicking the “friendly” facial pheromones cats deposit when they rub their cheeks on objects.
Research from UC Davis School of Veterinary Medicine supports the use of synthetic feline pheromones as part of a multi-modal approach to stress-related destructive behavior. Pheromone sprays are not a magic fix, but for cats whose scratching spikes during stressful periods — a new pet, a move, a change in schedule — they can meaningfully reduce the drive to over-mark.
You should now have: A DIY citrus spray applied to targeted furniture, sticky tape on the most-scratched surfaces, and (if stress is a factor) a pheromone spray in place.
Step 4: Protect Specific Furniture Materials
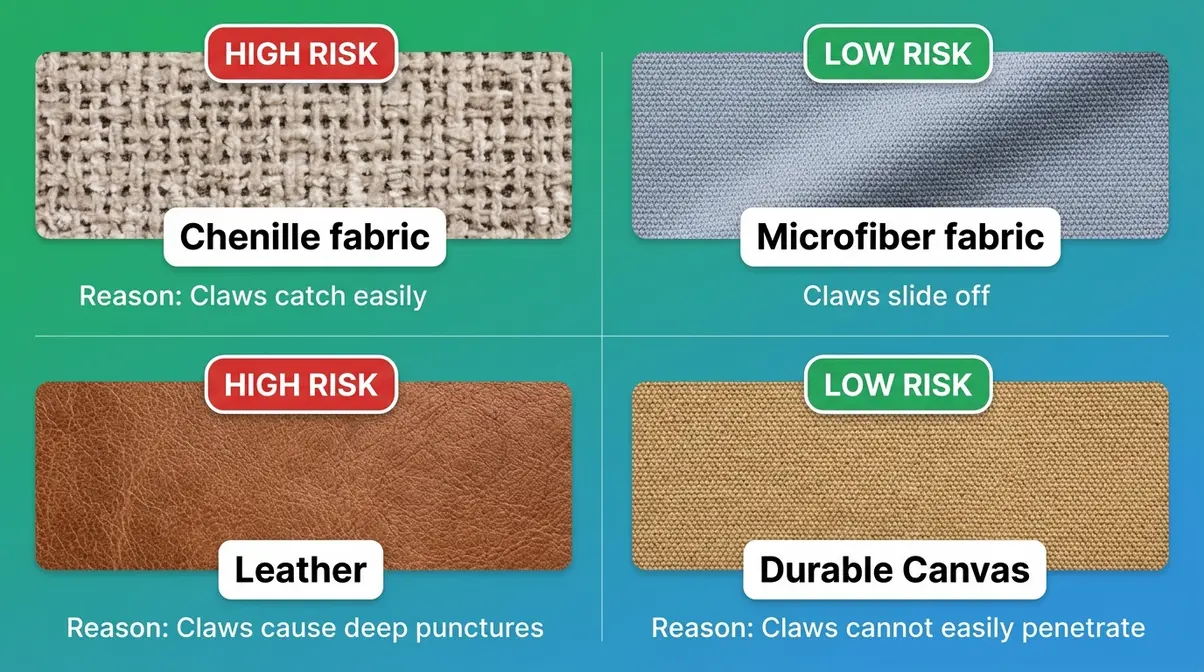
Different furniture materials need different protection strategies. Here’s what actually works, material by material.
Protecting Leather Furniture
Leather is a particularly satisfying texture for cats — it offers good resistance and holds scent well. For leather sofas and chairs, the most effective short-term protection is clear plastic furniture guards applied to the corners and arms. These create a smooth, slick surface that gives claws nothing to grip.
For ongoing protection, a leather conditioner applied regularly keeps the surface supple and slightly less appealing than dry, textured leather. If scratches have already occurred, a leather repair kit can minimize the visible damage while you work through the behavioral steps.
Protecting Fabric Furniture
Not all fabrics are equally vulnerable. Understanding which materials cats prefer — and avoid — lets you make smarter furniture choices going forward.
| Fabric | Scratch Risk | Why |
|---|---|---|
| Loosely woven fabrics (chenille, tweed, burlap) | High | Claws catch easily; satisfying resistance |
| Leather and faux leather | High | Holds scent; good claw purchase |
| Microfiber (tightly woven) | Low | Claws slide off; no satisfying catch |
| Velvet | Low–Medium | Dense pile resists snagging; less appealing texture |
| Canvas and denim | Low | Tight weave; minimal claw engagement |
| Silk and satin | Very Low | Slippery surface; claws find no purchase |
For existing upholstered furniture, furniture throws and slipcovers made from microfiber or canvas provide immediate protection while you work through the training steps.
What kind of fabric will cats not scratch?
Tightly woven microfiber is the most cat-resistant upholstery fabric available. Its dense weave gives claws nothing to catch on, making it far less satisfying to scratch than loosely woven fabrics like chenille, tweed, or burlap. Velvet, canvas, and denim also offer reasonable resistance. Leather and faux leather, despite feeling smooth, are actually high-risk because they hold scent well and provide good claw purchase. If you’re replacing damaged furniture, microfiber is the single most practical choice for cat-owning households.
Protecting Wood Furniture and Carpet
Wood chair legs and table legs are common scratching targets because the texture is satisfying and the location is prominent. Wrapping vulnerable legs with sisal rope (secured with non-toxic glue or zip ties) serves double duty: it protects the wood and converts the furniture leg into a legitimate scratching surface. This approach works with your cat’s behavior rather than against it.
For carpets, the Zakkart L-Shape Cardboard Scratcher placed flat on the floor near the targeted carpet area gives your cat an immediate horizontal alternative. Horizontal cardboard scratchers closely mimic the feel of carpet, making them a highly effective redirect for floor-scratching cats.
You should now have: Targeted protection on your highest-risk furniture, a fabric protection plan, and at least one horizontal scratcher for carpet-scratching cats.
Step 5: Train with Positive Reinforcement
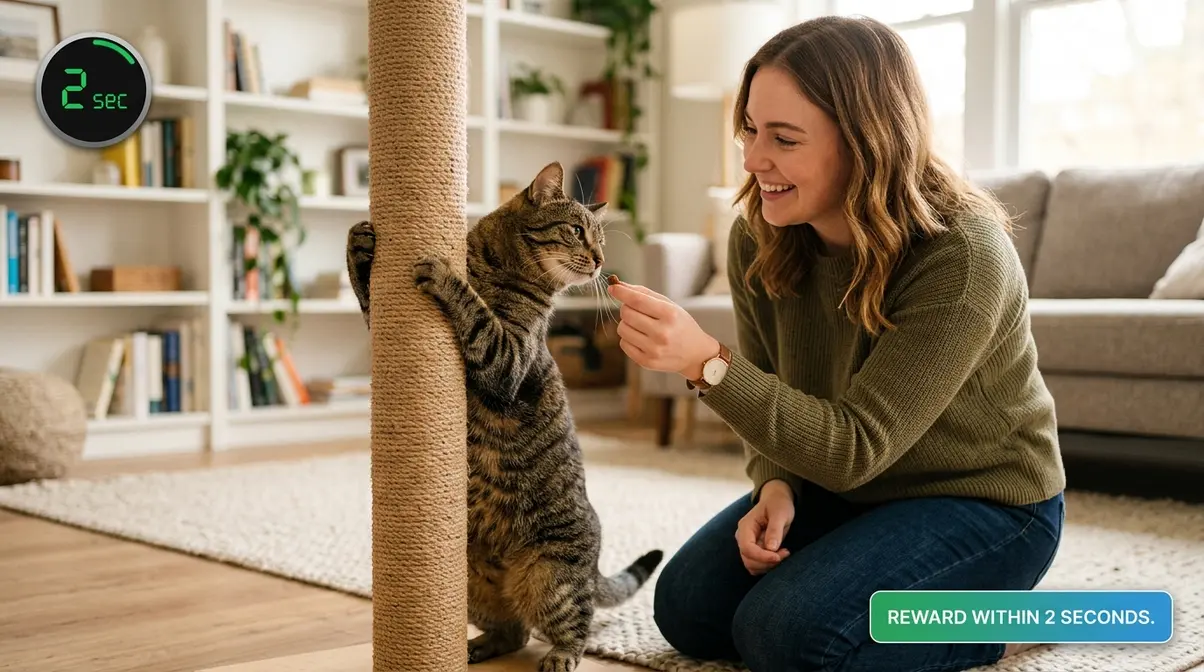
The right post in the right place with deterrents on the furniture will solve the problem for many cats on its own. But adding positive reinforcement training accelerates the process and builds a lasting habit — not just an avoidance pattern.
The Yes/No Technique Explained
The Yes/No technique, popularized by cat behaviorist Jackson Galaxy, is the clearest framework for redirecting scratching behavior. The principle is simple: every interaction either says “Yes — that surface” or “No — not that surface.” Here’s how it works in practice:
- “Yes” moments (reward these immediately):
- Your cat approaches the scratching post
- Your cat sniffs the scratching post
- Your cat places paws on the post
- Your cat does a full scratch on the post
- “No” moments (interrupt and redirect — don’t punish):
- Your cat approaches the targeted furniture
- Your cat sniffs the furniture arm
- Your cat begins to scratch the furniture
For “No” moments, the correct response is a calm, neutral interruption — a single quiet “Ah” or a gentle clap — followed immediately by physically carrying or guiding your cat to the nearest scratching post. The moment they touch the post, give a treat and praise.
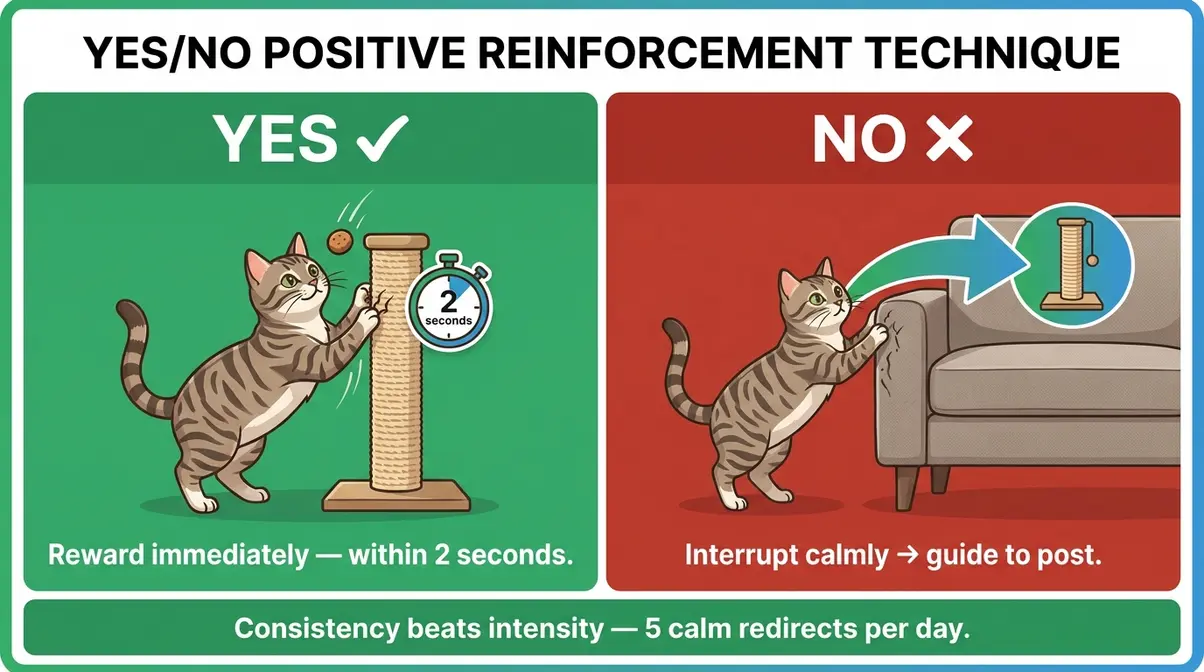
According to Jackson Galaxy, consistency is more important than intensity. Five calm, correctly-timed redirects per day will outperform one frustrated overreaction every time.
Getting Reward Timing Right
The most common reason positive reinforcement fails is late reward delivery. Cats make behavioral associations within 1–2 seconds of an action. If you give your cat a treat 10 seconds after they scratch the post, they’re not connecting the treat to the scratching — they’re connecting it to whatever they did immediately before you reached for the treat bag.
The rule: Treat must land within 2 seconds of the desired behavior. Keep a small container of high-value treats on a nearby shelf — not in a kitchen cupboard you have to walk to. The physical proximity of the treat source is not a minor detail; it’s the difference between training that works and training that doesn’t.
Across cat owner communities, the consistent finding is that owners who keep treats within arm’s reach of the scratching post see faster behavior change than those who store treats elsewhere.
You should now have: A clear Yes/No protocol in place, high-value treats positioned near the scratching post, and at least one “Yes” interaction logged today.
Step 6: Keep Your Cat’s Claws Trimmed
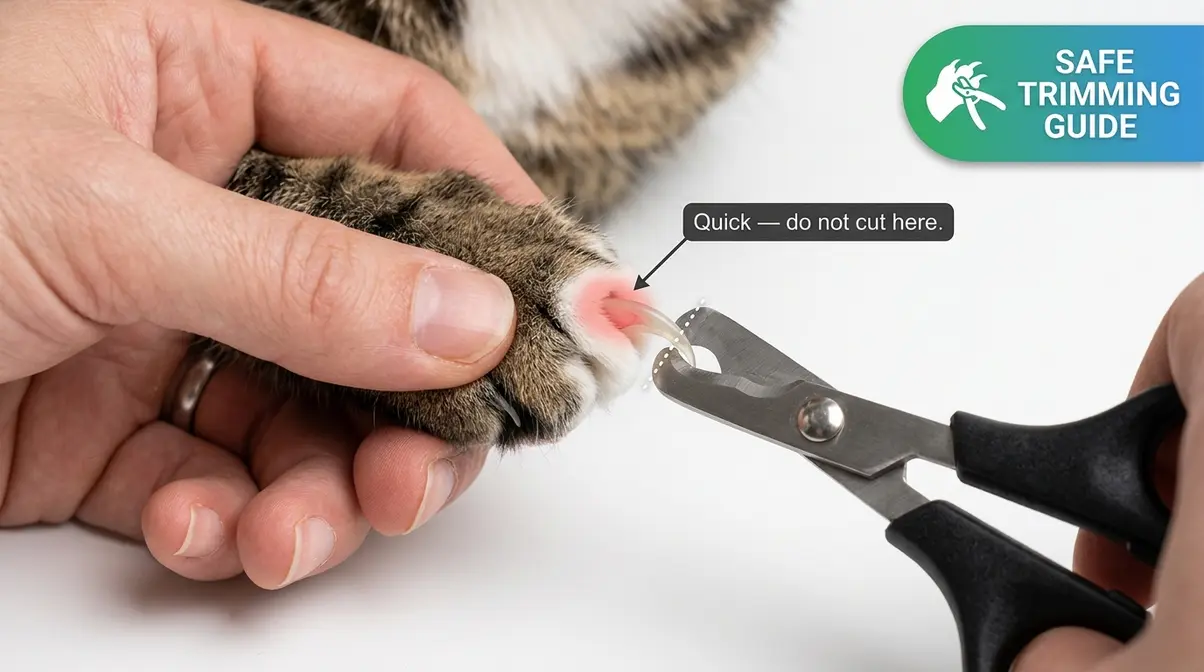
Trimmed claws do less damage — even during the transition period when your cat is still learning. Regular trimming also reduces the drive to scratch as aggressively, since the physical sensation of peeling away a dull outer claw layer is less urgent. For a deeper dive, review our guide on essential cat nail care and maintenance.
How to Trim Cat Claws Safely
Tools needed: Cat-specific nail clippers (guillotine or scissor style), styptic powder (in case of accidental nicking), treats.
Estimated time: 5–10 minutes per session.
If you need more visual guidance, check out how to trim cat claws safely at home. Otherwise, follow these steps:
- Choose a calm moment. Trim after a meal or play session when your cat is relaxed — never when he’s alert or agitated.
- Hold the paw gently. Press lightly on the toe pad to extend the claw. The translucent claw will extend forward.
- Identify the quick. The pink triangle visible inside the claw is the quick (the blood vessel and nerve). Cut only the clear tip — never the pink area.
Take a brief pause if your cat becomes restless before continuing to the next steps.
- Clip at a 45° angle. Cut the clear tip cleanly. If your clippers crush rather than cut, they need sharpening or replacing.
- Reward immediately. Give a treat within 2 seconds of each successful clip.
- Stop at any sign of stress. It’s fine to trim 2 claws today and 2 more tomorrow. Gradual sessions build tolerance better than forcing a full trim.
Aim to trim every 2–3 weeks. Most cats’ claws grow back to a damaging length within 3–4 weeks.
Nail Caps as an Alternative
If trimming feels too stressful for you or your cat, nail caps (also sold as Soft Paws or Soft Claws) are a humane, effective alternative. These are small vinyl caps that glue over each claw, preventing damage without restricting your cat’s ability to scratch, stretch, or retract claws normally.
Nail caps last approximately 4–6 weeks before falling off naturally as the claw grows. They require no special training — just patience during the first application. Most cats adapt within a few hours. They are not a permanent solution (you’ll need to reapply), but they provide immediate furniture protection during the behavioral training period.
You should now have: A nail trimming schedule set, or nail caps ordered if trimming isn’t feasible right now.
Common Mistakes That Make Things Worse
Even well-intentioned owners can accidentally slow the process — or make the scratching worse. These are the two most common categories of error.
Punishment Approaches Backfire
Shouting, physical reprimand, or using a spray bottle as a punishment tool are the most frequently reported mistakes in cat owner communities. As noted earlier, punishment increases stress — and stress increases the territorial drive to scratch. But beyond that, punishment creates a different problem: your cat learns to scratch when you’re not present, because the scratching itself isn’t the issue for them. The punishment is.
Water spray bottles deserve a specific mention: they’re widely recommended online but are counterproductive as a punishment tool. Your cat associates the spray with you, not with the furniture — which damages your relationship without changing the behavior.
Post Placement and Setup Errors
The three most common post placement mistakes:
- Putting the post in a low-traffic area. Scratching is a communication behavior. Cats won’t leave scent marks where no one will notice them. A post in a spare bedroom gets ignored.
- Buying a post that’s too short or too wobbly. As covered in Step 1, if the post doesn’t allow a full-body stretch or tips when pushed, your cat will reject it immediately.
- Removing deterrents too soon. Most owners remove sticky tape or furniture guards the moment the cat starts using the post. Keep deterrents in place for at least 4 weeks after your cat is reliably using the post — then remove them gradually.
What About Other Unwanted Cat Behaviors?
Scratching is the most common complaint from cat owners — but it’s rarely the only one. If your cat is also having litter box accidents, spraying, or showing signs of anxiety beyond scratching, these behaviors often share the same root cause: stress, territorial insecurity, or unmet environmental needs.
For inappropriate urination specifically — one of the most distressing companion behaviors — the approach follows similar principles: identify the trigger, address the environment, and redirect rather than punish. Our detailed guide on solving inappropriate urination issues walks through the same step-by-step framework applied here. You should also focus on understanding and addressing cat urinary tract issues if accidents persist, as medical problems often masquerade as behavioral defiance.
If you’re dealing with multiple problem behaviors at once, starting with scratching (as you’re doing now) builds the foundational skills — positive reinforcement timing, environmental enrichment, stress reduction — that apply across all of them. Establishing a routine helps cats feel secure in their territory.
If your cat’s scratching is sudden, compulsive, or accompanied by other behavioral changes like vocalization or hiding, a veterinary check-up is worthwhile to rule out pain-related causes before assuming a purely behavioral origin.
Frequently Asked Questions
What smell do cats hate to stop scratching furniture?
Citrus scents — lemon, orange, and grapefruit — are the most reliably effective smells for deterring cat scratching. Cats’ olfactory systems are roughly 14 times more sensitive than humans’, making strong citrus aromas genuinely aversive rather than just unpleasant. A diluted lemon or orange essential oil spray applied to furniture surfaces discourages most cats from returning to those spots. Lavender and eucalyptus are also commonly cited, but citrus produces the most consistent results across cat owner reports and is safest for most household surfaces (ASPCA, 2026).
What is the number one smell that cats hate?
Citrus is the single most universally aversive scent for cats. While individual cats vary, citrus produces the most consistent aversion response. This is why citrus-based deterrent sprays are widely recommended by cat behaviorists and veterinary guidance.
What is the 3-3-3 rule for cats?
The 3-3-3 rule describes the adjustment timeline for newly adopted cats: 3 days to decompress, 3 weeks to learn the household routine, and 3 months to feel fully at home. During this period — particularly the first three months — cats often scratch more intensively as a stress response and territorial marking behavior. PAWS Chicago notes that this heightened scratching is normal and temporary, but it’s also the window when establishing good scratching habits matters most. Setting up appropriate scratch surfaces before or immediately upon adoption prevents the furniture-scratching habit from forming in the first place.
How do I get my cat to stop clawing my furniture?
The most effective approach combines a tall sisal scratching post, a citrus deterrent spray, and consistent positive reinforcement. Cat behavior consultants consistently find that owners who implement all three elements together see results within 1–2 weeks. Using just one element produces much slower and less reliable results.
What smell do cats absolutely hate?
Beyond citrus, cats show strong aversion to eucalyptus, peppermint, and lavender. The ASPCA cautions that while these scents are effective deterrents on surfaces, several essential oils — including eucalyptus and peppermint — can be toxic to cats if ingested or inhaled in concentrated form. For safe furniture deterrence, stick to diluted citrus oil sprays applied to surfaces only. Never use essential oil diffusers in rooms where your cat spends significant time, and ensure any spray has fully dried before your cat re-enters the area.
Stop Cat Scratching Furniture: Next Steps
Learning how to stop cat scratching furniture is genuinely achievable for almost every cat and every home — but it requires working with your cat’s biology, not against it. Cats that have three appropriate scratch surfaces, positioned strategically near their current targets, and introduced with consistent positive reinforcement will reliably shift their scratching behavior within 2–4 weeks. That’s not a guarantee — it’s the consistent finding across veterinary behavioral guidance and cat owner communities who’ve implemented this approach.
The 3-Surface Rule is the organizing principle here: one vertical sisal post, one horizontal cardboard scratcher, one angled or alternative surface. Get those three surfaces right, apply a citrus deterrent to your furniture, and use the Yes/No technique every single day. The system works because it addresses the behavior at every level — biological drive, environmental design, and learned habit.
Start today with one action: place a scratching post directly next to the furniture your cat is currently targeting. That single step, done right now, begins the redirect. Add the citrus spray tomorrow. Start the Yes/No training this week. Your sofa — and your relationship with your cat — will both be better for it.

Dave King
Cat owner and writer at Mad Cat Man.