Your new cat is curious about everything — and that curiosity is exactly what makes your home dangerous before you’ve had a chance to prepare. Cat proofing your home isn’t about being overprotective. It’s about understanding that cats explore with their mouths, climb to unexpected heights, and squeeze into spaces that look impossibly small.
“I just moved to a new apartment and am planning to adopt a cat. It’s a studio apartment so I can’t close off any areas except the bathroom.”
If that sounds familiar, this guide is for you.
Most homes have at least a dozen hidden hazards that could seriously harm a cat — and the most dangerous ones aren’t always the obvious cords or plants. They’re the things you’d never think to check: the essential oil diffuser on your nightstand, the blind cord looped near your window, the robot vacuum that startles a cat into jumping onto the stove.
By the end of this guide, you’ll have completed a full Cat Safety Audit of your home — room by room — so your cat can explore freely and safely from day one. This guide walks you through 7 numbered steps, from removing toxic substances to addressing 2026’s emerging smart home hazards, in a systematic order that prioritizes the highest-risk dangers first.
Disclaimer: This guide provides general safety information compiled from veterinary school guidance and animal welfare organizations. Always consult a licensed veterinarian for advice specific to your cat’s health, breed, or medical needs.
Cat proofing your home is a 7-step process that takes 2–4 hours and protects your cat from toxic plants, electrical cords, choking hazards, and modern dangers like essential oil diffusers — starting with the highest-risk areas first.
- Toxic plants are the #1 hidden danger: The ASPCA maintains a comprehensive database of hundreds of plant species toxic to cats, including common houseplants like lilies, pothos, and philodendron.
- Cord hazards are preventable: Spiral cable wraps and cord clips cost under $10 and eliminate the electrocution risk entirely.
- The Cat Safety Audit framework moves room by room so no hazard gets missed — treating your home like a professional safety inspector would.
- Modern hazards matter: Essential oil diffusers, induction stoves, and robot vacuums are 2026 dangers most guides completely ignore.
- Outdoor access needs separate planning: Yards and balconies require pet-proof screens or catio enclosures before allowing access.
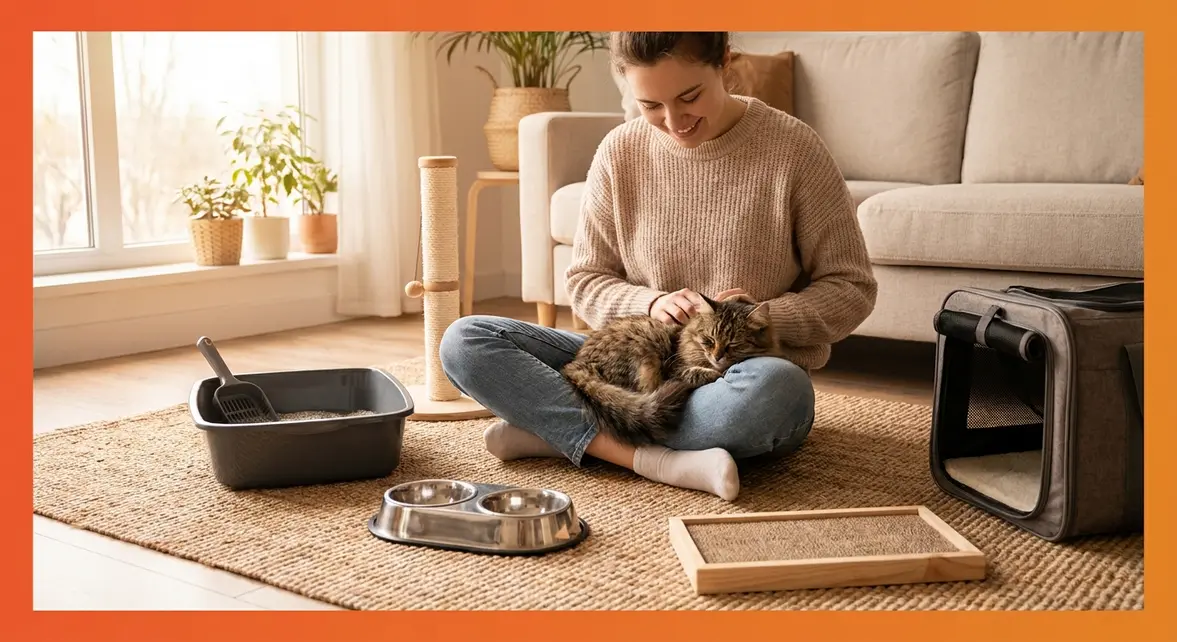
What You’ll Need Before You Start
Before you begin, you don’t need any special tools or expertise — just a spare afternoon and this checklist. The Cat Safety Audit is a systematic, room-by-room inspection process that identifies and neutralizes every hazard before your cat encounters it. Think of yourself as a professional safety inspector walking through your own home with fresh eyes.
Our team reviewed guidance from four veterinary schools and the ASPCA’s animal poison control resources to compile this checklist. Here’s everything you need to get started:
- Time required: 2–4 hours for a standard home; 1–2 hours for a studio apartment
- Childproof cabinet latches: Small plastic or magnetic locks that attach inside cabinet doors to prevent curious paws from pulling them open. Available at any hardware store for approximately $5–$10.
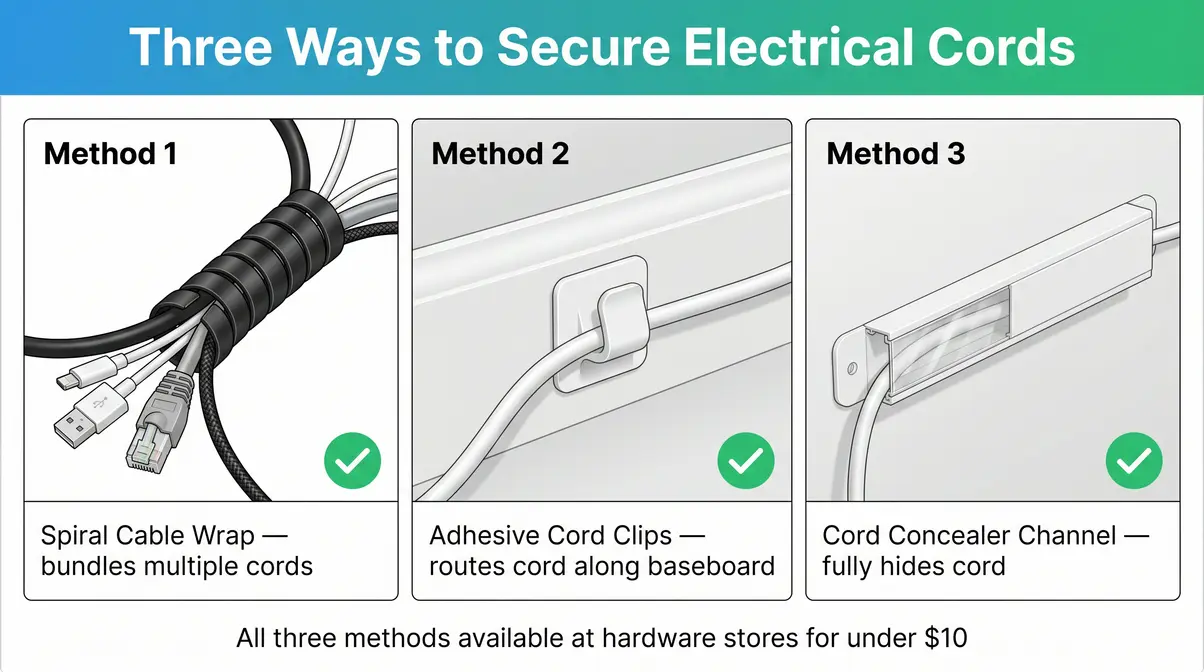
- Cord protectors / spiral cable wrap: Flexible tubing that bundles and covers electrical cords so they can’t be chewed. Look for “spiral cable wrap” or “cord concealer” at hardware or electronics stores.
- Adhesive cord clips: Small clips that stick to baseboards and route cords flat against the wall, out of reach.
- A notepad or phone: To track each room as you complete it.
- The ASPCA Toxic Plant List: A free, searchable database at the ASPCA toxic plant database. Bookmark it before you start — you’ll refer to it throughout Step 1.
- Optional but helpful: Pet-proof window screen inserts, deterrent spray, and cabinet locks for deeper kitchen and bathroom security.
Work through one room at a time. Don’t skip the bathroom or laundry room — they’re often the most dangerous spaces in any home.
Step 1: Remove Toxic Plants, Foods, and Chemicals
Step 1 of your Cat Safety Audit starts with the most urgent hazards: the things your cat could eat. According to the ASPCA’s Animal Poison Control Center, plant and chemical ingestion are among the most common reasons cat owners call the pet poison hotline. The good news is that most of these hazards are easy to remove or relocate once you know what to look for.

Toxic Houseplants to Remove or Relocate
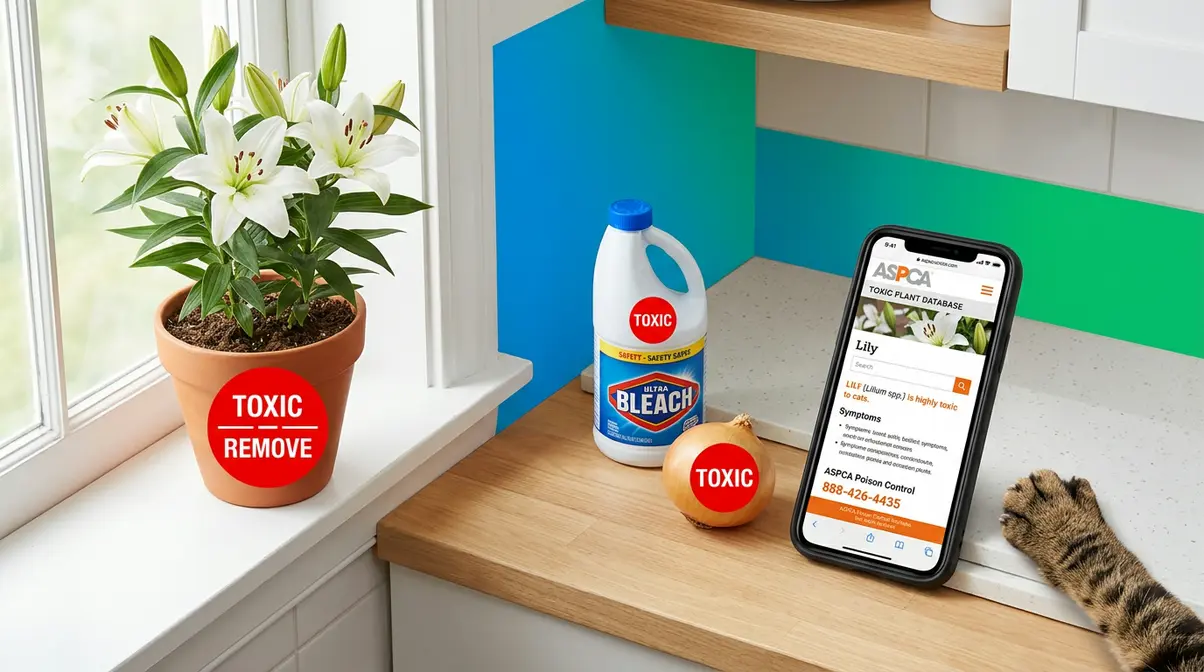
The ASPCA maintains a comprehensive database of plants toxic to cats, covering hundreds of species. Several of the most dangerous are extremely common houseplants that many owners don’t realize pose any risk.
- True lilies (Lilium and Hemerocallis species): These cause acute kidney failure (sudden, life-threatening loss of kidney function) in cats. Even a small amount of pollen, water from the vase, or a few chewed petals can be fatal within 24–48 hours. Easter lilies, Tiger lilies, and daylilies all belong in this category. The ASPCA Toxic Plant List flags true lilies as one of the most dangerous plants for cats.
- Pothos and Philodendron: Both contain calcium oxalate crystals (tiny, needle-like particles that irritate tissue on contact). Chewing these plants causes immediate oral pain, drooling, and swelling of the mouth and throat. Relocate them to a room your cat cannot access, or rehome them entirely.
- Aloe vera: Despite its reputation as a healing plant, aloe vera is toxic to cats and can cause vomiting, diarrhea, lethargy, and tremors.
- Sago palm: Every part of this plant is highly toxic. Even a small amount can cause liver failure.
If you’re unsure about a plant in your home, search the ASPCA toxic plant list before your cat arrives. If your cat ingests any plant material and you’re unsure what it was, call the ASPCA Animal Poison Control Center immediately at (888) 426-4435.
Foods That Are Dangerous to Cats
Your kitchen holds some of the most common cat toxins in any home. According to the UC Davis School of Veterinary Medicine, one of the top veterinary research institutions in the US, several everyday foods cause serious or fatal illness in cats.
- Onions and garlic: Both destroy red blood cells in cats, causing hemolytic anemia (a condition where red blood cells break down faster than the body can replace them). This applies to all forms — raw, cooked, powdered, or in sauces.
- Chocolate: Contains theobromine, a compound cats cannot metabolize. It causes vomiting, diarrhea, rapid heart rate, muscle tremors, and seizures.
- Grapes and raisins: Even small amounts can cause sudden kidney failure. The exact toxic compound is still being studied, but the risk is well-documented.
- Xylitol: An artificial sweetener found in sugar-free gum, peanut butter, and some baked goods. It triggers a dangerous drop in blood sugar and can cause liver failure.
- Alcohol and caffeine: Both are toxic in very small amounts and can cause rapid deterioration.
Keep these foods stored in closed containers or closed cabinets. Never leave food unattended on counters when your cat is present. For a deeper dive into specific dangers, read our full guide on what is toxic to cats.
Household Chemicals and Cleaners
Many common cleaning products are highly toxic to cats, who are especially vulnerable because they groom themselves — meaning any chemical residue on their paws or fur gets ingested directly.
- Bleach and disinfectants: Can cause chemical burns to the mouth, throat, and stomach if ingested. Cats are attracted to the smell of bleach and may lick recently cleaned surfaces.
- Antifreeze (ethylene glycol): Extraordinarily dangerous. It tastes sweet to animals and causes fatal kidney failure within hours. Keep antifreeze containers sealed and stored out of reach, and clean up any spills immediately.
- Fabric softener sheets: Contain cationic detergents that are toxic to cats even in small amounts. Store these in a closed cabinet.
- Essential oil-based cleaning sprays: See Step 6 for a full discussion. Avoid leaving these on surfaces your cat walks on.
Install childproof latches on any cabinet containing cleaning products. These simple plastic or magnetic locks prevent a cat from nudging a cabinet door open with a paw — a behavior that’s more common than most new owners expect.
Step 2: Secure Every Electrical Cord and Blind
Electrical cord chewing is one of the most common causes of serious injury in young cats and kittens. A cat that bites through a live electrical cord can suffer burns to the mouth, electric shock, and in severe cases, pulmonary edema (fluid in the lungs caused by the electrical current). The fix is inexpensive and takes less than an hour.
Covering and Concealing Electrical Cords
The goal isn’t just to move cords out of reach — it’s to make them uninteresting and inaccessible. Here’s how to approach it systematically:
- Identify every exposed cord in each room. Get down to floor level and look — you’ll likely spot cords you’d forgotten about.
- Bundle loose cords with spiral cable wrap (flexible tubing that coils around multiple cords). This removes the individual “chewable” texture that cats find appealing.
- Route cords flat against the wall using adhesive cord clips. This keeps cords out of the open floor space where cats play.
- Use cord concealer channels (rigid plastic channels that mount to baseboards) for cords along frequently traveled areas.
- Unplug any cords not in use. A de-energized cord is still a chewing hazard, but it eliminates the electrocution risk.
For cords you can’t conceal — like a lamp cord in the middle of a room — apply a bitter-tasting deterrent spray (available at pet stores) to the cord’s surface. According to guidance reviewed from veterinary behavior resources, bitter sprays work best when applied consistently and refreshed every few days.
Making Blind and Curtain Cords Safe
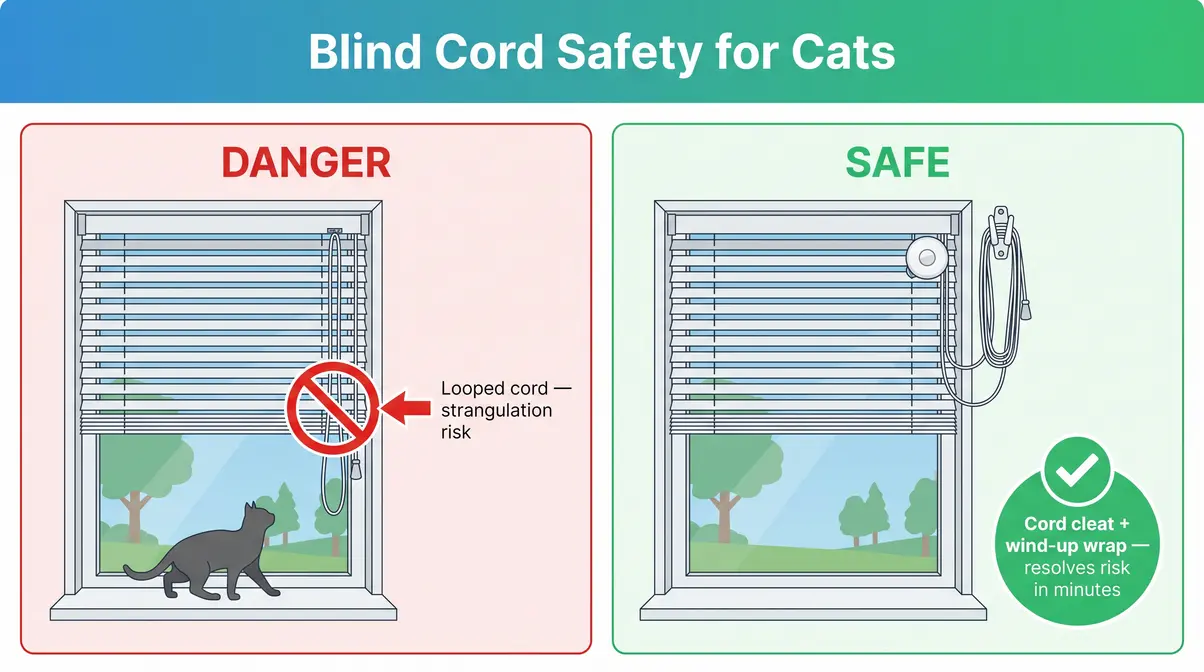
Looped blind cords are a strangulation risk (a situation where a loop catches around a cat’s neck, causing accidental hanging). This is one of the most serious and preventable hazards in any home. The Consumer Product Safety Commission has documented fatalities in both children and pets from looped window blind cords.
- Cut looped cords: If your blinds have a continuous loop cord, cut the loop and add a safety tassel at the bottom of each strand.
- Wind up excess cord and secure it with a wind-up cord wrap (a small device that keeps slack cord bundled near the top of the window).
- Use cord cleats: Small plastic hooks mounted high on the wall or window frame that you wrap the cord around, keeping it out of reach.
- Replace with cordless blinds where possible. Cordless or motorized window coverings eliminate the risk entirely and are widely available at major home improvement stores.
Managing Chargers and Small Appliances
Phone chargers, laptop cables, and small kitchen appliances present a secondary cord hazard that many guides overlook. Charger cables are thin, flexible, and easy for cats to chew through — and the low voltage doesn’t make them harmless.
- Store chargers in a drawer when not in use. Don’t leave them plugged in and dangling from a bedside table or counter.
- Use a charging station with a lid to contain multiple cables in one enclosed space.
- Unplug small appliances (toasters, electric kettles, blenders) when not in use and store their cords in a cabinet or behind the appliance, out of reach.
- Hair dryers and straighteners retain heat for up to 30 minutes after use. Store them immediately after cooling — a cat can burn its paws on a hot appliance left on a bathroom counter.
Step 3: Eliminate Choking and Blockage Hazards
Cats are drawn to small, lightweight objects — and swallowing them can cause a life-threatening intestinal blockage (a dangerous obstruction in the gut that blocks the passage of food and fluid). As the University of Minnesota’s veterinary physiology program notes, cats are particularly prone to ingesting linear foreign bodies (long, thin objects like string or thread), which can “plicate” or fold up the small intestine as the gut tries to move the object along. This folding causes tearing, infection, and a surgical emergency.
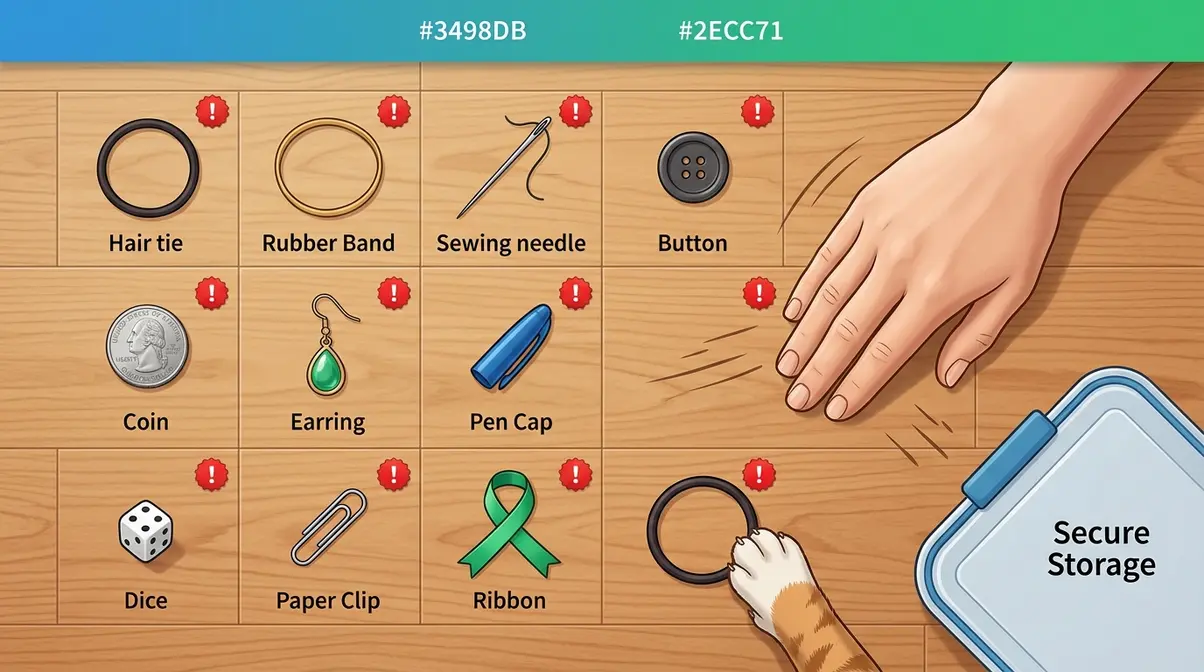
String, Hair Ties, and Rubber Bands
These are the most dangerous small objects in any home with a cat. The appeal is obvious — they move, they’re light, and they feel satisfying to bat around. The danger is that swallowing even a short length can anchor at the base of the tongue or in the stomach while the rest of the material gets pulled into the intestines.
- Remove or secure all of the following:
- Yarn, embroidery thread, sewing thread, and twine
- Hair ties and elastic bands (keep these in a closed drawer — never on a countertop or nightstand)
- Rubber bands
- Ribbons, tinsel, and gift wrap ties
- Dental floss — dispose of it immediately after use, never leave it accessible in a trash can without a lid
VCA Animal Hospitals notes that linear foreign body ingestion in cats requires surgical intervention in many cases, with recovery depending heavily on how early the obstruction is identified. If you see thread or string hanging from your cat’s mouth, do not pull it out — this can cause further intestinal damage. Contact your veterinarian immediately.
Objects Causing Intestinal Blockages
Beyond linear materials, many small household objects pose a blockage risk if swallowed. Cats are particularly attracted to objects that are small enough to bat across a floor — which also makes them small enough to swallow.
- Do a floor-level sweep of every room and remove:
- Coins, buttons, and small magnets
- Earrings, rings, and small jewelry pieces
- Bottle caps and pen caps
- Small toy parts, dice, and game pieces
- Paper clips and staples
- Any object smaller than a golf ball that a cat could pick up in its mouth
The Cornell Feline Health Center recommends a “floor-level inspection” mindset — getting down to your cat’s eye level to spot objects you’d otherwise miss from standing height. Store small items in closed containers or drawers. A bathroom counter covered in hair clips and bobby pins is a blockage hazard waiting to happen.
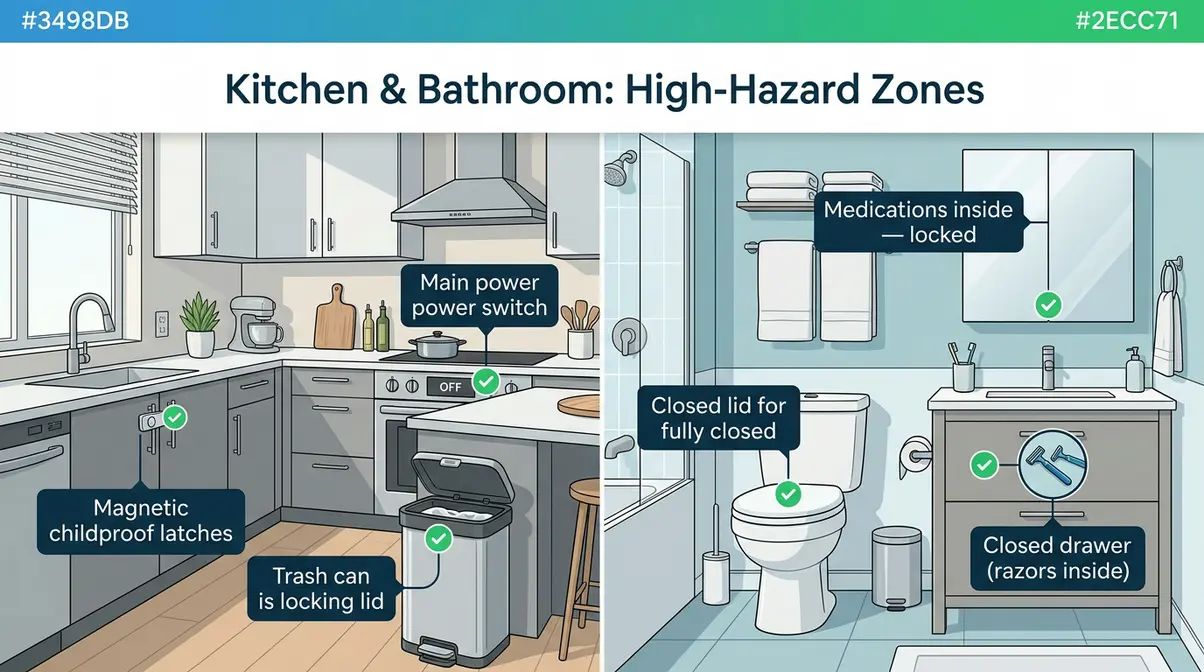
Step 4: Lock Down Kitchen and Bathroom Zones
Kitchens and bathrooms concentrate hazards in a way that no other rooms do. Both spaces contain chemicals, small objects, appliances, and water — all within a compact area that cats will explore thoroughly. This step of the Cat Safety Audit focuses on making these two rooms safe before your cat ever enters them.
Making Your Kitchen Cat-Safe
The kitchen presents overlapping hazards: toxic foods, sharp objects, hot surfaces, and enclosed spaces that cats can climb into.
- Install childproof latches on all lower cabinets. Cats can learn to open cabinets with lever handles and will investigate anything that smells interesting. Magnetic latches are the most reliable — they require a magnetic key to open and can’t be nudged open by a paw.
- Use a trash can with a locking lid. An open trash can is a source of toxic foods, sharp can lids, plastic bags, and food packaging that can cause choking or blockages.
- Keep the refrigerator closed at all times. Cats have been known to climb into open refrigerators when owners are loading groceries. Make it a habit to close the door immediately.
- Never leave hot burners unattended. A cat jumping onto a hot stove will burn its paw pads and may knock hot cookware off the surface. See Step 6 for specific guidance on induction stoves, which present a unique new hazard.
- Keep breakables off counters and shelves. Cats explore horizontally — they will walk across every surface and push objects off edges. Glassware, ceramic dishes, and knife blocks belong in closed cabinets.
Securing Bathrooms Against Cats
Bathrooms are small, enclosed, and full of hazards that are easy to overlook.
- Store all medications in a closed cabinet — not on a counter or windowsill. Acetaminophen (the active ingredient in Tylenol) is severely toxic to cats and can be fatal in very small doses. Ibuprofen and aspirin are also dangerous.
- Keep the toilet lid closed. Young kittens and small cats can fall in and struggle to escape. Toilet bowl cleaners in the water add a chemical hazard.
- Store razors, scissors, and nail clippers in a closed drawer. These are sharp objects that can injure a curious cat.
- Dispose of cotton balls and Q-tips immediately. Cats may swallow them, causing blockages.
- Keep the bathroom door closed when not in use. This is especially important in studio apartments where you can’t close off other areas — the bathroom is one room you can control completely.
The Laundry Room and Appliance Safety
Washing machines and dryers are a specific and serious hazard for cats. A cat can climb into a front-loading washer or dryer through an open door and be trapped inside when the cycle starts. This is not a rare occurrence — veterinary emergency rooms see cases of this type of injury every year.
- Establish these habits immediately and make them non-negotiable:
- Always check inside the washer and dryer before starting a cycle — open the door, look inside, and physically verify it’s empty.
- Keep washer and dryer doors closed at all times when not actively loading or unloading.
- Store laundry detergent pods in a closed cabinet. Laundry pods are brightly colored and look like toys to a cat. The concentrated detergent inside causes severe chemical burns and toxicity if bitten into.
- Keep dryer sheets in a closed container. As noted in Step 1, they contain cationic detergents that are toxic to cats.
Step 5: Seal Escape Routes and Off-Limits Areas
An indoor cat that escapes faces traffic, predators, disease, and the risk of getting permanently lost. According to the American Humane Association, only about 74% of lost cats are ever reunited with their owners. Sealing escape routes before your cat arrives is one of the most important steps in this entire audit.
Securing Windows and Balconies
Open windows are an escape route and a fall hazard. Cats can push through standard window screens — these screens are designed to keep insects out, not to support an animal’s weight. The Cornell Feline Health Center has documented what veterinarians call “high-rise syndrome,” where cats fall from elevated windows and balconies, suffering thoracic trauma (chest injuries) and fractures in a significant proportion of cases.
- Install pet-proof screens on all windows you plan to open. Pet-resistant screens (such as those made by Phifer) are constructed from vinyl-coated polyester and are significantly stronger than standard fiberglass mesh — strong enough to hold a cat’s weight if it leans against the screen.
- Use window stops to limit how far a window can open. A gap of 2 inches or less prevents most cats from squeezing through while still allowing airflow.
- For balconies: Install cat-proof netting or mesh along the railing. Products like ProtectaPet’s balcony mesh systems are designed specifically for this purpose and can be installed without drilling in many cases. For a DIY approach, heavy-gauge garden netting secured to railing posts with zip ties is an effective lower-cost alternative.
Controlling Doors and Escape Points
In a studio apartment or open-plan home, you can’t simply close a door to keep your cat away from hazards. Instead, focus on the primary exit points.
- Exterior doors: Brief your household members before the cat arrives. Establish a “two-step entry” habit — open the outer door, close it behind you, then open the inner area. This prevents a cat from darting out while you’re carrying groceries.
- Install door draft stoppers at the base of exterior doors. Kittens can squeeze under gaps that look impossibly small.
- Use baby gates with small-pet barriers for rooms you want to keep off-limits. Standard baby gates have gaps large enough for a cat to slip through — look for gates specifically rated for cats, or add mesh inserts.
- Microchip your cat before or immediately after adoption. If your cat does escape, a microchip dramatically increases the chance of reunion. Register the chip with a national database and keep your contact information current.
If you’re considering allowing outdoor access later, you might wonder if you should use an electronic cat door at home. If so, learning how to fit a cat flap securely is an important next step.
Cat-Proofing Your Yard or Outdoor Space
If you have a yard, giving your cat outdoor access requires a separate safety plan. Standard fencing does not contain cats — they can climb over most fence types in seconds.
Options for yard containment:
| Method | Approximate Cost | Containment Level | Best For |
|---|---|---|---|
| Roller bars / spinning fence toppers | $150–$400 | High | Existing wood or vinyl fence |
| Catio (pre-built enclosure) | $300–$1,500+ | Very High | Dedicated outdoor space |
| DIY catio (lumber + wire mesh) | $100–$400 | Very High | Budget-conscious owners |
| Cat-proof fence netting systems | $200–$600 | High | Large yard perimeters |
| No outdoor access (indoor only) | $0 | Complete | Apartments and high-traffic areas |
For most new cat owners, keeping the cat indoors until fully settled is the safest starting point. The 3-3-3 rule — a guideline used by shelters and veterinarians to describe the typical adjustment period — suggests cats need 3 days to decompress, 3 weeks to learn their routines, and 3 months to truly feel at home. Outdoor access is best introduced after this adjustment period, in a controlled and contained environment.
How to prevent escapes in a studio?
In a studio apartment, the two most effective strategies are establishing a two-step entry habit at the front door and installing pet-proof screens on any windows you open. A two-step entry means closing the outer door before opening the inner space — this prevents a cat from darting out while you’re entering. Window stops that limit the opening to 2 inches or less allow ventilation without creating an escape route. Microchipping your cat before or at adoption is essential, as even well-managed cats occasionally escape. The 3-3-3 rule also applies here — cats are most likely to attempt escape during the first 3 days when their stress levels are highest.
Step 6: Address Modern Home Hazards Cats Face
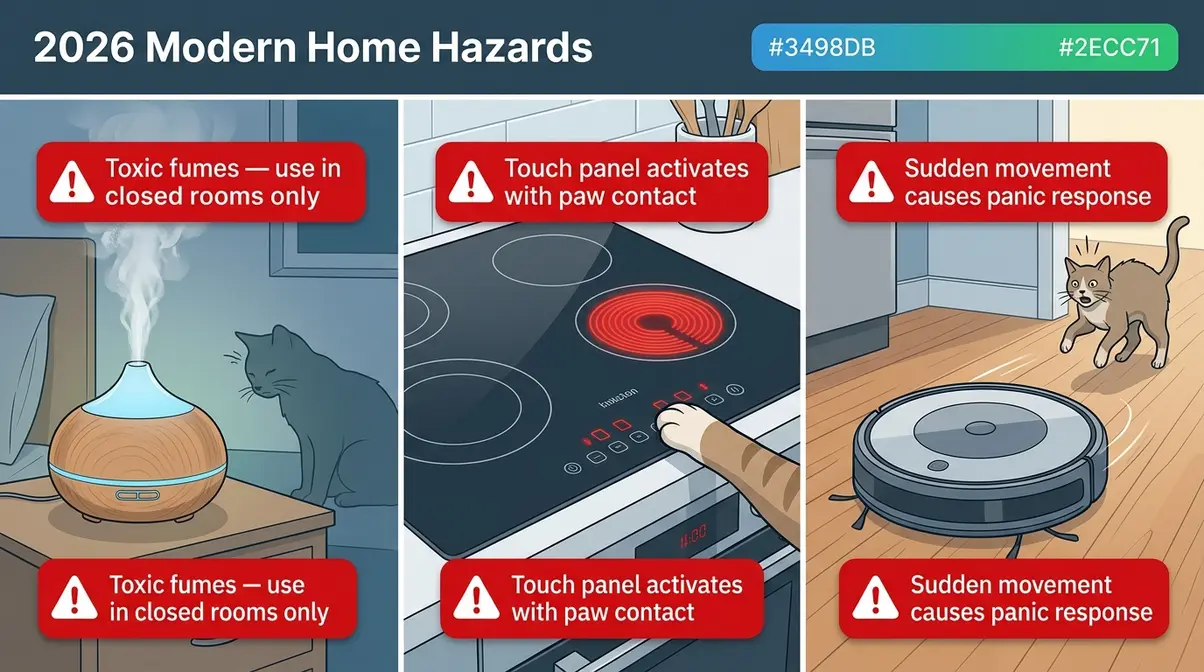
This step covers three hazards that no major competitor guide addresses — and that are increasingly present in modern homes. The Cat Safety Audit isn’t complete without them. Our review of veterinary and animal welfare guidance from 2024–2026 identified these as the most significant emerging risks for indoor cats.
Essential Oil Diffusers and Aromatherapy
Essential oil diffusers have become common household items, but they pose a genuine and serious risk to cats that most owners don’t know about. Cats lack a specific liver enzyme (glucuronyl transferase) that humans and dogs use to metabolize the phenols, terpenes, and ketones found in many essential oils. As a result, these compounds accumulate to toxic levels in a cat’s body far faster than in other species.
According to the ASPCA, essential oils can cause serious harm to cats through three exposure routes: inhalation (breathing aerosolized particles from a diffuser), skin absorption (walking through spilled oil or having oil applied directly), and ingestion (grooming oil off their fur). The BC SPCA notes that cats and birds are particularly sensitive to aerosolized oils, and that diffusers — especially ultrasonic and nebulizing types — have been linked to rising reports of pet illness.
- Essential oils that are particularly toxic to cats include:
- Tea tree (melaleuca)
- Eucalyptus
- Peppermint
- Cinnamon and clove
- Citrus oils (d-limonene)
- Ylang ylang
- Pine and pennyroyal
Signs of essential oil toxicity in cats include drooling, vomiting, wobbling or loss of coordination (ataxia), difficulty breathing, low heart rate, and lethargy. These symptoms require immediate veterinary attention.
- Practical guidance:
- If you use a diffuser, run it only in rooms your cat cannot access, with the door closed and good ventilation.
- Never apply essential oils directly to your cat’s skin or fur — this includes “natural” flea treatments.
- Store all essential oil bottles sealed and out of reach. A tipped bottle of concentrated oil can expose a cat to a dangerous dose through paw contact alone.
- Reed diffusers carry lower risk than ultrasonic diffusers but are still not considered safe in spaces where cats spend significant time.
Induction Stoves and Touch Appliances
Modern induction cooktops use touch-sensitive control panels — the same technology as a smartphone screen. A cat walking across the stovetop can activate a burner with a single paw step. This isn’t a theoretical concern: South Korean fire safety data has documented hundreds of confirmed house fires caused by cats accidentally activating induction cooktops, a pattern that has been reported by fire services as an emerging trend in homes with cats.
The hazard is compounded by the fact that induction cooktops give fewer visual heat cues than gas or electric coil burners. A cat that steps onto an induction surface while it’s heating may not perceive the danger as quickly.
- How to manage this hazard:
- Switch off the main power to the cooktop when not in use. Don’t rely on the standby mode — the touch panel remains active.
- Use a stove knob cover or burner cover designed for induction surfaces to physically block the control panel.
- Keep cats off counters through consistent deterrence (see Step 7 for deterrent mat options).
- Microwave ovens and other touch-panel appliances carry similar risks — a cat walking across a microwave keypad can start a cycle with food left inside.
Robot Vacuums and Smart Home Devices
Robot vacuums are a genuine stressor for many cats. The sudden, unpredictable movement of a robot vacuum — especially when it starts automatically on a scheduled cycle — can startle a cat into a panic response. A panicked cat may jump onto counters, hot stoves, or high shelves, creating a secondary hazard.
Beyond robot vacuums, smart home motion sensors present a different problem: they’re calibrated for human-sized movement and will trigger lighting, HVAC systems, or security alerts when a cat moves through a room. This is a minor inconvenience for owners but worth noting for home security systems that automatically alert or dispatch.
- Practical steps:
- Schedule robot vacuum cycles for times when your cat is in a separate room or when you’re home to monitor the cat’s reaction.
- Introduce the robot vacuum gradually — run it while stationary first so the cat can investigate it as an inert object before it moves.
- Secure the underside of furniture so your cat can’t get trapped under a robot vacuum’s path. Some models have been reported to trap cats’ tails or paws against furniture legs.
- Review your smart home motion sensor settings and adjust sensitivity thresholds to reduce false triggers from cat movement.
Can I use an essential oil diffuser?
Essential oil diffusers are not considered safe to use around cats in enclosed spaces, according to the ASPCA and BC SPCA. Cats lack the liver enzyme needed to metabolize the phenols and terpenes in most essential oils, which means even airborne exposure can cause toxicity over time. If you choose to use a diffuser, run it only in a room your cat cannot enter, with the door closed and adequate ventilation. Never use tea tree, eucalyptus, peppermint, clove, cinnamon, citrus, or ylang ylang oils in any space your cat shares. Reed diffusers carry lower but not zero risk.
Step 7: Choose Cat-Proofing Products and DIY Fixes
With the hazards identified and addressed in Steps 1–6, Step 7 focuses on the products and solutions that reinforce your Cat Safety Audit long-term. Some of these are one-time purchases; others are ongoing deterrence strategies.
Deterrent Mats, Sprays, and Guards
Deterrent products work by making certain surfaces or objects unpleasant to interact with — without causing any harm to the cat. They’re most effective when introduced before the cat develops a habit of accessing the area.
- Deterrent mats (spike mats): Flexible plastic mats with blunt nubs that cats find uncomfortable to walk on. Place them on counters, stovetops, or furniture you want to keep off-limits. They’re harmless but effective.
- Bitter deterrent sprays: Applied directly to cords, furniture legs, or plants, these sprays have a taste that cats find unpleasant. Reapply every 2–3 days for best results. Look for products that are non-toxic and specifically formulated for cats.
- Double-sided tape: Cats dislike the sticky sensation on their paws. Apply strips to counter edges or furniture corners to discourage jumping and scratching.
- Furniture guards / scratch guards: Clear plastic or vinyl panels that attach to the corners or sides of upholstered furniture to prevent scratching. These redirect scratching behavior to designated scratching posts rather than eliminating the behavior entirely. These guards are also highly effective when you need to stop a cat from scratching furniture.
Approximate cost guide:
| Product | Average Cost | Best For |
|---|---|---|
| Deterrent mat (set of 4) | $15–$25 | Counter and stovetop access |
| Bitter deterrent spray (8 oz) | $8–$15 | Cord and furniture protection |
| Double-sided tape roll | $5–$10 | Furniture and counter edges |
| Furniture corner guards (4-pack) | $10–$20 | Upholstered furniture |
| Magnetic childproof latches (8-pack) | $20–$35 | Cabinet security |
Budget-Friendly DIY Cat-Proofing
Professional cat-proofing products are convenient, but most of the core safety work can be done with inexpensive materials.
- Binder clips + cord management: Use large binder clips to bundle and secure cords to the back of desks or tables. This costs pennies and keeps cords off the floor.
- Aluminum foil on surfaces: Cats strongly dislike the texture and sound of aluminum foil. Covering a counter or stovetop with foil for the first few weeks after adoption trains your cat to avoid the surface, after which you can remove it.
- Rubber shelf liner as a deterrent mat: Cut sections of rubber shelf liner (available for $3–$5 at dollar stores) and place them on surfaces you want to keep off-limits. The texture is unpleasant for most cats.
- DIY cord concealer: PVC conduit pipe (sold by the foot at hardware stores for under $1) can be cut lengthwise and snapped around cords as a low-cost alternative to commercial cord channels.
- Pool noodle furniture bumpers: Cut a pool noodle lengthwise and wrap it around sharp furniture corners to protect a curious cat’s head from impacts during high-speed play.
If you are renting, you might need to know how to cat-proof your apartment without drilling.
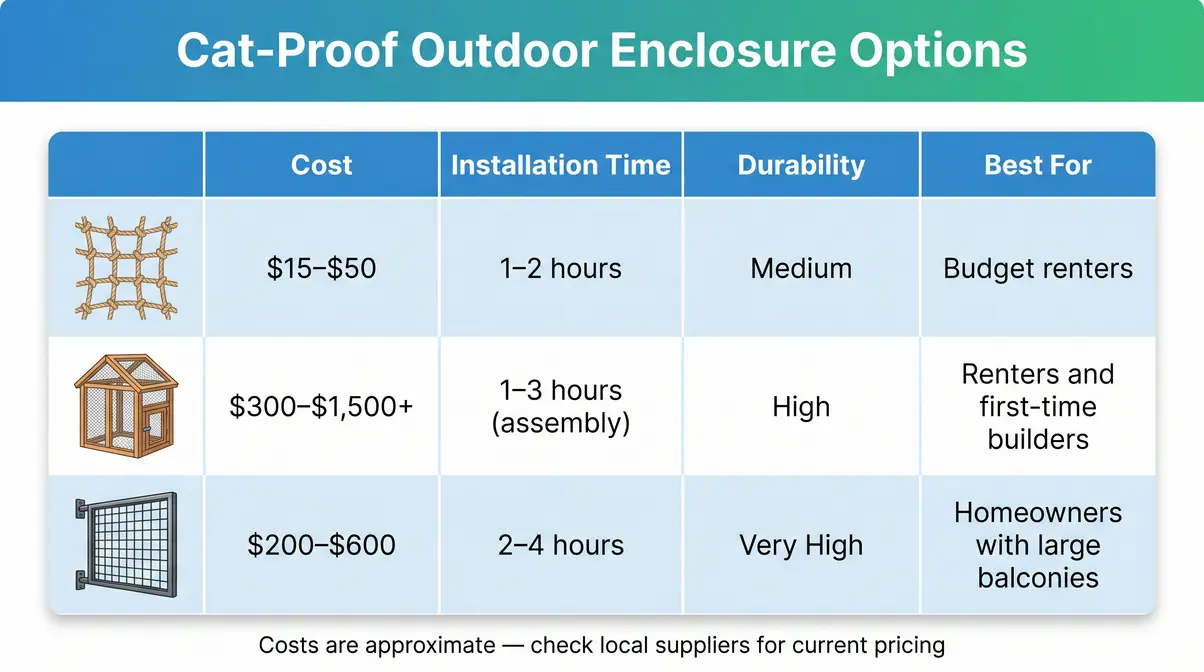
Pre-Built Catios vs. DIY Enclosures
If you want to give your cat outdoor access without the escape and injury risks of a free-roaming yard, a catio (a cat-specific outdoor enclosure) is the safest solution. Catios come in two main forms:
Pre-built catios are manufactured enclosures that arrive ready to assemble. They range from small window-box extensions ($150–$300) to large walk-in structures ($600–$1,500+). They’re weatherproof, structurally tested, and typically don’t require building skills. The tradeoff is cost.
DIY catios use lumber framing and galvanized wire mesh (sometimes called “hardware cloth”) to create a custom enclosure. A basic DIY catio can be built for $100–$400 depending on size. Cat owners across DIY forums and community boards consistently report that a 2×4 frame with 1/2-inch galvanized hardware cloth is the most durable and predator-resistant combination. Avoid standard chicken wire — it can be bent by larger animals and has gaps wide enough for a kitten’s head.
| Feature | Pre-Built Catio | DIY Catio |
|---|---|---|
| Cost | $150–$1,500+ | $100–$400 |
| Build time | 1–3 hours (assembly) | 1–3 days |
| Customizability | Low–Medium | High |
| Durability | High (manufacturer-tested) | Medium–High (depends on build) |
| Best for | Renters, first-time builders | Homeowners with outdoor space |
Verify Results: The Cat Safety Audit Checklist
You’ve completed all 7 steps. Before your cat arrives, run through this final checklist to confirm your Cat Safety Audit is complete. Check off each item as you verify it room by room. For even more comprehensive advice, review these 15 veterinarian-informed cat advice tips.
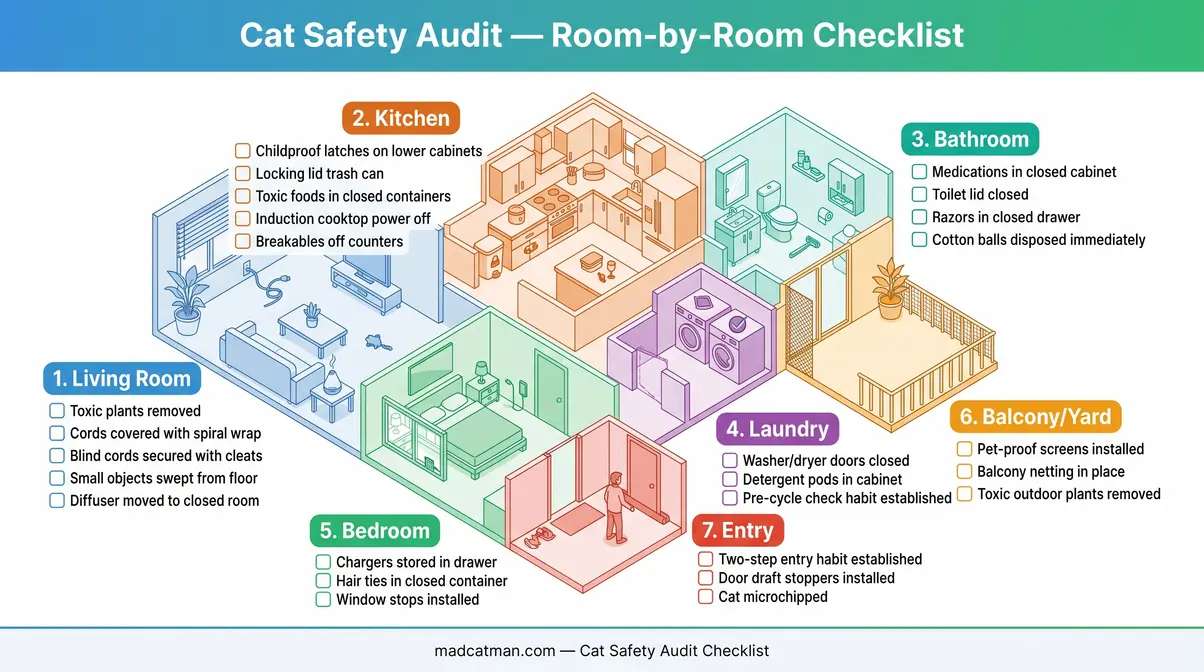
- Living Room / Common Areas
- [ ] Toxic plants removed or relocated to inaccessible areas
- [ ] All electrical cords covered with spiral wrap or cord clips
- [ ] Blind cords secured with cleats or wind-up wraps
- [ ] Small objects (hair ties, rubber bands, coins) removed from floor level
- [ ] Essential oil diffuser moved to a closed room or removed
- Kitchen
- [ ] Childproof latches installed on lower cabinets
- [ ] Trash can has a locking lid
- [ ] Toxic foods stored in closed containers
- [ ] Induction cooktop main power switched off when not in use (if applicable)
- [ ] Breakables moved off counters
- Bathroom
- [ ] Medications stored in a closed cabinet
- [ ] Toilet lid closed
- [ ] Razors and sharp objects in closed drawer
- [ ] Cotton balls and Q-tips disposed of immediately after use
- Laundry Room / Appliances
- [ ] Washer and dryer doors kept closed
- [ ] Laundry detergent pods stored in a closed cabinet
- [ ] Dryer sheets stored in a closed container
- [ ] Pre-cycle check habit established (look inside before starting)
- Windows and Exits
- [ ] Pet-proof screens installed on openable windows
- [ ] Window stops limiting gap to 2 inches or less
- [ ] Balcony netting or mesh installed (if applicable)
- [ ] Two-step entry habit established with all household members
- [ ] Cat microchipped and chip registered
- Outdoor Space (if applicable)
- [ ] Yard containment solution selected and installed
- [ ] Toxic plants in yard identified and removed
Common Cat-Proofing Mistakes to Avoid
Even diligent new cat owners make predictable mistakes. This section covers the most common ones — not to alarm you, but to give you a balanced picture of where the Cat Safety Audit most often falls short.
Common Pitfalls
Pitfall 1: Treating toxic plant removal as a one-time task.
Many owners remove the plants they know about before the cat arrives, then receive new plants as gifts or purchase new varieties without checking the ASPCA list first. Make it a habit to verify any new plant before bringing it home — not just the first time.
Pitfall 2: Assuming “out of reach” is high enough.
Cats are exceptional climbers. A shelf at five feet is not inaccessible — it’s just a slightly more interesting challenge. If a plant or chemical is toxic, it needs to be behind a closed door, not simply elevated. Cat owners across veterinary forums consistently report that cats reach shelves and countertops they “shouldn’t be able to access” within the first week of adoption.
Pitfall 3: Overlooking the laundry room.
The washer and dryer check is easy to forget once it becomes routine. Veterinary guidance from multiple sources emphasizes that this habit must be non-negotiable — not just for the first month, but permanently. Set a visual reminder (a sticky note on the machine door, for example) until the habit is fully established.
Pitfall 4: Using essential oil diffusers in “just one room.”
Aerosolized essential oil particles travel through HVAC systems and spread throughout a home. A diffuser running in a bedroom with the door slightly ajar can expose a cat sleeping in the hallway to meaningful concentrations of toxic compounds. If you use diffusers, run them only when the cat is in a completely separate, well-ventilated area.
Pitfall 5: Skipping the cord audit for rooms the cat “won’t use.”
Cats explore every accessible space, particularly in the first weeks of adjustment. A home office that’s “usually closed” will be investigated the moment the door is left open. Complete the cord audit in every room, not just the main living areas.
When to Seek Expert Help
Some cat-proofing scenarios genuinely require professional guidance:
- If your cat has already ingested a toxic substance: Call the ASPCA Animal Poison Control Center at (888) 426-4435 immediately. Do not wait for symptoms to appear — many toxins cause irreversible damage before visible symptoms develop. This line charges a consultation fee, but the alternative is a veterinary emergency room visit.
- If you’re managing a multi-cat household or introducing a cat to other pets: A veterinary behaviorist can help you design an introduction plan that reduces stress-related escape attempts and territorial aggression.
- If your cat is persistently accessing a hazard despite deterrents: A certified cat behavior consultant (CCBC) can identify why the behavior is occurring and recommend targeted interventions. Contact information for certified consultants is available through the International Association of Animal Behavior Consultants (IAABC).
- For complex outdoor enclosure builds or balcony netting in rental properties: Consult your building management and, if needed, a contractor familiar with pet safety installations. Some municipalities have regulations about exterior modifications.
Always consult a licensed veterinarian before making decisions about your specific cat’s health, environment, or behavioral needs. General guidance in this guide is not a substitute for professional veterinary advice.
Frequently Asked Questions
What is the 3-3-3 rule for cats?
The 3-3-3 rule is a guideline describing the typical adjustment period for a cat in a new home: 3 days to decompress and feel safe, 3 weeks to learn the household routine, and 3 months to feel truly at home. During the first 3 days, your cat may hide, refuse food, or seem withdrawn — this is normal stress behavior, not a sign that something is wrong. By 3 weeks, most cats begin exploring confidently and using the litter box consistently. The 3-month mark is when you’ll typically see your cat’s true personality emerge. Understanding this timeline helps you set realistic expectations and avoid introducing outdoor access too soon.
What smells do cats absolutely hate?
Cats are strongly averse to citrus scents (lemon, orange, grapefruit), as well as lavender, eucalyptus, peppermint, and vinegar. These scents can be used as natural deterrents — placing citrus peels near a plant you want to protect, for example, can discourage investigation. However, peppermint and eucalyptus are also toxic to cats in concentrated form (see Step 6 on essential oils), so use diluted versions cautiously and never apply them directly to surfaces your cat walks on. Commercially available cat deterrent sprays use these compounds in safe, diluted concentrations.
What household items are most toxic?
The most commonly reported household toxins for cats include lilies (causing acute kidney failure), acetaminophen (Tylenol), onions and garlic, antifreeze, concentrated essential oils, and certain laundry products. According to the ASPCA Animal Poison Control Center, plant ingestion and household chemical exposure are among the most frequent reasons cat owners call the poison hotline. The ASPCA’s full toxic plant and substance database is the most comprehensive free resource available and covers hundreds of specific substances. When in doubt about any item, check the database before your cat has access to it.
What annoys cats the most?
Cats are most bothered by sudden loud noises, strong unfamiliar scents, and unpredictable movement — which is why robot vacuums, induction cooktop sounds, and essential oil diffusers (which emit ultrasonic frequencies in some models) cause such strong reactions. Inconsistent routines, being picked up without warning, and restricted access to high perches also cause stress in most cats. Understanding what annoys or stresses your cat is useful for cat-proofing: a stressed cat is more likely to attempt escapes, access off-limits areas, and engage in destructive behavior. Providing vertical space (cat trees, shelves) and predictable routines reduces stress-driven hazardous behavior significantly.
How long does cat-proofing take?
For most homes, a complete Cat Safety Audit takes 2–4 hours when done systematically using a room-by-room approach. A studio apartment typically takes 1–2 hours. The most time-consuming parts are the cord audit (especially in rooms with entertainment systems or home offices) and installing childproof latches on kitchen and bathroom cabinets. One-time purchases like cord wrap, cabinet latches, and pet-proof screen inserts can be sourced at a hardware store for under $50 total for a standard apartment. The audit is best completed at least 24–48 hours before your cat arrives, giving you time to address anything you missed.
Bringing It All Together
For new cat owners, a systematic Cat Safety Audit — completed room by room before your cat ever sets foot in your home — is the single most effective thing you can do to prevent injury and illness. The hazards covered in this guide range from well-known dangers like toxic plants and electrical cords to 2026-specific risks like induction cooktops and essential oil diffusers that no other guide currently addresses. Completing all 7 steps takes one afternoon and costs under $100 for most apartments.
The Cat Safety Audit framework exists because random checklists get skipped and forgotten — but a systematic, room-by-room inspection ensures nothing gets missed. Each step builds on the last: removing toxins first, then eliminating physical hazards, then sealing escape routes, then addressing modern technology risks. This sequencing prioritizes the hazards most likely to cause serious harm within the first 48 hours.
Your next step is straightforward: print or save the Verify Your Results checklist from this guide, walk through your home room by room today, and complete each item before your cat arrives. If you discover a hazard you’re unsure how to address — particularly anything involving your cat’s health or potential toxin exposure — consult your veterinarian before proceeding. The ASPCA Animal Poison Control Center at (888) 426-4435 is available 24 hours a day for urgent questions. A few hours of preparation now means years of safe, confident coexistence with your cat.
Dave King
Cat owner and writer at Mad Cat Man.