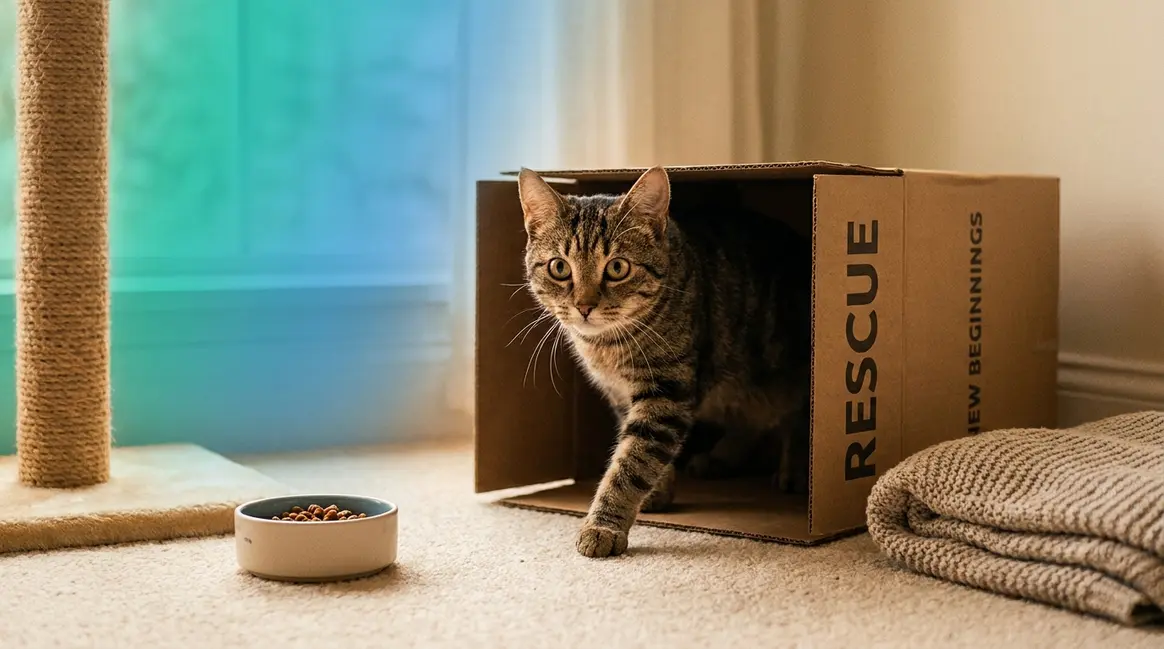

You’ve finally adopted a rescue cat — and now the worry sets in. Will she be scared? Will she hide forever? Will you do something wrong? These fears are completely normal, and they reflect exactly how much you already care about your new companion.
Rush the process, and you risk creating weeks of hiding, stress, and even long-term anxiety for your cat — and that’s the last thing either of you needs. The good news is that introducing a rescue cat to your home doesn’t have to be a guessing game. In this guide, you’ll learn the exact 5-step process — built around the 3-3-3 adjustment rule — for bringing your rescue cat home safely, calmly, and with total confidence. Based on guidance from veterinary behaviourists and community consensus across rescue adoption forums, this framework has helped thousands of first-time adopters navigate every phase of the journey.
Each step includes specific behavioural checkpoints so you always know exactly where your cat is in the process — and what to do next.
Introducing a rescue cat to your home successfully means following a structured, phase-by-phase process — not rushing trust. The Fear-to-Trust Ladder gives you clear behavioural checkpoints at 3 days, 3 weeks, and 3 months.
- Start small: A single safe room removes overwhelm and lets your cat decompress on her own terms.
- Follow the 3-3-3 rule: 3 days to decompress, 3 weeks to settle, 3 months to feel fully at home.
- Let your cat dictate the pace: Forcing interaction backfires — patience is a strategy, not just a virtue.
Quick Answer
The safest way to introduce a rescue cat to your home is to confine her to one quiet “safe room” for the first 3 days, allow her to decompress without pressure, then gradually expand her territory over 3 weeks while building positive associations with food, play, and routine. Full integration typically takes up to 3 months.
Estimated Time: 3 months
Tools and Materials:
- Litter tray (plus one extra)
- Food and water bowls
- Hiding spots (cardboard box, igloo bed)
- Scratching post
- Toys (crinkle ball, feather wand)
- Feliway Classic diffuser
- Baby gate
Before You Begin: What You Need at Home

Getting the right supplies in place before your cat arrives removes one of the biggest sources of new-adopter anxiety. You won’t be scrambling on day one, and your cat will step into an environment that’s already calm and ready. For more detailed room setups, check out our guide on how to introduce a rescue cat to a new home.
Essential Items for the Safe Room
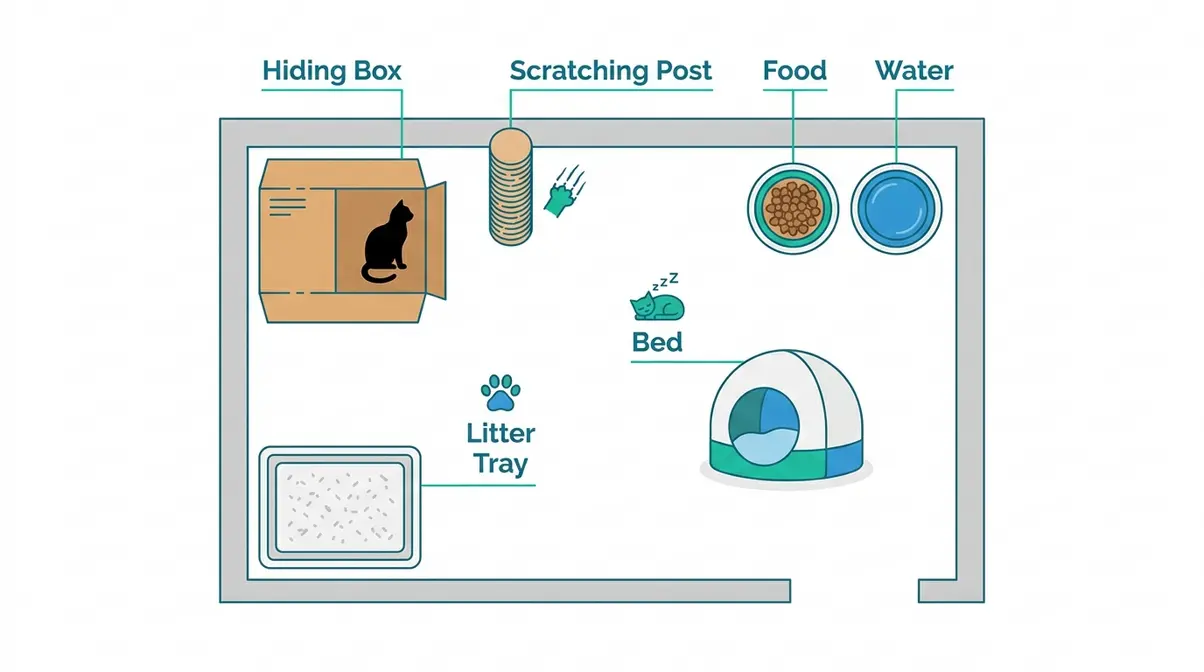
Your cat’s safe room — a single, quiet room where she’ll spend her first days — needs just a handful of items. Keep it simple. Too many new objects can be overstimulating for a cat that’s already overwhelmed.
Safe room essentials checklist:
- Litter tray — one tray per cat, plus one extra (so two trays for a single cat household)
- Food and water bowls — placed away from the litter tray (cats dislike eating near their toilet area)
- Hiding spots — a cardboard box on its side, an igloo bed, or a covered crate; hiding places are essential, not optional
- Scratching post — helps your cat self-soothe and mark territory safely
- A few toys — a crinkle ball or feather wand for gentle solo play
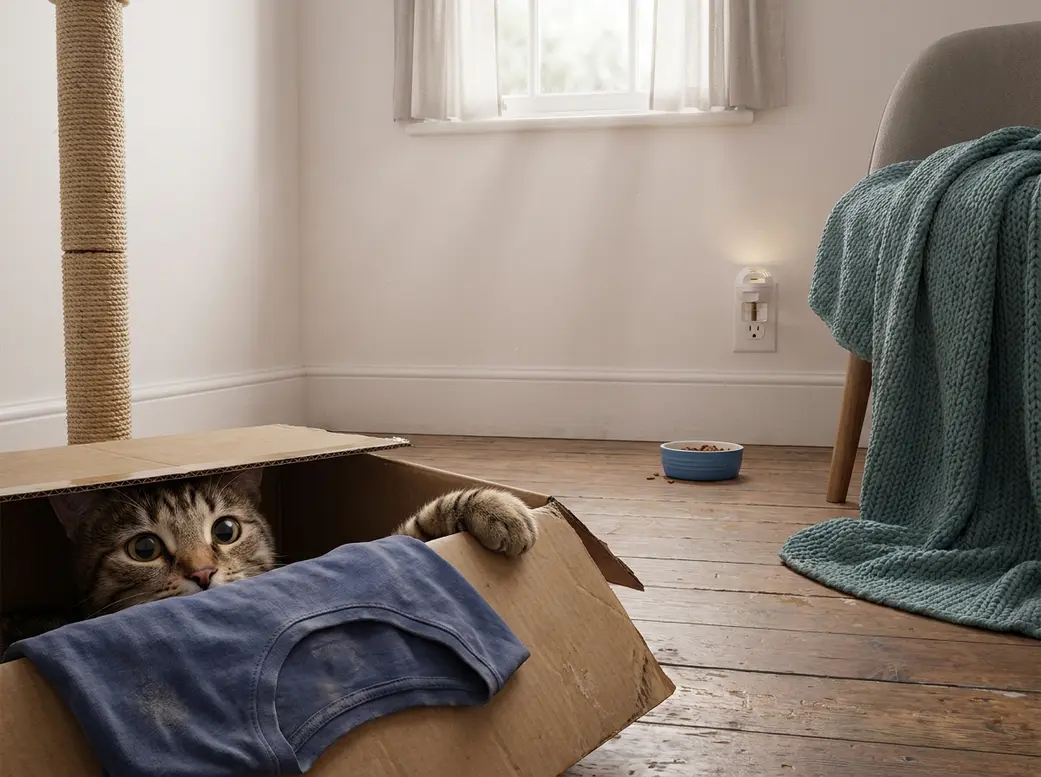
- Your worn clothing — a t-shirt or sock placed in the room so your cat begins associating your scent with safety
Cat-Proofing Your Home Checklist
Before your cat eventually explores beyond the safe room, walk through your home and address these common hazards:
- Secure loose wires and cables — cats chew them; use cable tidies or cord covers
- Remove toxic plants — lilies, poinsettias, and ivy are all dangerous to cats; check the ASPCA toxic plant list before bringing any plant inside
- Close washing machine and dryer doors — cats will climb inside
- Check for gaps behind appliances — a frightened cat can squeeze into surprisingly small spaces
- Store cleaning products and medications in closed cupboards
- Install a baby gate (a pet gate with a small cat flap) if you want to restrict access to certain areas while still allowing your cat freedom of movement later
Step 1 — Set Up the Perfect Safe Room
The safe room is the single most important thing you can do when introducing a rescue cat to your home. It replaces the overwhelming expanse of an entire house with one manageable, controllable space where your cat can begin to feel safe.
Choosing the Right Room
The best safe room is quiet, low-traffic, and has a door that closes fully. A spare bedroom, a home office, or a large bathroom all work well. Avoid the kitchen (too much noise and activity) and the living room (too much foot traffic and too many new smells at once).
The room should have:
- Natural light — a window helps, but make sure it’s secure or screened
- A consistent temperature — avoid rooms that get very cold at night
- No hiding spots you can’t access — if your cat hides under a bed, you need to be able to reach her gently in an emergency; block the undersides of beds with storage boxes if needed
According to PAWS, confining a new cat to a single room initially is one of the most effective strategies for reducing stress-related hiding behaviour and accelerating the adjustment process.
What to Put in the Safe Room
Beyond the essentials checklist above, placement matters. Put the litter tray in one corner and the food and water bowls in the opposite corner — distance between the two is important for hygiene and for your cat’s comfort. Place the hiding box or igloo bed against a wall, not in the centre of the room. Cats feel most secure with their back against something solid.
Add a few layers of comfort:
- Feliway Classic diffuser (a synthetic feline pheromone — a chemical signal cats produce when they feel safe) — plug it in 24 hours before your cat arrives if possible
- A piece of bedding from the rescue shelter — familiar scents reduce the shock of a completely new environment
- Your worn sock or t-shirt — placed inside the hiding box so your scent becomes associated with the safe space from day one
First Moments — Bringing Your Cat Inside
When you arrive home, carry the cat carrier directly to the safe room and close the door before opening it. Let your cat exit the carrier in her own time. Do not tip the carrier or pull her out. Place the carrier on the floor with the door open and step back.
Then do something that feels counterintuitive: sit quietly on the floor and ignore her.
Reading a book, scrolling your phone, or simply sitting still communicates that you are not a threat. You’re just another object in the room. Most cats will emerge to investigate within 20–60 minutes. Some will take several hours. Both are completely normal.
Step 2 — The First 3 Days: Decompression
The first 72 hours are the most critical period in the entire adjustment process. Your cat is processing an enormous amount of sensory information — new smells, sounds, textures, and temperature. Her nervous system is working hard.
“Introducing a cat into a new home is extremely stressful for most cats. A cat’s basic reaction to stress is to run and hide.”
— PAWS Chicago
This is not a sign that something is wrong. It is a completely healthy stress response — the same survival instinct that kept wild cats alive for millennia.
What to Expect on Day One
On the first day, many rescue cats will spend most of their time hiding. You may hear nothing from the safe room for hours. This is normal. Check that food and water have been touched (a sign she’s comfortable enough to eat), and check the litter tray once in the morning and once in the evening.
- Normal day-one behaviours include:
- Hiding behind or inside furniture
- Refusing food (mild stress-related appetite suppression for 24–48 hours is common)
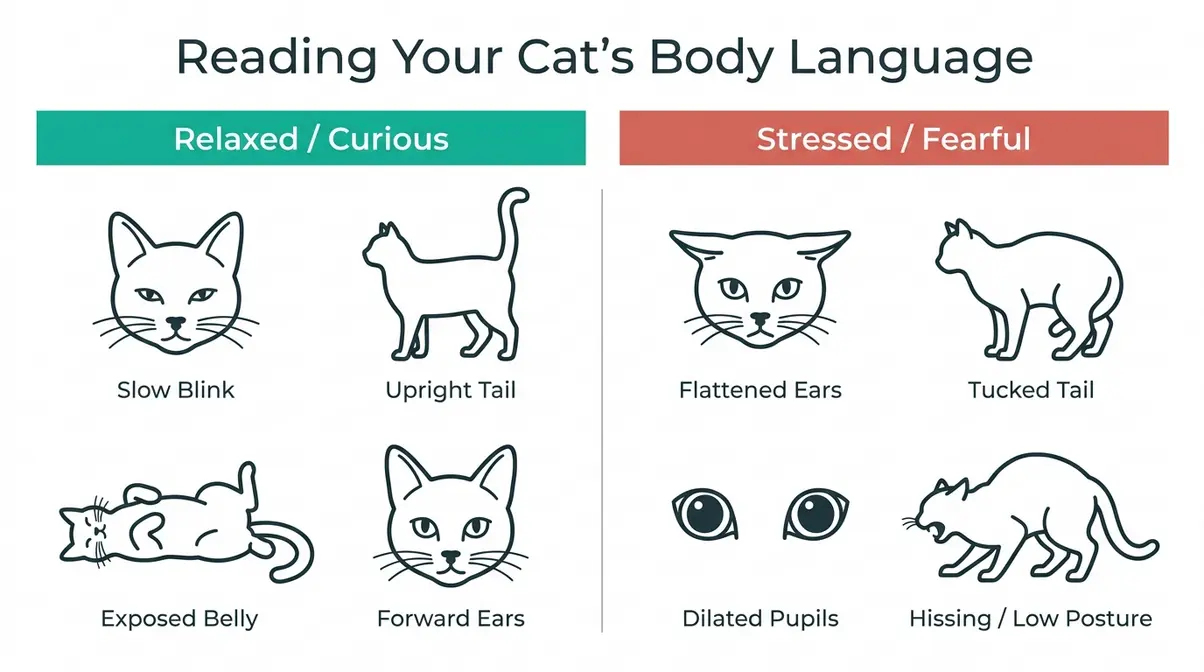
- Dilated pupils and a low, tucked posture
- Slow, deliberate movement
- Signs that warrant a vet call on day one:
- No urination or defecation in over 48 hours
- Laboured breathing or open-mouth panting
- Repeated vomiting
The Fear-to-Trust Ladder: Your Cat’s Emotional Timeline
The Fear-to-Trust Ladder is a framework for understanding exactly where your cat is in her adjustment journey — and what your job is at each rung.
It maps directly onto the widely-used 3-3-3 rule (3 days, 3 weeks, 3 months), which animal behaviourists and rescue organisations use as a benchmark for feline adjustment timelines.
| Rung | Timeline | Your Cat’s State | Your Job |
|---|---|---|---|
| 1 — Survival Mode | Days 1–3 | Hiding, frozen, hyper-alert | Do nothing. Be present. Let her observe you. |
| 2 — Cautious Curiosity | Days 4–7 | Emerging briefly, watching from distance | Sit quietly, speak softly, offer treats by hand |
| 3 — Conditional Trust | Weeks 2–3 | Approaching on her terms, accepting pets | Maintain routine, play gently, no forced contact |
| 4 — Active Exploration | Weeks 3–6 | Initiating contact, exploring new rooms | Expand territory slowly, introduce household sounds |
| 5 — Full Integration | Month 3+ | Seeking affection, fully relaxed posture | Deepen bond through play, routine, and enrichment |
The key insight of the Fear-to-Trust Ladder is this: you cannot skip rungs. Trying to move from Rung 1 to Rung 3 in a single day — by picking your cat up, carrying her around the house, or inviting guests over — doesn’t accelerate trust. It resets the clock.
How to Interact During the Decompression Phase
During the first three days, your interactions should be minimal, predictable, and always on your cat’s terms. Here’s what that looks like in practice:
- Enter the safe room once or twice a day — no more. Announce yourself by speaking softly before you open the door.
- Sit on the floor — never loom over a frightened cat. Ground-level is non-threatening.
- Extend your hand, palm down, at floor level — let her approach and sniff. Do not reach toward her.
- Speak in a low, steady voice — read aloud, hum, or narrate what you’re doing. The content doesn’t matter; the calm tone does.
- Leave before she seems ready for you to go — ending interactions while she’s still comfortable builds positive associations faster than overstaying.
According to Best Friends Animal Society, keeping interactions short and positive during the first week is consistently associated with faster bonding outcomes across their shelter network.
Step 3 — Weeks 1-3: Exploring and Settling
By the end of the first week, most rescue cats begin showing signs of Rung 2 or Rung 3 on the Fear-to-Trust Ladder. The decompression phase is giving way to cautious curiosity — and this is when your active role in the process begins.
Signs Your Cat Is Ready to Explore
Watch for these behavioural green lights before expanding her territory:
- Eating consistently — a cat eating well is a cat feeling safe enough to be vulnerable
- Grooming in your presence — self-grooming requires relaxation; a cat won’t groom while on high alert
- Making eye contact and slow blinking — the feline equivalent of a friendly wave
- Approaching you voluntarily — even a brief nose-touch to your hand is significant
- Vocalising — soft chirps, trills, or meows directed at you signal she’s attempting communication. If the vocalization seems excessive, you might wonder why is my cat meowing so much.
When you see three or more of these signs consistently over two days, she’s ready to begin exploring beyond the safe room.
The Scent-Swapping Technique: Step-by-Step Script
Scent-swapping — the process of exchanging items that carry your cat’s scent with items from other areas of the home (or from a resident cat) so she can investigate smells before encountering new environments or animals — is one of the most evidence-backed techniques in feline introduction protocols.
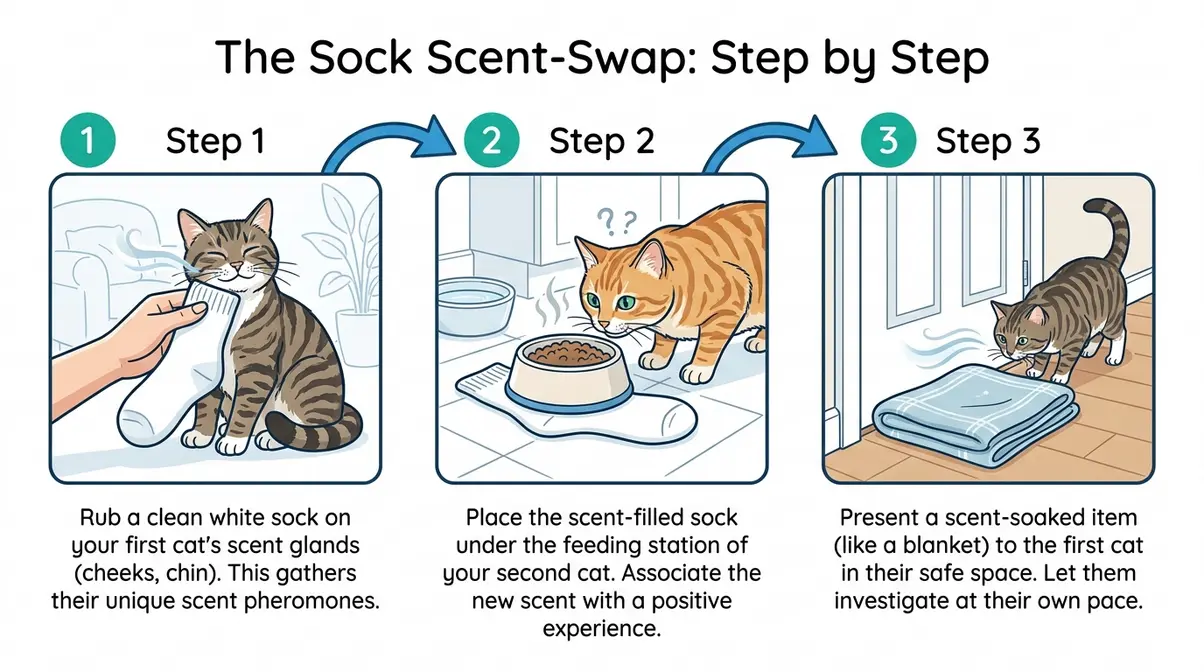
The Sock Scent-Swap Script (for single-cat or multi-cat households):
- Gather two clean socks — one for your rescue cat, one for your home environment (or resident cat).
- Rub Sock A gently along your rescue cat’s cheeks and chin — these areas contain her scent glands, which produce calming pheromones. She may rub back against the sock; that’s ideal.
- Place Sock A under your own dinner plate or near your favourite chair — so her scent becomes associated with your daily spaces.
Next steps for the swap:
- Rub Sock B on furniture or bedding from the main house (or on your resident cat’s cheeks if applicable).
- Place Sock B just inside the safe room door — let your rescue cat investigate it at her own pace.
- Repeat daily for 5–7 days, gradually moving the socks closer together or swapping feeding bowls.
This technique is recommended by the SPCA of British Columbia as a key first step before any visual or physical introduction between cats.
Feeding, Play, and Routine Building
Cats are creatures of routine — predictability is one of the most powerful trust-building tools available to you. By weeks two and three, establish a consistent daily pattern. If you need more ideas for building routines, review these how to introduce a cat to a new home top tips.
- Feed at the same times each day — morning and evening works well for most households
- Play for 10–15 minutes before each meal — this mimics the hunt-catch-eat sequence cats are hardwired for, and it burns off stress energy
- Use a wand toy (a feather or ribbon on a stick) rather than your hand as a toy — you want your hand associated with calm and safety, not excited pouncing
Positive reinforcement — rewarding calm, curious, or affectionate behaviour with a small treat or a soft word — accelerates the bonding process far more effectively than any form of correction.
Step 4 — Introducing to a Resident Cat
If you already have a cat at home, this step requires patience and a structured, three-phase approach. Rushing this process is the single most common reason multi-cat introductions fail. According to the UC Davis Veterinary Medicine guidance on feline introductions, cats that are introduced too quickly show significantly higher rates of long-term aggression and resource-guarding behaviour.
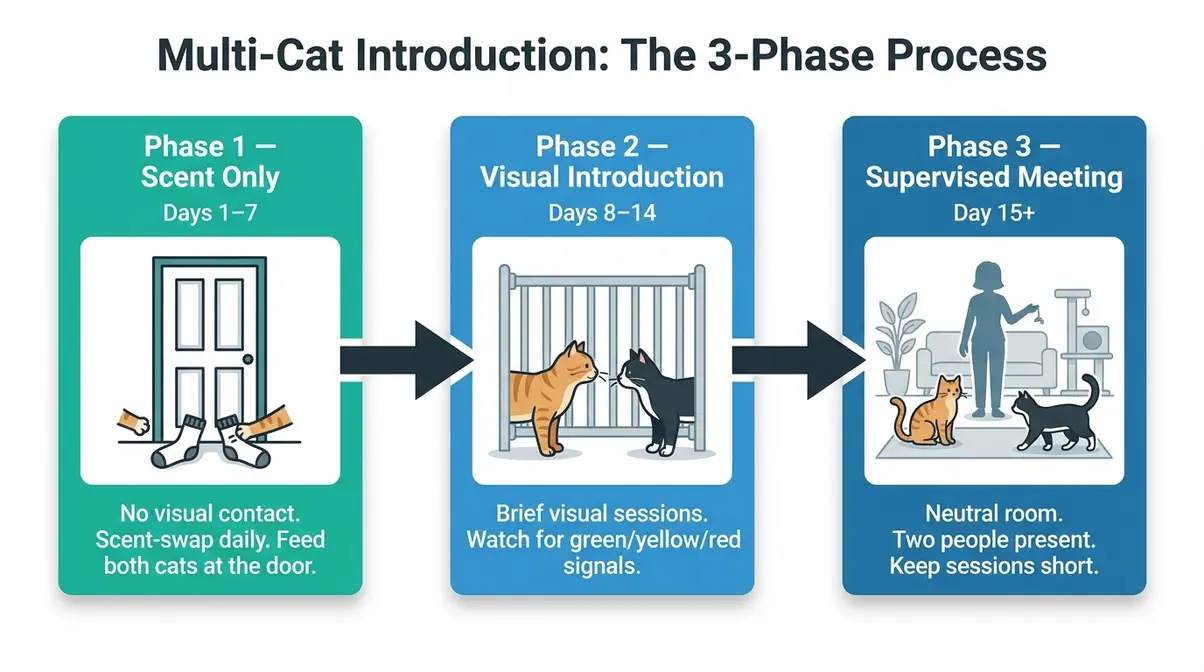
Phase 1 — Scent Introduction (Days 1–7)
During the first week, your resident cat and your rescue cat should have absolutely no visual or physical contact. The safe room door stays closed. Your job in this phase is to use the sock scent-swap technique (described in Step 3) and to feed both cats on opposite sides of the closed safe room door.
- The cracked-door feeding method:
- Place your rescue cat’s bowl just inside the safe room door.
- Place your resident cat’s bowl just outside the same door.
- Feed both cats at the same time — they eat near each other’s scent without seeing each other.
- Over 5–7 days, gradually move the bowls closer to the door until both cats eat calmly within a few centimetres of it.
This technique creates a powerful positive association: the smell of the other cat predicts food. Best Friends Animal Society describes this as one of the most reliable methods for building inter-cat tolerance before any visual contact.
Phase 2 — Visual Introduction Through a Barrier
Once both cats eat calmly near the closed door for two consecutive days, move to Phase 2: visual contact through a baby gate or a door cracked open 5–10 cm, propped securely.
- What to watch for:
- Green light: Both cats sniff, look away, and return to eating — this is healthy curiosity
- Yellow light: One cat hisses once and walks away — normal; repeat the session the next day
- Red light: Sustained hissing, growling, lunging, or one cat refusing to eat — close the door and return to Phase 1 for 2–3 more days
Keep visual sessions to 5–10 minutes initially. Gradually increase duration over several days. Never force prolonged eye contact between cats — in feline communication, a direct stare is a challenge, not a greeting.
Phase 3 — Supervised Face-to-Face Meeting
Only move to Phase 3 when both cats consistently show relaxed body language during barrier sessions — no hissing, both eating, occasional mutual sniffing through the gap. If you encounter behavioral hiccups, consult our cat behavior and training tips step by step fixes.
For the first face-to-face session:
- Choose a neutral room — not the resident cat’s favourite sleeping spot
- Have two people present — one to supervise each cat
- Open the safe room door and let both cats approach in their own time — do not carry either cat toward the other
- Keep the session to 10–15 minutes, then separate them again
- End on a positive note — if the session is going well, end it before either cat shows signs of stress; you want both cats to walk away with a neutral-to-positive experience
Expect the first few face-to-face meetings to involve some hissing and posturing — this is normal negotiation behaviour. Gradual, consistent exposure is far more effective than a single “big introduction.”
Step 5 — Months 1–3: Reaching Full Integration
Full integration — the point at which your rescue cat feels completely at home — typically takes between one and three months, according to PAWS. Some cats reach this milestone faster; shy or previously traumatised cats may take longer. Both outcomes are normal.
Signs of Successful Integration
By the end of month three, look for these indicators that your cat has fully settled:
- Sleeping in open, exposed areas — a fully relaxed cat doesn’t need to hide to feel safe
- Slow blinking at you from across the room — this is the cat equivalent of “I love you” (the feline slow blink, sometimes called a “cat kiss,” signals trust and affection)
- Grooming you or sleeping pressed against you — allogrooming (mutual grooming) is one of the strongest bonding signals in feline behaviour
- Confident, upright tail carriage when approaching you
- Playing independently — a cat that initiates solo play is a cat that feels safe enough to be playful
In multi-cat households, integration signs include mutual grooming, sleeping in close proximity (within a metre), and sharing resources (food bowls, beds) without tension.
Building a Long-Term Bond
The Fear-to-Trust Ladder doesn’t end at Rung 5 — it deepens. Beyond the three-month mark, focus on:
- Daily interactive play — 15–20 minutes of wand-toy play maintains physical health and reinforces your bond
- Enrichment — puzzle feeders, window perches, and cat trees satisfy your cat’s natural hunting and climbing instincts
- Respecting her communication — if she walks away, let her go; a cat that can always leave will always come back
- Routine veterinary care — annual wellness checks, dental care, and parasite prevention are fundamental to long-term wellbeing
On gender compatibility in multi-cat households: research from shelter populations suggests that opposite-sex pairings (one male, one female, both neutered) tend to have slightly lower rates of long-term conflict than same-sex pairings, though individual temperament is a far stronger predictor of compatibility than gender alone.
How Long Does It Take for a Rescue Cat to Adjust to a New Home?
Most rescue cats show significant behavioural improvement within 3 weeks, though full adjustment typically takes up to 3 months. Cats from stable foster backgrounds may settle in days. Cats with histories of neglect, multiple rehomings, or shelter stress may take longer. A 2023 study published by the Journal of Veterinary Behavior found that environmental enrichment and predictable routines were the strongest predictors of faster adjustment — not breed, age, or gender. Patience and consistency matter more than any single technique.
What Not to Do — Common Mistakes and Red Flags
Understanding what not to do is just as important as knowing the correct steps. Common pain points reported by new cat owners — gathered from rescue adoption communities and shelter counsellor feedback — cluster around a handful of recurring mistakes.
The Five Most Common Mistakes New Owners Make
1. Giving free run of the house on day one
This is the most common and most damaging mistake. A cat released into an entire unfamiliar house has too many variables to process and will typically find one hiding spot and refuse to leave it for days. The safe room removes this problem entirely.
2. Forcing interaction
Picking up a frightened cat, carrying her around to “show her the house,” or inviting guests over to meet her in the first week all backfire. Forced interaction doesn’t build trust — it depletes it. Let her dictate the pace.
3. Letting her outside too early
Outdoor access should not be considered until your cat has been fully settled indoors for a minimum of three to four weeks — and ideally longer. A cat that escapes before she’s bonded to your home may not know how to find her way back.
4. Punishing stress behaviours
Hissing, hiding, and swatting are communication, not defiance. Responding with a raised voice or a squirt bottle increases your cat’s stress response and damages the relationship you’re trying to build. Redirect; never punish.
5. Comparing timelines
Every rescue cat’s history is different. A cat from a loving foster home may settle in three days. A cat with a history of neglect or multiple rehomings may take three months to reach Rung 2 on the Fear-to-Trust Ladder. Both are valid.
Red Flags in Cat Body Language
Most stress signals are normal during the adjustment period. However, some signs indicate that your cat needs veterinary attention or professional behaviourist support. To understand severe reactions, read about cat aggression 10 real owner case studies.
| Signal | What It Means | Action Required |
|---|---|---|
| Flattened ears + hissing | Fear-based aggression | Give more space; reduce interaction |
| Dilated pupils constantly | Sustained high stress | Review safe room setup; add hiding spots |
| Tail tucked under body | Extreme anxiety | Reduce noise and foot traffic near safe room |
| Open-mouth panting | Pain or respiratory distress | Vet call — same day |
| Not eating for 48+ hours | Medical concern or severe stress | Vet call — within 24 hours |
| Hiding for 5+ days with no improvement | Possible illness or deep trauma | Vet check + consider behaviourist referral |
| Unprovoked aggression after 4+ weeks | Territorial or pain-related issue | Behaviourist referral |
When to Call Your Vet or a Behaviourist
Call your vet if your cat shows any of the following during the first month:
- No urination or defecation in 48 hours
- Laboured or open-mouth breathing
- Refusal to eat for more than 48 hours
- Visible injury or limping
Seek a referral to a certified animal behaviourist (look for the CCAB or CAAB credential in the US, or ABTC-accredited status in the UK) if:
- Aggression between cats persists beyond four weeks of structured introductions
- Your cat shows no improvement in anxiety after six weeks
- You notice compulsive behaviours such as excessive grooming leading to bald patches
What Are the Red Flags When Introducing Cats to Each Other?
Sustained growling, lunging, or one cat refusing to eat near the other are the clearest red flags in a cat-to-cat introduction. A single hiss or swat is normal negotiation; prolonged, escalating aggression is not. Other red flags include one cat completely blocking the other’s access to food, water, or the litter tray (resource-guarding), unprovoked stalking behaviour, and either cat showing signs of chronic stress such as hiding for days or over-grooming. If these persist beyond two weeks of structured introductions, slow the process down and consider a behaviourist referral.
Frequently Asked Questions
What is the 3-3-3 rule for introducing cats?
The 3-3-3 rule is a behavioural timeline used by rescue organisations to set realistic adjustment expectations. In the first 3 days, your cat is in survival mode — hiding, refusing food, and processing the shock of a new environment. By 3 weeks, she begins to settle into routines and show cautious curiosity. By 3 months, she typically reaches full integration — sleeping in the open, initiating contact, and behaving like a fully relaxed household member. The rule helps new owners avoid the most common mistake: expecting too much too soon.
What should you not do when introducing a new cat?
Never give a rescue cat free run of the house on day one — it creates overwhelming sensory overload. Avoid forcing interaction (picking her up, carrying her to meet family members), punishing stress behaviours like hissing or hiding, and introducing her to other pets before the scent-swap phase is complete. Letting her outside before she’s fully bonded to your home — typically less than four weeks — is also a significant risk. Each of these mistakes can reset the adjustment clock by days or weeks.
What is the 3-3-3 rule for cats when moving?
The 3-3-3 rule applies equally to cats moving to a new home as it does to newly adopted rescue cats. In the first 3 days after a move, confine your cat to a single room with her familiar belongings — her bed, litter tray, and food bowls. Over 3 weeks, gradually allow access to the rest of the house as she shows comfort signals. By 3 months, most cats have fully remapped their mental territory and feel as secure as they did in the previous home. Keep the safe room available as a retreat throughout.
Which cat gender gets along best?
Opposite-sex pairings — one neutered male and one spayed female — are generally considered the most harmonious combination in multi-cat households, according to guidance from the SPCA of British Columbia. However, individual temperament is a far stronger predictor of compatibility than gender. A confident, sociable male can conflict with a dominant female regardless of sex. The most reliable approach is to ask your rescue organisation about each cat’s history with other cats — that information is more predictive than gender alone.
How traumatic is it for a cat to change owner?
Rehoming is genuinely stressful for cats, but it is not inherently traumatic in a lasting sense — provided the transition is handled carefully. Cats are highly adaptable animals. Common pain points reported by new cat owners include the cat hiding for several days and showing reduced appetite, both of which are normal stress responses rather than signs of lasting psychological harm. Research from animal welfare organisations suggests that cats placed in stable, enriched environments with predictable routines recover fully from the stress of rehoming within weeks to months. The Fear-to-Trust Ladder is specifically designed to support this recovery.
How do you say “I love you” in cat language?
The slow blink — a long, deliberate eye-close directed at your cat — is widely recognised by animal behaviourists as the feline equivalent of “I love you.” A 2020 study published in Scientific Reports (Humphrey et al.) found that cats were significantly more likely to slow-blink back at humans who initiated the gesture, and more likely to approach humans who used it. To try it: make soft eye contact with your cat, then slowly close and open your eyes. If she slow-blinks back, that’s genuine communication. Other “I love you” signals include head-butting (bunting), kneading, and sleeping pressed against you.
What You’ve Accomplished — and What Comes Next
Every rescue cat arrives carrying her own history — you don’t always know what that history contains. What you do know is that you’ve committed to giving her something better. That matters enormously.
The Fear-to-Trust Ladder works because it replaces vague reassurance with a concrete map. At every point in the journey — day one in the safe room, the first cautious sniff of your hand, the first time she slow-blinks at you from across the room — you now know exactly which rung you’re on and what your next move is. You’re not guessing. You’re climbing.
Start with the safe room. Follow the 3-3-3 timeline. Let her dictate the pace. The cats that become the most deeply bonded companions are almost always the ones who were given the space to choose trust — rather than having it forced upon them. Your rescue cat is already on her way up the ladder. Your job is simply to make each rung feel worth climbing.

Dave King
Cat owner and writer at Mad Cat Man.