Estimated Time: 3 months
To introduce a cat to a new home, confine them to a single quiet “safe room” with food, water, a litter box, and bedding for the first 3–7 days. Then slowly expand their access to the rest of the house over 3 weeks, following the 3-3-3 rule. This 8-step process takes approximately 3 months for full adjustment.
“I am about to move into my new apartment and I was wondering what are things that I should consider when introducing my cat to a new home?”
If that sounds familiar, you’re not alone — and you’re asking exactly the right question.
For cats, a new home isn’t just a change of scenery — it’s a complete disruption of their territory, their scent map, and everything that made them feel safe. Done wrong, the transition can leave your cat anxious, hiding, or refusing to eat for weeks.
In this guide, you’ll learn the exact 8-step process — including the 3-3-3 rule and The Decompression Blueprint framework — so you can help your cat settle in quickly and stress-free. We’ll cover everything from setting up the safe room before arrival to introducing your cat to resident pets, with a dedicated section for shy, senior, or outdoor cats.
Introducing a cat to a new home successfully takes 3 months on average — following the 3-3-3 rule gives you a clear roadmap for each phase.
- Start with a safe room: Confine your cat to one quiet room for the first 3–7 days to prevent overwhelming them
- Follow The Decompression Blueprint: 3 days to hide, 3 weeks to settle, 3 months to bond — each phase has specific actions
- First night matters most: A quiet, enclosed sleeping space reduces stress-related anxiety (UC Davis)
- Multi-pet households need extra steps: Scent swapping before any face-to-face meeting prevents territorial aggression
- Shy and senior cats need more time: Modify the standard process — patience is the active ingredient
What You’ll Need Before Bringing Your Cat Home

Good preparation happens 24–48 hours before your cat arrives — not after. This is the foundation of The Decompression Blueprint, a three-phase system (3 days to hide, 3 weeks to settle, 3 months to bond) that gives you a predictable roadmap from arrival to full adjustment. Check our complete new cat supply checklist if you need a deeper breakdown.
Gather these 8 items before your cat walks through the door:
- A cat carrier (hard-sided preferred — more protective during transport)
- A designated safe room (a bedroom, bathroom, or spare room that closes fully)
- Food and water bowls (separate from any existing pets’ bowls)
- A litter box with unscented litter (scented litter can be overwhelming to a cat’s sensitive nose)
- Bedding from the previous home or shelter (familiar scent = immediate comfort)
- A synthetic feline pheromone diffuser (a plug-in device that releases calming cat scent signals — available at most pet stores)
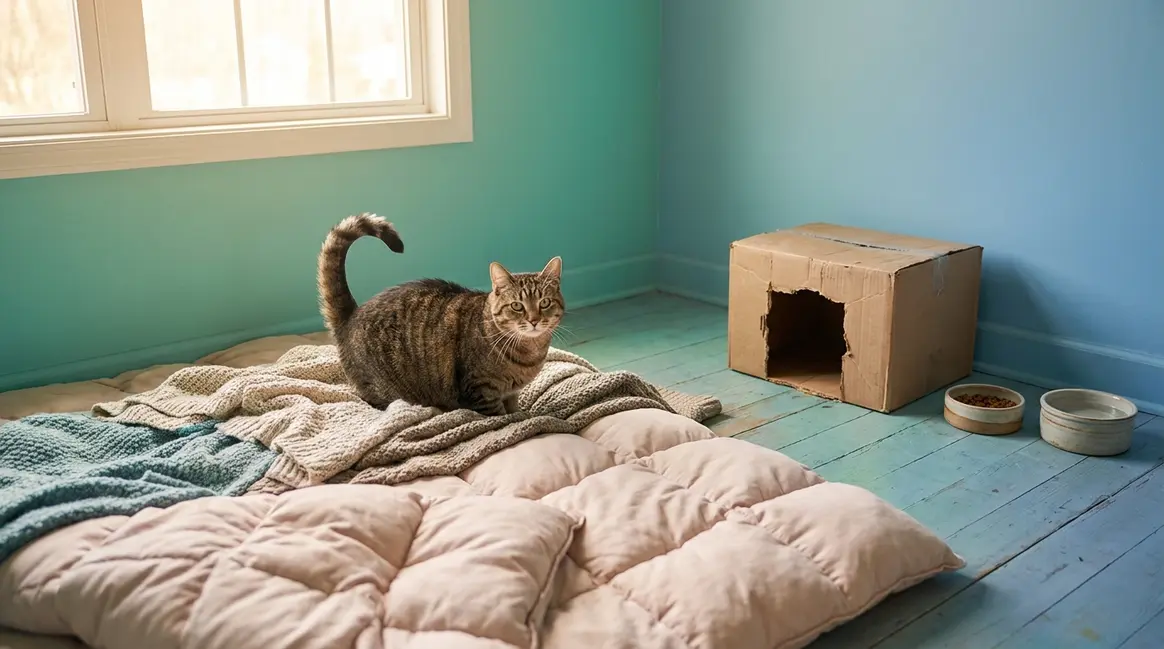
- At least 2 hiding spots (a cardboard box with a cut-out entrance or a covered cat bed works perfectly)
- Interactive toys (wand toys and puzzle feeders for bonding sessions in the coming weeks)
If you have all 8 items ready before your cat arrives, you’re already ahead of most new owners.
With your supplies ready, it’s time to prepare your home itself — and that means removing dangers before your cat walks through the door.
Step 1: Cat-Proof Your Home Before Arrival

Cat-proofing your home isn’t optional — it’s the first active step in The Decompression Blueprint. A cat exploring a new space is curious and unpredictable. Removing hazards before they arrive prevents accidents that can derail the entire adjustment process. This step covers both what to remove and what to add.
Remove Hidden Hazards Room by Room
Walk through each room at floor level — literally get on your hands and knees — to see what your cat will see. The hazards that matter most are the ones hiding in plain sight. Check essential tips for introducing a cat to a new home for a fuller reference list.
Focus on these specific dangers:
- Toxic plants: Remove lilies (Easter, Tiger, Asiatic, and Daylilies), pothos, aloe vera, peace lily, and dracaena. Lilies are immediately life-threatening — even small amounts cause acute kidney failure in cats (ASPCA Animal Poison Control Center). The ASPCA lists over 400 plants toxic to cats; when in doubt, remove it.
- Unsecured cords and cables: Cats chew these, creating a real electrical shock risk. Use cord covers or tuck cables behind furniture.
- Open appliances: Washing machines, dryers, and dishwashers attract cats seeking warm, enclosed spaces. Always check before closing the door.
- Small swallowable objects: Rubber bands, hair ties, and twist ties look like prey. A hair tie looks like prey to a curious cat — and can cause a dangerous intestinal blockage if swallowed.
Set Up Safe Zones and Escape Routes
Hazard removal is only half the job. Cats feel safer when they can observe from height, so clear a shelf or place a cat tree near a window in any room your cat will eventually access. Escape routes are just as important as hiding spots — ensure your cat can always retreat without being cornered.
Think of it this way: a cornered cat is a frightened cat. A cat with a clear exit route is a confident one.
Your home should now be hazard-free with at least one elevated spot and one clear escape route in every room. Now that your home is ready, it’s time to build the most important space of all — the safe room.
Step 2: Set Up the Perfect Safe Room
The safe room is the cornerstone of how to introduce a cat to a new home successfully. According to Ohio State University’s Indoor Pet Initiative, cats confined to a safe room show lower stress markers than cats given full home access immediately. One quiet room lets your cat decompress at their own pace without being overwhelmed by unfamiliar smells, sounds, and sights all at once.

Choosing the Right Room
Pick a room that meets these three criteria: it has a door that closes fully, it’s away from the main household traffic (not the living room or kitchen), and it has a window for natural light and visual stimulation. A spare bedroom or a quiet bathroom works well. Avoid garages or laundry rooms — temperature swings and loud appliances add unnecessary stress.
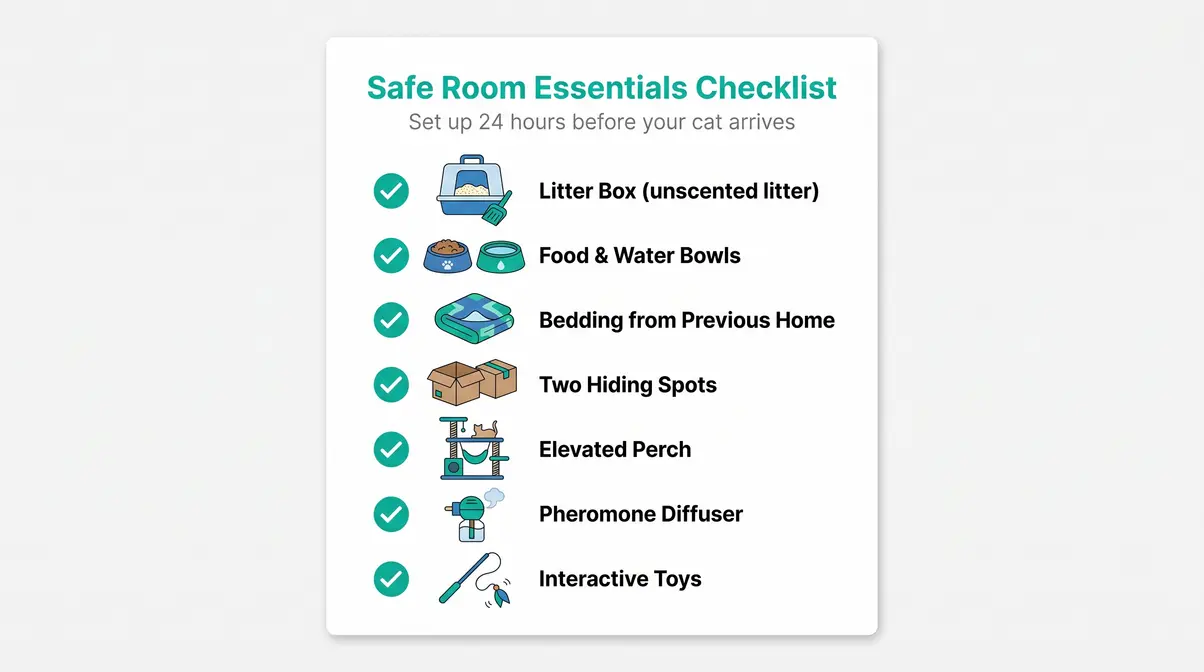
The Safe Room Essentials Checklist
Set up the room in this specific layout for best results:
- Litter box: Place it in the far corner, away from the food and water bowls. Cats instinctively avoid eating near their toilet area.
- Food and water bowls: Position them on the opposite side of the room from the litter box.
- Bedding with familiar scent: Place the bedding from the shelter or previous home in the hiding spot — this is the single most effective comfort tool you have.
- Two hiding spots at floor level: A cardboard box with a cut-out hole, or a covered cat bed. Hiding is not a sign of unhappiness — it’s healthy decompression behavior.
- One elevated perch: A shelf, cat tree, or even a cleared dresser top. Height = security for cats.
- Pheromone diffuser: Plug it in 24 hours before your cat arrives so the room is already calming when they enter.
- Toys: Leave 1–2 toys in the room, but don’t force play on day one.
Creating Comfort and Hiding Spots
Hiding is not a problem to solve — it’s a process to respect. Animal welfare organizations consistently report that cats who are given adequate hiding spots during the first 3–7 days show faster overall adjustment than cats who are prevented from hiding. Resist the urge to pull your cat out from behind the sofa. Let them emerge on their own timeline. The safe room makes this easy because everything they need is within a small, manageable space.
Step 3: Transport Your Cat Safely on Moving Day

The journey itself is a significant stressor. Keep transport time as short as possible and the carrier environment as calm as you can make it.
Before You Leave: Carrier Preparation
Place the carrier in your home 3–5 days before moving day with the door open and familiar bedding inside. This makes the carrier a known, safe space rather than a sudden threat. On moving day, spray the inside of the carrier with a synthetic feline pheromone spray (the same type as the diffuser) 15–30 minutes before placing your cat inside.
During the Journey: Keeping Stress Low
Cover the carrier with a light blanket to reduce visual stimulation. Keep the car at a comfortable temperature — cats are sensitive to heat. Speak in a calm, low voice if your cat vocalizes; avoid opening the carrier while the car is moving. According to VCA Animal Hospitals, keeping the carrier covered and minimizing noise during transport significantly reduces cortisol (the primary stress hormone) levels in cats during relocation.
When you arrive, carry the carrier directly to the safe room and open the door. Let your cat walk out on their own. Don’t tip the carrier or reach in — give them 5–10 minutes of quiet.
Step 4: The Critical First Night

The first night sets the emotional tone for the entire adjustment. This is the most anxiety-producing moment for new owners — and the most important to get right.
Where Should Your Cat Sleep?

Your cat should sleep in the safe room on the first night. Keep the door closed. This is not cruel — it’s protective. A cat loose in an unfamiliar house overnight can hide in inaccessible spaces, knock over hazards, or become severely stressed by sounds and smells they haven’t yet mapped. Research from UC Davis indicates that enclosed sleeping environments on the first night reduce stress-related anxiety responses in newly relocated cats.
Do not bring your cat into your bedroom on night one, even if they cry. The safe room is their basecamp — and consistency here builds the trust that makes the whole process work.
What to Expect and How to Respond
Most cats will hide for the first 12–24 hours. Some will not eat on the first night — this is normal for up to 24–48 hours. You may hear vocalization (meowing or crying), especially at night. Here is how to respond to each:
- Hiding: Leave them alone. Check the room every few hours to ensure water and food haven’t been touched, but don’t force interaction.
- Not eating: Offer a small amount of their usual food. If they haven’t eaten in 48 hours, contact your vet.
- Vocalization: Sit quietly near the door and speak softly. Don’t open the door repeatedly — it increases anxiety, not comfort.
Common concerns reported by new cat owners include guilt about leaving the cat alone in one room. Remember: this confinement is temporary and deliberate. It is the kindest thing you can do.
Step 5: Days 2–3 – The Decompression Phase
The Decompression Blueprint Phase 1 officially begins on day two. The 3-3-3 rule — developed and promoted by the Animal Humane Society — describes three adjustment phases: 3 days to decompress, 3 weeks to learn the routine, and 3 months to feel truly at home.

What “Decompressing” Actually Looks Like
During days 1–3, your cat is not broken — they are processing. Expect to see: hiding behind or under furniture, dilated pupils, flattened ears when approached, reduced appetite, and little interest in play. These are all normal stress responses, not personality traits. How traumatic is moving for a cat? Animal welfare researchers describe it as a moderate-to-high stressor — comparable, in feline terms, to a significant environmental disruption. Most cats begin showing curiosity behaviors (sniffing, slow blinking, brief exploration) by day 3.
What NOT to Do During Decompression
These mistakes are the most common — and the most damaging:
- Do not force interaction. Pulling a hiding cat out from their spot increases cortisol and breaks trust.
- Do not introduce other pets yet. Even through a door. Wait until your cat is eating normally and moving around the safe room with confidence.
- Do not rearrange the safe room. Consistency of scent and layout is a stabilizing anchor during this phase.
- Do not use punishment. Hissing, swatting, or accidents outside the litter box during this phase are stress responses, not behavioral problems.
Step 6: Weeks 1–3 – Building Routine
Once your cat is eating consistently, using the litter box reliably, and approaching you when you enter the safe room, they are ready for Phase 2 of The Decompression Blueprint. According to PAWS, most cats reach this milestone between days 3 and 7.
Establishing a Feeding and Play Routine
Routine is the most powerful anxiety-reduction tool available to you. Feed your cat at the same times each day — twice daily is the standard recommendation from the American Veterinary Medical Association (AVMA). Introduce 10–15 minutes of interactive play (using a wand toy) once or twice a day. Play builds confidence and redirects stress energy into positive behavior. Keep sessions short and end them while your cat is still engaged — always let them “win” by catching the toy.
Gradual Room Expansion
Do not open the entire house at once. Open one additional room every 2–3 days. Let your cat explore the new room while the safe room remains accessible as their retreat. Watch for: sniffing the new room’s doorframe before entering (green flag), slow deliberate movement through the new space (green flag), or sprinting back to the safe room after a few minutes (normal — they’re self-regulating). By week 3, most cats have comfortably mapped 2–3 rooms and are ready for broader access.
Step 7: Months 2–3 – Full Home Access and Bonding
Phase 3 of The Decompression Blueprint is the longest — and the most rewarding. By month 2, most cats have full home access and are beginning to show their true personality.
Signs Your Cat Has Settled In
How long does it take a cat to get used to a new house? The Animal Humane Society notes that most cats feel fully at home within 2–3 months, with some shy or senior cats taking up to 6 months. Watch for these behavioral checkpoints that confirm your cat has settled:
- Grooming in open spaces (not just hidden areas) — a confident cat grooms where they feel safe
- Slow blinking at you — a direct signal of trust and comfort
- Bringing you “gifts” (toys, socks) — a bonding behavior that indicates attachment
- Sleeping in exposed spots rather than always hiding
- Kneading and purring during petting sessions
Encouraging Exploration and Play
Continue daily interactive play sessions through month 3. Add puzzle feeders (food-dispensing toys that require problem-solving) to stimulate your cat mentally. Rotate toys weekly to maintain novelty. If your cat hasn’t initiated contact with you by week 6, try the “slow blink” technique: make eye contact, blink slowly, and look away. Most cats respond by slow-blinking back — a non-verbal invitation to approach on their terms.
Step 8: Introducing Your Cat to Other Pets
Multi-pet introductions require their own structured process. Rushing this step is the single most common cause of long-term inter-pet conflict. The ASPCA’s pet introduction guidelines recommend a minimum of 7–10 days of separation before any face-to-face contact.
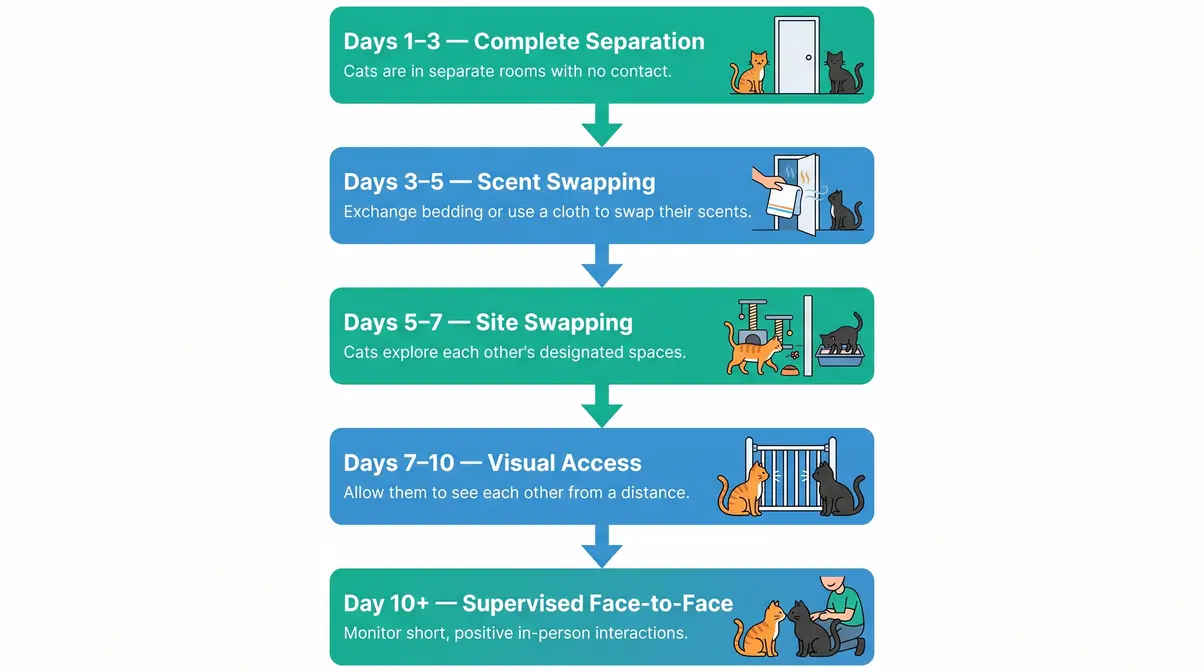
Cat-to-Cat Introduction: Scent Swapping
Scent swapping (the process of exchanging bedding between cats so they can smell each other before meeting) is the foundation of any cat-to-cat introduction. Start on day 3–5 of the new cat’s arrival:
- Take a small towel or piece of bedding from the new cat’s safe room.
- Place it near the resident cat’s food bowl — associating the new scent with something positive.
- Repeat in reverse: place the resident cat’s bedding near the new cat’s food bowl.
- Do this for 3–5 days before moving to the next phase.
You might also wonder if cats can share a litter box during this period—it is highly recommended to keep their resources completely separate initially.
Site Swapping and Visual Access
After 3–5 days of scent swapping, swap the cats’ physical spaces temporarily. Let the new cat explore the main home while the resident cat spends time in the safe room. This continues scent exchange without direct confrontation. After another 2–3 days, introduce visual access through a cracked door, baby gate, or glass door panel. Watch for: relaxed body posture and curiosity (green flags) versus hissing, growling, or puffed tails (slow down — return to scent swapping for another 3 days).
Step-by-Step Dog Introduction Protocol
Dog introductions require even more structure, because a dog’s natural investigative behavior (bounding forward, nose-first) reads as an attack to most cats.
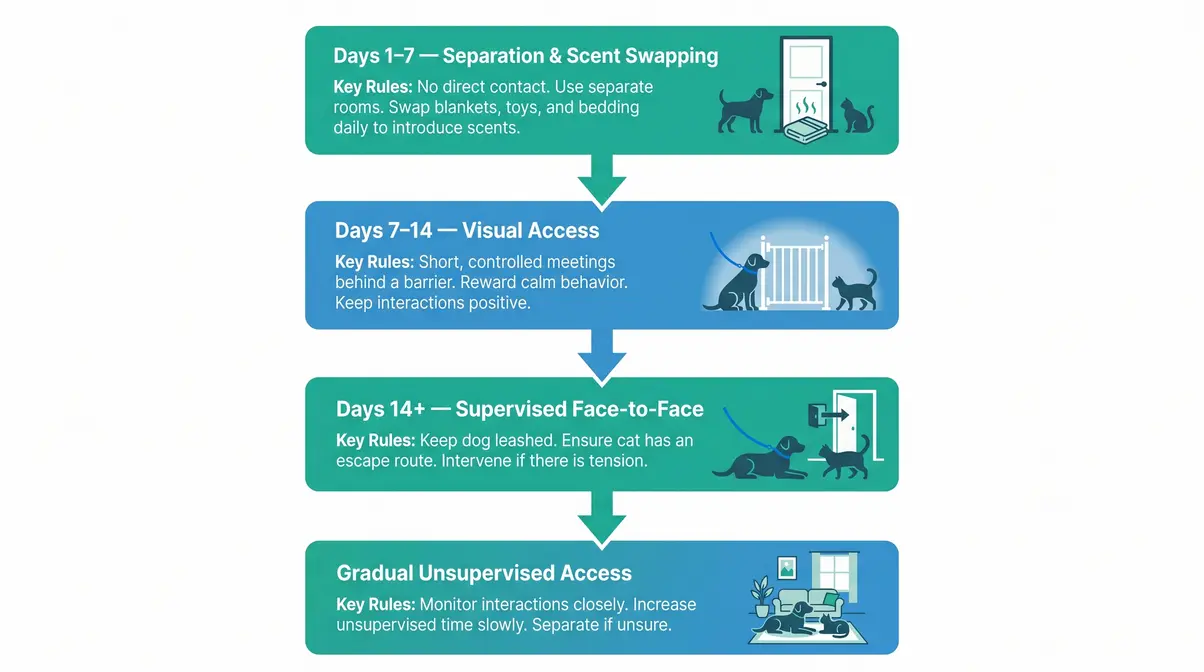
Follow these steps in order:
- Days 1–7: Complete separation. Scent swap using bedding, as described above.
- Days 7–14: Visual access only. Keep the dog on a leash and behind a baby gate. Allow the cat to approach if curious — never force proximity. Reward the dog for calm behavior (lying down, looking away).
- Day 14+: Supervised face-to-face sessions, with the dog leashed and in a “sit” or “down” position. The cat must always have a clear escape route — an elevated perch or an open door to another room.
- Never leave them unsupervised until both animals are consistently relaxed in each other’s presence across multiple sessions.
If you encounter persistent prey drive issues, consult our guide on how to stop a dog from chasing a cat for advanced intervention strategies.
Body Language: Green and Red Flags
| Green Flags (Proceed) | Red Flags (Slow Down) |
|---|---|
| Slow blinking, relaxed ears | Hissing, growling, spitting |
| Tail held upright or neutral | Puffed tail, arched back |
| Curious sniffing at distance | Flattened ears, dilated pupils |
| Grooming after interaction | Swatting with claws out |
| Eating normally near the other animal | Refusing food after interactions |
Special Considerations for Cats

Not every cat follows the standard 3-3-3 timeline. The Decompression Blueprint applies to all cats — but the pacing changes based on your cat’s individual history and temperament.
Introducing a Shy Cat to a New Home
A shy cat may not emerge from hiding for 5–10 days, or longer. This is not a failure of your process — it’s a difference in individual temperament. Extend Phase 1 to 7–14 days before attempting room expansion. Sit on the floor near (not at) their hiding spot and read aloud or work on your laptop — your calm, non-threatening presence builds association. Use food as a bridge: place high-value treats (small pieces of cooked chicken or tuna) just outside the hiding spot entrance and gradually move them closer to you over several sessions. Community consensus from r/CatAdvice consistently reports that patience, not intervention, is the most effective tool for shy cats.
For specialized advice on shelter animals with unknown backgrounds, review our complete guide on how to introduce a rescue cat to a new home.
Helping a Senior Cat Adjust
Senior cats (aged 10+) often have established territorial routines that make change more disorienting. Maddiesfund.org notes that older cats may show increased vocalization, appetite changes, or litter box avoidance during transitions — behaviors that can mimic illness. If your senior cat stops eating for more than 24 hours or shows signs of disorientation, contact your vet promptly. Extend every phase of The Decompression Blueprint by 50%: if the standard timeline says 3 days, give your senior cat 4–5 days. Maintain their exact feeding schedule, litter box brand, and bedding from the previous home — consistency is stability for an older cat.
Transitioning Outdoor Cats Indoors
Outdoor cats transitioning to full indoor living face an additional adjustment: the loss of territory, stimulation, and hunting behavior. According to Maddie’s Fund, environmental enrichment — window perches, puzzle feeders, and interactive play — is essential for preventing boredom-driven stress behaviors like overgrooming or furniture scratching. Start with a secure outdoor enclosure or “catio” if possible, allowing scent continuity with the outside world. Increase indoor enrichment gradually over 4–6 weeks before removing outdoor access entirely.
Common Mistakes to Avoid (and How to Fix Them)
Every cat is different — observe your pet’s specific behavior and consult your vet if you have concerns. That said, most introduction problems trace back to the same predictable errors.
The 5 Most Common Introduction Mistakes
1. Giving free roam of the house on day one.
This is overwhelming for cats. Fix: return to the safe room immediately and restart Phase 1.
2. Forcing interaction when the cat is hiding.
This breaks trust and prolongs the adjustment timeline. Fix: sit nearby, speak softly, and let the cat initiate contact.
3. Introducing resident pets too early.
“Too early” means before the new cat is eating consistently and moving around the safe room confidently. Fix: restart scent swapping and add 3–5 more days of separation.
4. Inconsistent feeding times.
Routine is a primary anxiety-reduction mechanism. Fix: feed at the same two times daily, every day, without exception.
5. Changing the safe room setup mid-adjustment.
Cats navigate by scent. Moving furniture or changing the litter box location mid-process removes their scent anchors. Fix: keep the safe room identical until Phase 2 begins.
When to Call Your Vet
Contact your veterinarian if you observe any of the following:
- No food or water intake for more than 48 hours — cats can develop hepatic lipidosis (fatty liver disease) from prolonged anorexia
- Labored breathing, open-mouth panting, or lethargy — these are not stress responses; they are medical symptoms
- Blood in urine or stool, or straining in the litter box
- Severe, persistent vocalization that doesn’t decrease after 72 hours
- Signs of injury from an altercation with a resident pet
Frequently Asked Questions
What is the 3-3-3 rule for cats when moving?
The 3-3-3 rule for cats is an adjustment framework promoted by the Animal Humane Society describing three phases of transition: 3 days to decompress (hiding, low appetite, high stress), 3 weeks to learn the routine (emerging, exploring, building confidence), and 3 months to feel truly at home (showing true personality, initiating bonding). Each phase has specific behavioral checkpoints. The rule gives owners a realistic, phase-by-phase timeline rather than vague reassurances — making it the backbone of The Decompression Blueprint.
How long does it usually take a cat to get used to a new house?
Most cats adjust to a new house within 2–3 months, according to the Animal Humane Society’s 3-3-3 framework. However, shy cats may take 4–6 months, and senior cats often need extended timelines. The first 3–7 days are the most critical — consistent safe room confinement during this window significantly reduces the total adjustment time. Behavioral checkpoints like grooming in open spaces and slow blinking indicate a cat has genuinely settled in, not just stopped hiding.
What not to do when introducing cats?
Never rush face-to-face contact between cats before completing scent swapping and site swapping phases. Additional key prohibitions: don’t force a hiding cat out of their safe spot, don’t skip the safe room phase, don’t introduce cats in a shared feeding space (competition triggers aggression), and don’t punish hissing or swatting — these are normal stress communications. According to PAWS, premature introductions are the leading cause of long-term inter-cat conflict in multi-cat households.
How traumatic is it for a cat to change homes?
Changing homes is a moderate-to-high stressor for cats, primarily because cats are territorial animals who rely on familiar scent maps for security. However, the level of trauma depends almost entirely on the introduction process. Cats introduced using the safe room method and 3-3-3 framework consistently show faster recovery than cats given immediate full-home access, according to Ohio State University’s Indoor Pet Initiative. Most cats show no lasting behavioral effects after a structured transition.
Where should a cat sleep on its first night in a new home?
Your cat should sleep in the safe room on the first night, with the door closed. This is the single most protective decision you can make. A cat loose in an unfamiliar house overnight can access hidden hazards, become severely stressed by unfamiliar sounds, or hide in inaccessible spaces. Research from UC Davis indicates that enclosed sleeping environments reduce stress-related anxiety responses in newly relocated cats. Keep the safe room setup consistent — familiar bedding, pheromone diffuser running, and access to water — and resist opening the door if your cat vocalizes during the night.
Bringing It All Together
For first-time adopters and owners moving house, knowing how to introduce a cat to a new home is the difference between a stressed, hiding animal and a confident, bonded companion. The research is consistent: cats introduced with a structured safe room protocol and the 3-3-3 adjustment timeline adjust faster and show fewer long-term stress behaviors than those given immediate free roam (Ohio State University Indoor Pet Initiative; Animal Humane Society).
The Decompression Blueprint works because it matches your actions to your cat’s actual neurological needs — not to your emotional desire to bond quickly. Three days of decompression, three weeks of routine-building, three months of bonding: each phase has a clear purpose, and each phase prepares the next.
Start today by setting up the safe room before your cat arrives. Gather your 8 supplies, plug in the pheromone diffuser 24 hours early, and place familiar bedding in the hiding spot. Then follow the steps in sequence — resist the urge to skip ahead. If you have a shy cat, a senior cat, or resident pets, use the specific protocols in Steps 8 and the Special Considerations section. And if you’re ever unsure, your vet is always the right first call.
*Every cat is different — observe your pet’s specific behavior and consult your vet if you have any concerns.
Dave King
Cat owner and writer at Mad Cat Man.