You already scoop the litter box. But then what? If you’ve been tying the bag, tossing it in the kitchen trash, and quietly wondering is this actually right? — you’re not alone. Knowing how to dispose of cat litter safely is one of those things nobody really teaches you, and the conflicting advice online makes it worse.
Quick Answer: Scoop used litter into a sealed bag, tie it off, and place it in your outdoor trash bin. Never flush cat litter — even brands labeled “flushable” — and never compost cat waste in a standard backyard composter. That’s the safest routine for most households.
This guide walks you through every step, covers what to do in apartments and rural homes, and explains exactly why flushing and composting are off the table. Local waste regulations vary, so check your municipality’s guidelines alongside this advice.
The Scoop-Seal-Secure Protocol is the safest daily method for how to dispose of cat litter: scoop the waste, seal it in a bag, and secure it in your outdoor bin before trash day.
- Never flush: Even “flushable” litter can carry Toxoplasma gondii into waterways that treatment plants can’t fully neutralize.
- Never backyard compost: Standard composters don’t reach the 165°F needed to kill pathogens in cat feces.
- Eco-friendly options exist: Compostable bags, paper bags, and Bokashi composting are all safer alternatives to single-use plastic.
What You’ll Need Before You Start
Good disposal starts with the right tools. Having these ready means you’re not improvising at 7 a.m. with a used grocery bag and crossed fingers.
Your basic kit:
- A slotted litter scoop — wide slots let clean litter fall through while clumps stay behind
- Waste bags — standard plastic bags, biodegradable bags, or compostable bags (more on this below)
- A small lidded bin or Litter Genie — for temporary indoor storage between daily scoops and trash day
- Baking soda or a litter deodorizer — helps neutralize ammonia odors between scoops
- Gloves — optional but recommended, especially if you’re pregnant or immunocompromised
- A dedicated outdoor trash can — your final destination for sealed litter bags
You don’t need anything fancy. Most cat owners already have most of this. The goal is a repeatable system, not a complicated one.
Step 1: Scoop the Litter Box at Least Once a Day
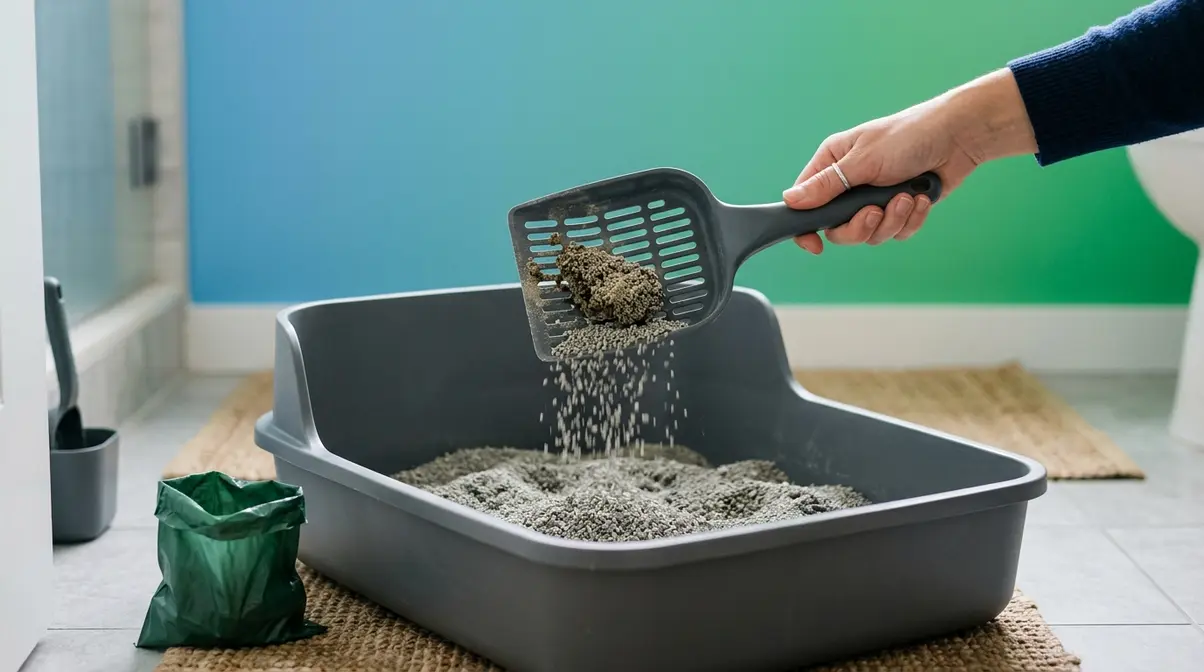
The first action in the Scoop-Seal-Secure Protocol is scooping — and doing it daily is the single biggest factor in keeping your home odor-free and your cat happy.
How Often Should You Scoop?
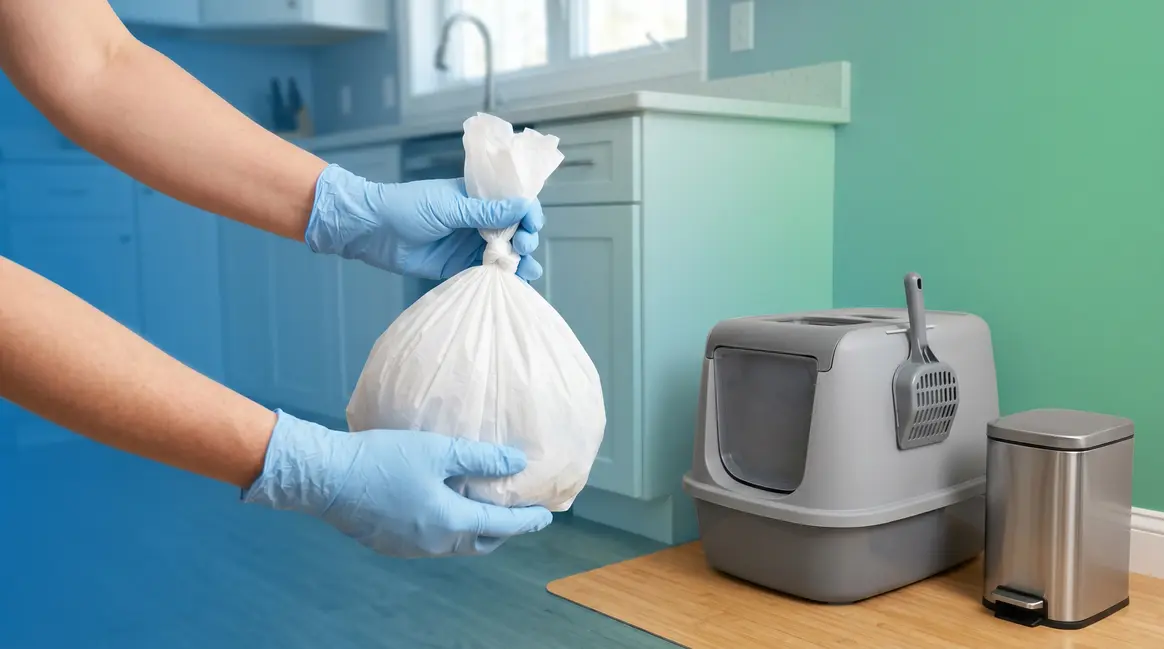
!(https://pub-8ce7ac24839649d585b239b4a6127843.r2.dev/images/how-to-dispose-of-cat-litter__2840__en/cat-litter-never-flush-compost.webp)
Two hard stops in cat litter disposal: never flush (Toxoplasma gondii risk) and never backyard compost (pathogens survive below 165°F).
Scoop at least once every 24 hours. Most cats will start avoiding a box that hasn’t been cleaned within a day, which leads to accidents outside the box — a much bigger problem than a little extra scooping.
For multi-cat households, scoop twice daily. The general rule from veterinary professionals is one litter box per cat, plus one extra, and each box needs daily attention. The AVMA’s pet care guidelines consistently reinforce that cleanliness directly affects feline urinary health — a dirty box is one of the most common reasons cats develop stress-related elimination problems.
Cat owners in online communities echo this consistently. Across litter box forums and subreddits, the near-universal consensus is: once a day minimum, twice if you have the time or more than one cat.
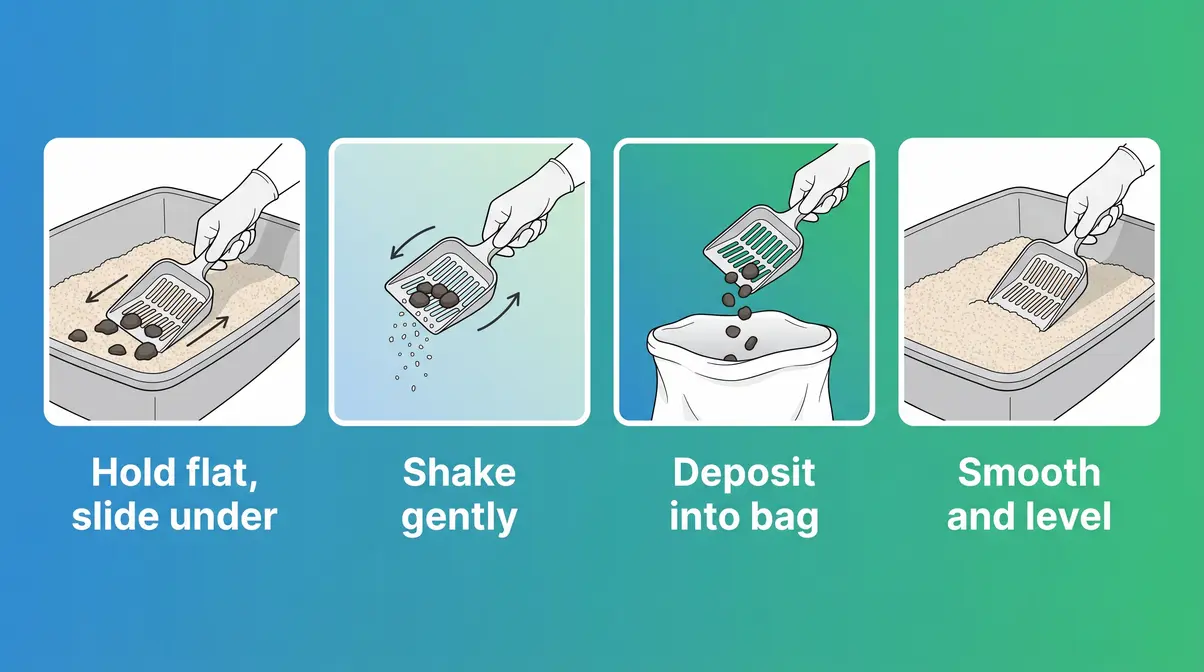
The Right Scooping Technique
Scooping correctly keeps more clean litter in the box and less waste in your bag — which saves money and reduces volume.
- Hold the scoop flat and slide it along the bottom of the box, under the clumps.
- Shake gently from side to side. Clean litter falls through the slots; clumps and solids stay in the scoop.
- Deposit waste directly into your waiting bag or waste receptacle. Don’t shake the scoop over the box — that breaks up clumps and spreads fine dust.
- Smooth the remaining litter with the back of the scoop. This redistributes clean litter and gives your cat a fresh surface.
- Add a small amount of fresh litter if the box is looking thin — about a quarter inch is enough to maintain the 2–3 inch depth cats prefer.
Step 2: Bag the Waste Safely to Lock In Odor
Sealing the waste is the second action in the protocol. A properly sealed bag is what stands between your kitchen and that unmistakable “stink puff” when you open the trash.
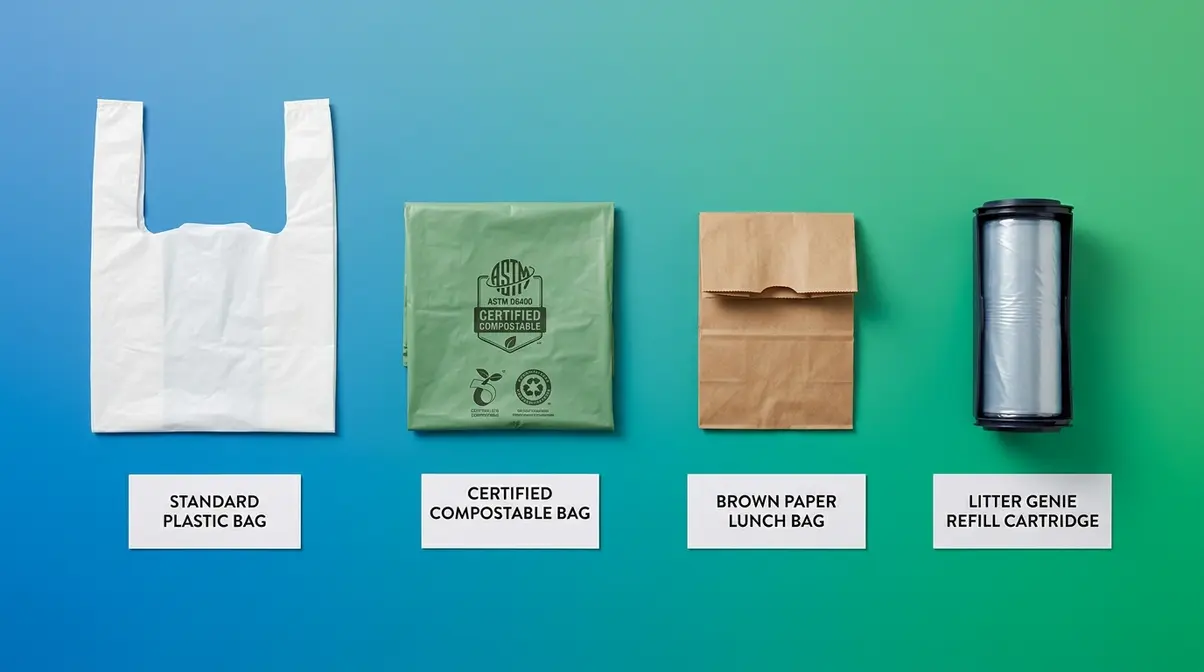
Choosing the Right Bag (Including Plastic-Free Options)
You have more choices here than most guides admit.
Standard plastic bags work fine but add to landfill volume. If you use them, repurposing grocery bags is better than buying new ones — but they’re thin and can puncture.
Biodegradable bags are worth examining closely. The FTC’s Green Guides (ftc.gov/green-guides) warn that “biodegradable” claims on packaging are often misleading — most bags marketed this way won’t break down in a sealed landfill because there’s no oxygen or sunlight to drive decomposition. Read labels carefully.
Compostable bags (certified ASTM D6400 or EN 13432) are a better choice if your local facility accepts them. They break down in industrial composting conditions — but remember, the bag can be composted separately from the litter waste inside it (more on that in the eco section below).
Paper bags — like small paper lunch bags — work well for daily scoops in low-odor situations. Double-bag if you’re transporting waste any distance.
No bag at all is possible with a dedicated outdoor bin: scoop directly into a sealed outdoor container lined with a compostable bin liner, then empty it on trash day.
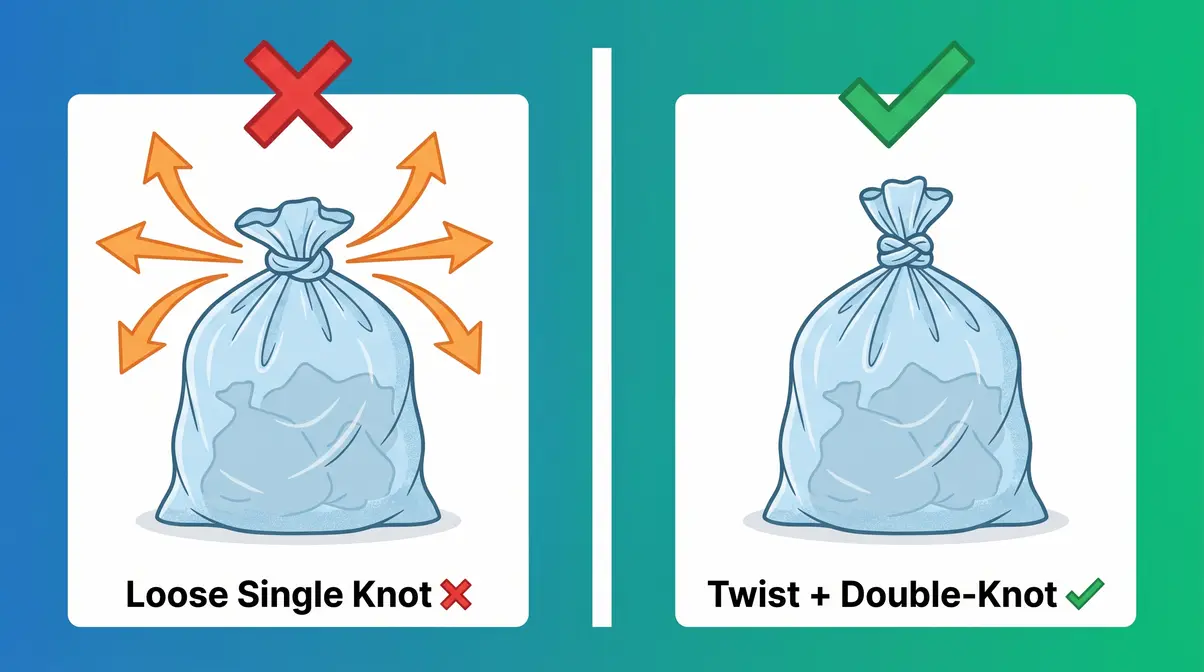
How to Seal the Bag to Prevent Odor Escape
A loose knot is not enough. Here’s how to seal properly:
- Squeeze out the air before tying — air carries odor molecules out every time you open the trash.
- Double-knot the bag. One knot loosens; two knots hold.
- Twist the neck of the bag first, then knot. This compresses the contents and prevents the knot from slipping.
- For daily small scoops, a Litter Genie (a diaper-pail-style waste system for cat litter) uses a continuous plastic film that you cut and seal, keeping odors locked in until the unit is full. It’s a genuinely useful tool if you scoop daily and don’t want to make a trip to the outdoor bin each time.
Step 3: Store the Bag Until Trash Day
Scoop it, seal it — now secure it. The third action in the Scoop-Seal-Secure Protocol is getting the sealed bag out of your living space and into an appropriate holding spot.
Temporary Indoor Storage Without Odor
If you can get to your outdoor bin daily, do it. That’s the simplest solution. But in apartments or during bad weather, you’ll need a short-term indoor strategy.
Best options for temporary indoor storage:
- A Litter Genie or similar waste pail — keeps multiple days’ worth of sealed waste in one contained unit with minimal odor
- A lidded step trash can dedicated solely to litter waste — keep it near the litter box, not in the kitchen
- A small sealed bin on the balcony — even in apartments, a covered outdoor container on a balcony dramatically reduces indoor odor
- A sealed bag inside a second bag — if you have nothing else, double-bagging and placing in a lidded trash can buys you 24–48 hours without noticeable smell
Avoid storing sealed litter bags in closets or under sinks. Even well-sealed bags can off-gas ammonia over time, and confined spaces concentrate the smell.
Checkpoint: Your Disposal Routine Is Working If…
Use this quick self-check to confirm your system is on track:
- ✅ Your home doesn’t smell like cat waste between scoops
- ✅ Your cat is consistently using the litter box (not going elsewhere)
- ✅ You’re not finding dried clumps stuck to the box walls from days ago
- ✅ Your outdoor bin lid closes fully — no overflow
- ✅ You’re not dreading scoop time (a good system feels automatic, not burdensome)
If any of these are off, the troubleshooting section below covers the most common fixes.
Step 4: Do a Full Box Change Every 1–4 Weeks
Daily scooping extends the life of your litter, but it doesn’t replace it. Over time, urine breaks down into ammonia even in non-clumping sections, and fine soiled particles accumulate at the bottom of the box. A full change is necessary.
How to Know When to Change All the Litter
For clumping litters: Change completely every 2–4 weeks, even with daily scooping. When the remaining litter starts to look gray, feel powdery, or smell despite being “clean,” it’s past its useful life.
For non-clumping litters: Change every 1–2 weeks. Non-clumping litter absorbs liquid without forming removable clumps, so the entire bed becomes saturated faster.
For crystal/silica litters: Change every 3–4 weeks for a single cat. The crystals change color (usually from white to yellow) as they saturate — that’s your visual cue.
If you’ve recently adopted a new cat or have a multi-cat household, you’ll hit these thresholds faster. Don’t wait for the smell to tell you — by then, you’ve already waited too long.
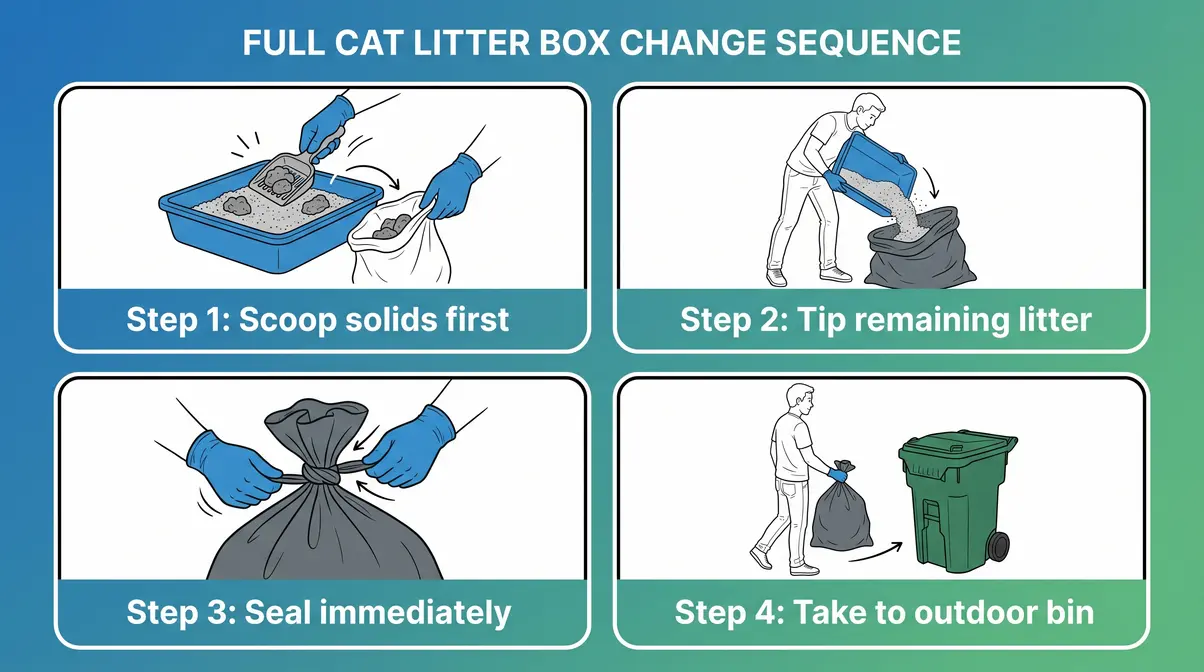
How to Safely Bag and Remove a Full Litter Change
Getting rid of a lot of dirty cat litter at once requires a slightly different approach than daily scooping.
- Use a heavy-duty trash bag — standard kitchen bags can tear under the weight of a full box of wet litter. 13-gallon contractor bags or doubled grocery bags work well.
- Scoop out solids first, then tip the remaining litter into the bag. This makes the bag easier to handle and reduces dust.
- Don’t overfill — a 20-pound box of used clumping litter is genuinely heavy. Split into two bags if needed.
- Seal immediately (twist + double-knot) and take directly to the outdoor bin. Don’t set a heavy, sealed bag of old litter down inside your home for “later.”
- Rinse the empty box before refilling (Step 5 covers this in detail).
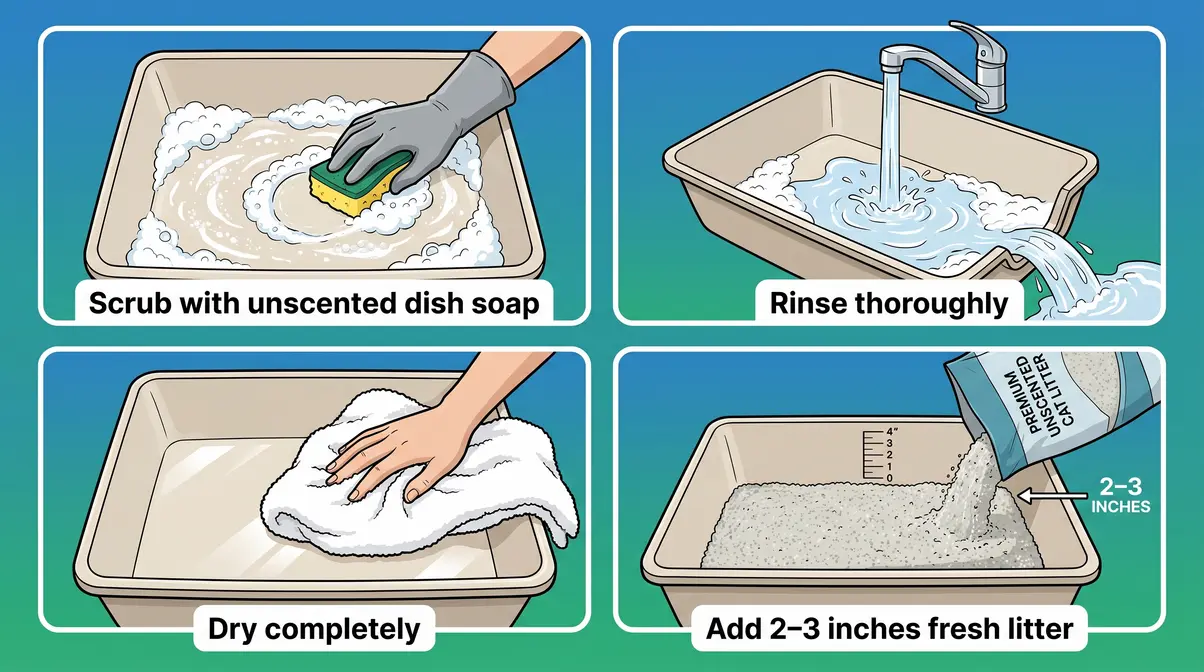
Step 5: Deep Clean the Litter Box After Each Full Change
A clean box isn’t just about smell — residue left on the walls and floor of the box harbors bacteria and can deter even well-trained cats from using it. This step closes the loop on your disposal routine.
Safe Cleaning Products for the Litter Box
What to use:
- Warm water and unscented dish soap — the safest, most effective option for routine cleaning
- A diluted white vinegar solution (1:1 with water) — neutralizes ammonia odors without harsh chemicals
- Baking soda paste — for stubborn stains or residue on the box walls
What to avoid:
- Bleach or ammonia-based cleaners — ammonia smells like cat urine to your cat, which can discourage use. Bleach is harsh on plastic and can leave residue.
- Strongly scented cleaners — cats have a sense of smell roughly 14 times stronger than humans. A citrus-scented cleaner may smell pleasant to you and repellent to your cat.
- Abrasive scrubbers — they scratch the plastic surface, creating grooves where bacteria accumulate.
Respiratory note: Fine litter dust — particularly from clay and silica litters — can irritate the sinuses and airways. Evidence from occupational health research suggests repeated exposure to clay dust may contribute to respiratory irritation over time. Clean the box in a ventilated area, and consider a dust mask if you’re sensitive. If you experience persistent sinus problems after litter box cleaning, consult your doctor.
Drying and Refilling the Box
- Rinse thoroughly to remove all soap or vinegar residue.
- Dry completely before adding fresh litter. A damp box causes litter to clump immediately at the bottom, reducing its effective life.
- Add 2–3 inches of fresh litter — enough for your cat to dig and cover, but not so deep that clumps sink to the bottom unreachably.
- Sprinkle a thin layer of baking soda under the fresh litter to absorb future ammonia odors from the base up.
Two Things You Should Never Do
These aren’t minor cautions. They’re hard stops — backed by health authorities and environmental agencies.
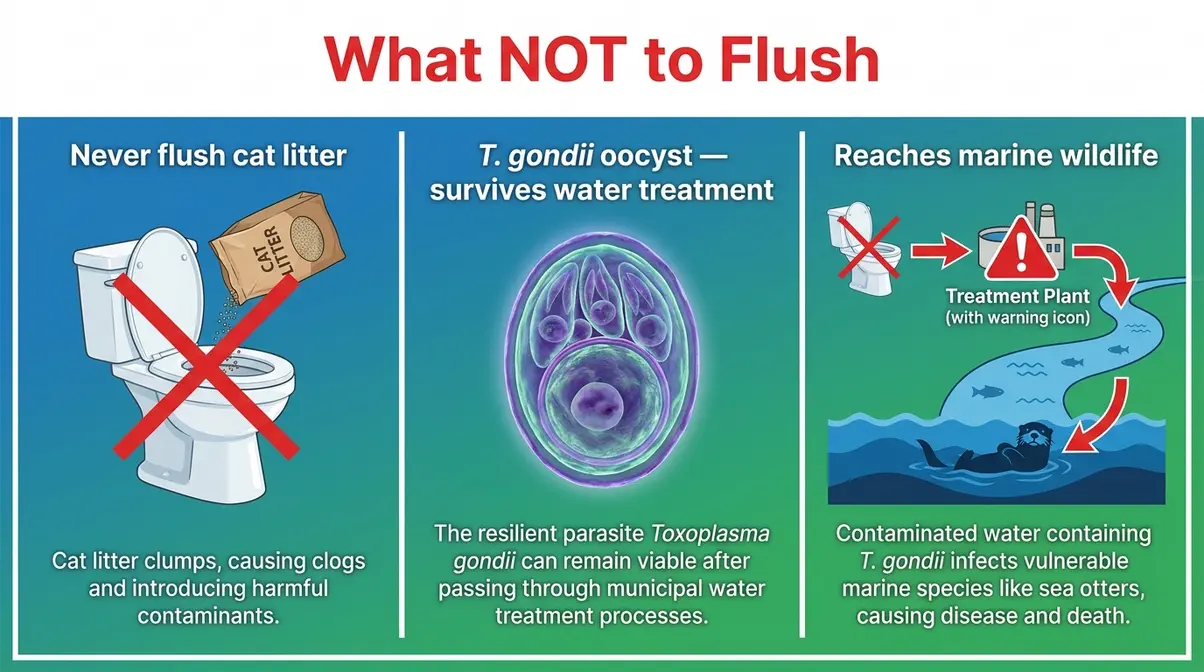
Never Flush Cat Litter — Even If the Label Says “Flushable”
This is the most common mistake cat owners make, and the label is partly to blame.
Some litters are marketed as “flushable,” implying they’re safe to send down the toilet. They’re not — at least not safely. Here’s why.
The plumbing problem: Cat litter — even so-called flushable varieties — is designed to absorb liquid and clump. In pipes, it does exactly that. It absorbs water, swells, and accumulates. Over time, this contributes to serious pipe blockages, particularly in older plumbing systems.
The pathogen problem: Cat feces can contain Toxoplasma gondii (a microscopic parasite found in cat feces that can cause toxoplasmosis). The CDC explicitly warns that municipal water treatment systems are not consistently effective at removing T. gondii oocysts (the infectious stage of the parasite). When infected litter is flushed, these oocysts can pass through treatment and enter waterways — where they pose documented risks to marine mammals, particularly sea otters along the U.S. Pacific Coast.
Toxoplasma gondii is also a serious concern for humans. The CDC notes that most healthy adults show no symptoms, but infection can cause severe complications in people who are pregnant or immunocompromised. If you are pregnant or immunocompromised, consult your veterinarian or physician about Toxoplasma exposure risks and precautions.
The EPA’s guidance on pet waste and water quality reinforces that pet waste — including cat feces — is a recognized source of nutrient and pathogen pollution in stormwater systems when not properly contained and disposed of through solid waste channels.
The bottom line: Bag it. Bin it. Never flush it.
“Question, what does everyone do with their dirty cat litter to have this garbage company take it? I had a designated garbage can that the forklifts can pick up for years. Now they want me to bag it and then put it in the garbage can… which to me is stupid bec”
This frustration is completely understandable — and common. The answer is: yes, bag it and put it in the garbage can. That’s exactly what waste management companies require, and it’s the method that protects both your plumbing and local water quality.
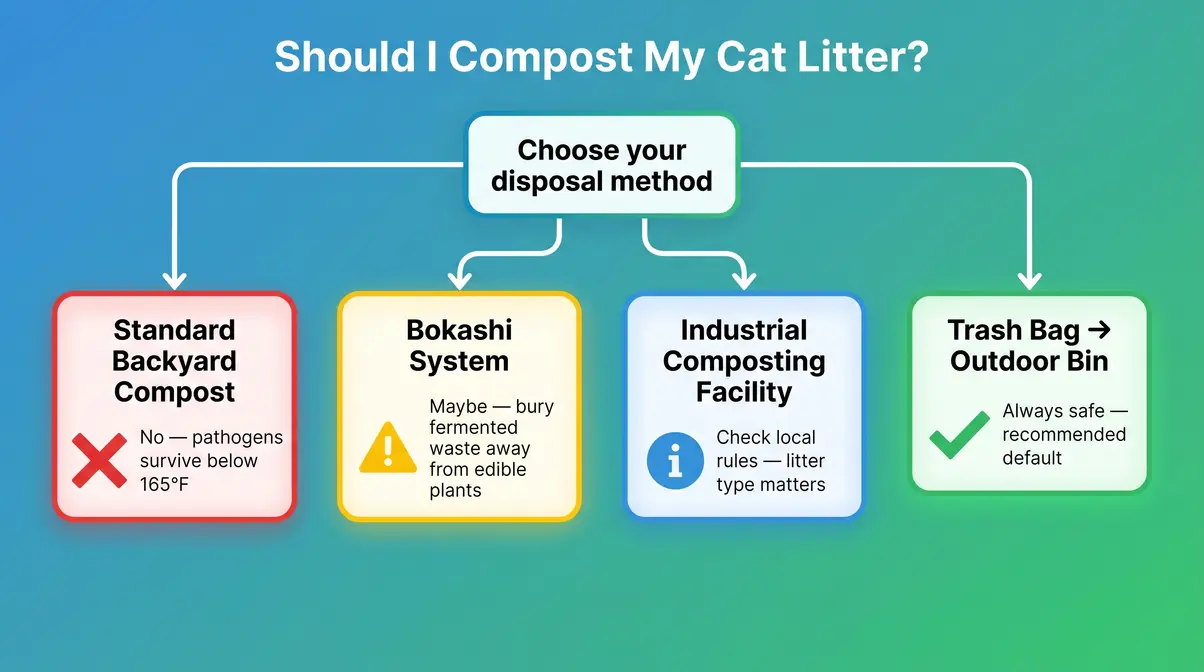
Never Compost Cat Waste in Your Backyard
Composting feels like the responsible choice. For fruit peels and coffee grounds, it absolutely is. For cat feces, it’s a health risk.
Standard backyard composters reach temperatures of 130–140°F at best. According to the Cornell Waste Management Institute, destroying pathogens in animal waste — including Toxoplasma gondii and harmful bacteria like E. coli and Salmonella — requires sustained temperatures of 165°F throughout the entire compost mass. Backyard piles don’t achieve this consistently, especially at the edges and bottom.
The practical risk: if you use backyard compost containing cat waste on a vegetable garden, you may be introducing pathogens directly to food you’ll eat. That’s a meaningful risk, not a theoretical one.
What about dumping litter in the woods? This is equally problematic. Cat feces deposited in soil can contaminate groundwater and introduce T. gondii into local wildlife populations. Domestic cats are not part of native ecosystems, and their waste carries pathogens that wild animals have no immunity to. The California Department of Fish and Wildlife has linked T. gondii from domestic cat waste to significant mortality in sea otters — a documented, peer-reviewed environmental consequence.
The one exception is Bokashi composting — covered in the eco section below.
Eco-Friendly Disposal: What’s Actually Safe
Being eco-conscious about dirty cat litter is genuinely tricky. Here’s what actually works.
Skip the Plastic: Safer Bag Alternatives
You don’t have to use a new plastic bag every day. Practical alternatives include:
- Certified compostable bags (look for ASTM D6400 certification) — these break down in industrial composting facilities, though the litter waste inside still goes to landfill
- Paper bags — unlined paper lunch bags work well for daily scoops; they’re biodegradable in landfill conditions
- Repurposed bags — bread bags, cereal liners, and produce bags are all thinner plastic going to waste anyway; reusing them is better than buying new
- No bag, dedicated bin — a lidded outdoor compost-style bin lined with a compostable liner, emptied on trash day, eliminates daily bag use entirely
A note on “biodegradable” labels: the FTC’s Green Guides (ftc.gov) caution that unqualified “biodegradable” claims on plastic products are often misleading. Most plastics marketed this way won’t meaningfully degrade in a sealed landfill. Look for third-party certifications rather than marketing language.
Bokashi Composting: The One Safe Exception
Bokashi is a fermentation-based system — not traditional composting — that uses inoculated bran to break down organic waste, including meat and animal products, in an anaerobic (oxygen-free) sealed bucket.
Unlike standard composting, Bokashi acidifies the waste, which evidence suggests can neutralize some pathogens over time. Some cat owners use Bokashi to process cat waste before burying the fermented material in a dedicated garden bed (not a vegetable garden). This is the only composting-adjacent method with a reasonable safety argument for cat waste — and even then, it requires a separate burial area away from edible plants and groundwater.
Bokashi is not a mainstream solution, and it requires purchasing a starter kit and maintaining the system consistently. But for eco-conscious cat owners in homes with garden space, it’s worth researching further.
Choosing Litter Types That Are Easier to Dispose of Responsibly
Some litters create less disposal guilt than others. Here’s a quick orientation:
- Clay litters are strip-mined and don’t biodegrade — the most environmentally costly option
- Silica gel litters are non-biodegradable but last longer per pound, reducing volume
- Wood, pine, and paper litters are made from recycled or renewable materials and are more landfill-friendly
- Corn, wheat, and grass litters are biodegradable and often compostable through industrial facilities (check your local rules)
Switching litter type is a meaningful eco step — but do it gradually to avoid box rejection from your cat.
How to Dispose of Different Types of Cat Litter
The core method (bag + bin) applies to all litter types. But each type has specific nuances worth knowing.
Clay and Bentonite Clumping Litter
Dispose: Scoop clumps and solids into a sealed bag → outdoor trash bin. Never flush — bentonite clay swells dramatically in water and will block pipes.
Clay litter is the most common type and the least eco-friendly. The strip-mining process and non-biodegradable nature mean it sits in landfill indefinitely. If you use clay litter and want to reduce impact, focus on minimizing waste volume: scoop efficiently, use the full lifespan of each batch, and consider transitioning to a greener alternative when your cat is ready.
Silica Gel and Crystal Litter
Dispose: Bag and bin — same as clay. Crystal litter is also non-flushable and non-compostable. The crystals are made from silicon dioxide, which is non-toxic but inert in landfill.
One advantage: crystal litter lasts longer per pound (typically 3–4 weeks for one cat), which means less frequent disposal and less total landfill volume over time compared to clay.
Wood, Pine, and Paper Litter
Dispose: Bag and bin. Some wood and paper litters are technically compostable in industrial facilities — check with your local waste management provider.
Wood pellet litters often disintegrate into sawdust when wet. If you use a sifting two-tray system, you scoop out the sawdust and leave dry pellets behind. The sawdust can sometimes be added to a green waste bin (without feces) — check local rules.
Biodegradable and Natural Litters (Corn, Wheat, Grass)
Dispose: Bag and bin as a safe default. Some municipalities accept these in green/organics bins — but only if the litter is certified and local rules permit it. The litter material itself may be compostable; the waste inside it is not, through standard channels.
Be cautious with “biodegradable” labeling. Per the FTC’s guidance, this claim requires no independent certification in the U.S. and is frequently applied to products that don’t meaningfully biodegrade in real-world landfill conditions. Look for specific certifications (ASTM D6400, BPI Certified Compostable) rather than the marketing label alone.
Disposal Solutions for Apartments and Rural Homes
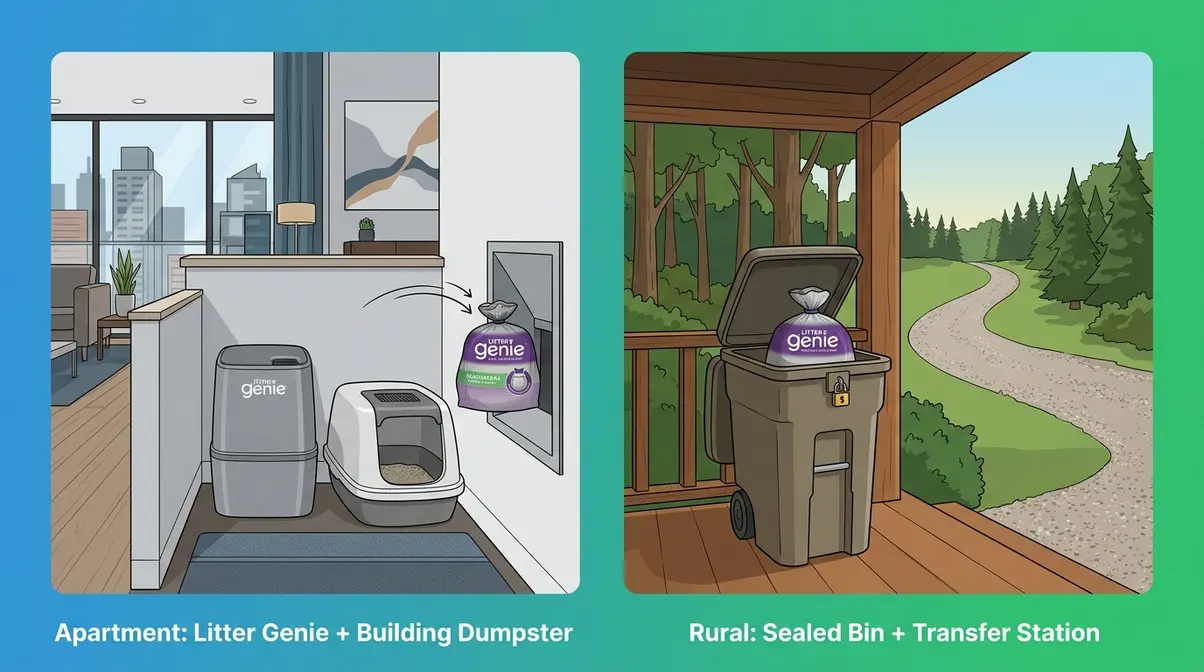
The standard method assumes you have an outdoor bin a short walk away. Not everyone does.
Apartment Living: Managing Litter Disposal Without Outdoor Access
Living in an apartment adds one real challenge: you can’t just step outside to a dedicated bin. Here’s a workflow that works.
The apartment Scoop-Seal-Secure routine:
- Scoop daily into a Litter Genie or lidded step bin kept near the litter box
- Seal each deposit using the Litter Genie’s built-in film cutter, or use small sealed bags dropped into the lidded bin
- Empty the Litter Genie (or bin) every 2–3 days into a standard trash bag
- Tie the trash bag and store in a lidded kitchen trash can or on your balcony until building trash day
- Take to the building’s dumpster or trash chute on your way out — don’t let it sit more than 48–72 hours indoors
For full litter changes in an apartment: Use a large trash bag, seal it tightly, and carry it directly to the building’s trash area. Don’t leave it in the hallway. Check your building’s rules — some require all pet waste to be double-bagged.
Odor management: A covered litter box significantly reduces airborne odor in small spaces. An air purifier with a HEPA + activated carbon filter near the litter area handles residual smell effectively.
Rural Living: No Municipal Pickup? Here’s What to Do
Without curbside collection, you have a few legitimate options:
- Transfer station drop-off: Most rural counties have a transfer station or solid waste facility. Cat litter goes in the general solid waste section — bag it, seal it, and drop it with your regular trash.
- Private waste hauler: Many rural areas have private collection services. Check whether your hauler requires bagged waste (most do).
- Burn barrel (where legal): Some rural jurisdictions permit burning of household waste. Cat litter — particularly clay — does not burn cleanly and can release silica dust. Check local rules before attempting this, and note that burning cat feces is not recommended.
- Dedicated outdoor bin: Store sealed litter bags in a wildlife-proof, covered outdoor container between transfer station trips. A locking lid prevents wildlife access to the pathogen-containing waste.
What not to do in rural areas: Don’t bury cat waste in the yard or woods. T. gondii oocysts can survive in soil for up to 18 months and can leach into groundwater. Rural well water is particularly vulnerable.
Tools and Systems for Odor-Free Waste Management
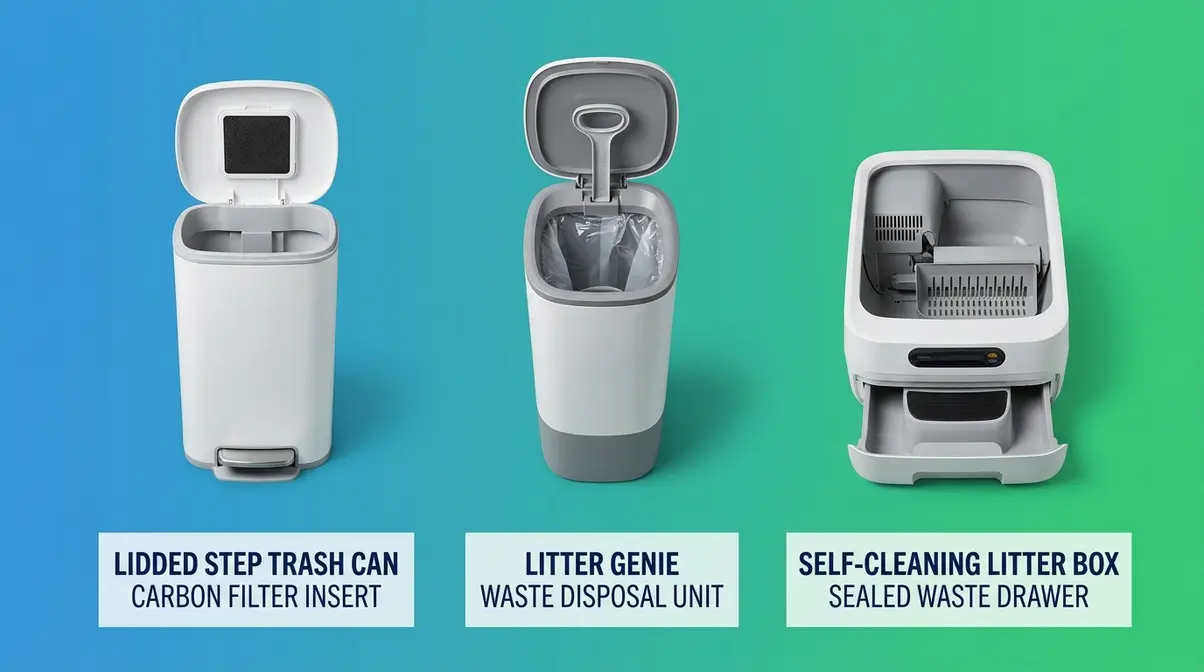
The right tool makes the daily routine genuinely painless.
Litter Genies and Waste Disposal Systems
A Litter Genie works like a diaper pail for cat waste. You drop sealed scoops into the top, pull a handle that drops the waste into a continuous film tube below, and cut and seal the tube when it’s full. The result: an odor-contained unit that holds up to two weeks of waste for one cat before needing to be emptied.
Why it works: The continuous film creates an airtight seal around each deposit, not just around the bag as a whole. This is significantly more effective than a standard lidded bin.
The trade-off: Litter Genie refill cartridges are a recurring cost (roughly $5–8 per cartridge, lasting 2–4 weeks depending on cat count). You’re also still using plastic film. Some owners find a lidded step trash can with a carbon filter lid insert achieves similar results at lower cost.
Cat owners consistently report that a dedicated waste pail — whether a Litter Genie or a simple lidded bin — is the single biggest upgrade to their disposal routine. The convenience of not making a trip to the outdoor bin every day makes daily scooping feel far less burdensome.
Self-Cleaning Litter Boxes: Are They Worth It?
Self-cleaning boxes automatically rake or rotate waste into a sealed compartment after each use. For busy households or multi-cat setups, they reduce how often you need to actively scoop.
They don’t eliminate disposal — you still need to empty the waste drawer into a bag and bin it. But they do reduce the frequency of direct contact with waste, which some owners find helpful.
Worth it if: You have 2+ cats, travel regularly, or find daily scooping genuinely difficult to maintain.
Not worth it if: You have one cat, a tight budget, or you’re comfortable with a daily manual routine. A $15 scoop and a Litter Genie outperform a $400 robot box for most single-cat households.
Common Mistakes to Avoid
Even well-intentioned cat owners fall into these patterns. Here’s how to course-correct.
Common Pitfalls
Pitfall 1: Waiting too long between scoops. Skipping a day seems minor but ammonia builds up fast. Your cat may start avoiding the box within 24–48 hours of a missed scoop — leading to accidents that are far harder to clean than a dirty litter box.
Fix: Set a phone reminder for the same time each day. Pair scooping with an existing habit (morning coffee, evening TV) to make it automatic.
Pitfall 2: Flushing “flushable” litter. The label is misleading. As covered above, this risks pipe damage and introduces T. gondii into water systems that aren’t equipped to neutralize it.
Fix: Bag it. Every time. No exceptions.
Pitfall 3: Using strongly scented bags or deodorizers. Artificial fragrances can deter cats from using the box. What smells “clean” to you may smell overwhelming to a cat.
Fix: Use unscented bags and baking soda rather than synthetic deodorizers.
Pitfall 4: Overfilling the bag before sealing. An overfull bag is harder to seal properly, more likely to tear, and releases odor when you handle it.
Fix: Seal daily scoops in small bags rather than letting waste accumulate in one large open bag over several days.
Pitfall 5: Ignoring local disposal regulations. Some municipalities have specific rules about how pet waste must be packaged. A few areas have restrictions on which bin it goes in.
Fix: Search “[your city/county] + pet waste disposal guidelines” or call your waste management provider. It takes two minutes and protects you from fines.
When to Choose Alternatives
If your building has no outdoor bin access: Switch to a Litter Genie system and coordinate with building management about pet waste disposal protocols.
If you have a large yard and one cat: Bokashi composting with a dedicated burial area is worth exploring as a plastic-reduction strategy — but requires consistent maintenance and a separate garden zone.
If you’re concerned about Toxoplasma exposure (pregnant, immunocompromised): Have another household member handle litter box duties, or wear gloves and wash hands thoroughly. Consult your physician or veterinarian for personalized guidance.
When to Seek Expert Help
If you’re managing a large number of cats (5+), running a foster or rescue situation, or dealing with a local authority notice about waste disposal, contact your municipal waste management office directly. Large-volume cat waste has different handling requirements in some jurisdictions, and a quick call can prevent compliance issues.
Frequently Asked Questions
Can you just throw away cat litter?
Yes, throwing cat litter in the trash is the recommended disposal method. Scoop the waste into a sealed bag, tie it off, and place it in your outdoor trash bin. Most municipal waste systems handle bagged cat litter as standard solid waste. The key is sealing the bag properly to contain odors and pathogens before it reaches the bin. Never throw loose, unsealed litter directly into an open trash can.
Where do I dispose of my cat litter?
Used cat litter belongs in your household trash bin, not the toilet, recycling bin, or compost. Scoop waste into a sealed bag and place it in your outdoor garbage can for collection. Apartment dwellers should use building dumpsters or designated trash chutes. Rural households without curbside pickup can use a local transfer station or private waste hauler — bag and seal the litter before transport.
How do I get rid of a lot of cat litter?
For large-volume disposal (full litter changes), use heavy-duty trash bags and distribute the weight across two bags if needed. Scoop solids first, then tip the remaining litter into the bag. Seal immediately and take directly to your outdoor bin. A 20-pound box of used clumping litter is genuinely heavy — don’t overfill one bag. For ongoing high-volume disposal (multi-cat households), a Litter Genie or dedicated outdoor bin makes the process far more manageable.
Can cat litter cause sinusitis?
Repeated exposure to fine litter dust — particularly from clay and silica litters — may irritate the nasal passages and sinuses over time. Clay litter dust contains fine silica particles that can be inhaled during scooping and cleaning. If you scoop in a small, poorly ventilated space, consider wearing a dust mask and opening a window. Low-dust and dust-free litter formulas are available and meaningfully reduce airborne particles. If you have persistent sinus symptoms, consult your doctor.
Is it okay to dump cat litter in the woods?
No — dumping cat litter in the woods or soil is not safe and is environmentally harmful. Cat feces can contain Toxoplasma gondii oocysts that survive in soil for up to 18 months and can contaminate groundwater and local wildlife. Domestic cat waste introduces pathogens that wild animals haven’t developed immunity to. Always bag and bin used litter through your regular solid waste system.
Is it okay to flush kitty litter down the toilet?
No — even litter labeled “flushable” should not be flushed. The CDC warns that municipal water treatment systems cannot reliably remove Toxoplasma gondii oocysts from flushed cat waste. Additionally, litter swells in water and can cause serious pipe blockages over time. Bag it, seal it, and bin it — every time.
What is the 3-3-3 rule for cats?
The 3-3-3 rule describes the adjustment timeline for newly adopted cats: 3 days to decompress, 3 weeks to learn the household routine, and 3 months to feel fully at home. During the first 3 days, a new cat may hide and refuse to eat — this is normal. By week 3, they’ll start showing their personality. By month 3, they’ll behave as if they’ve always lived with you. Understanding this timeline helps new owners avoid panic and give their cat the space it needs to settle in.
The Scoop-Seal-Secure Protocol: Your Daily Routine
Knowing how to dispose of cat litter safely doesn’t require a chemistry degree or a bin for every litter type. The Scoop-Seal-Secure Protocol gives you one repeatable, health-safe, eco-conscious routine that works in any home.
Scoop at least once a day using proper technique — shake out clean litter, deposit waste directly into your bag. Seal the bag with a twist and double-knot to lock in odors and pathogens. Secure it in your outdoor bin or a dedicated indoor waste system until trash day. Do a full box change every 1–4 weeks, deep clean the box with unscented soap, and you’re done.
The two hard rules — never flush, never backyard compost — exist because Toxoplasma gondii is a real pathogen with real consequences for water systems and vulnerable people. The CDC and EPA guidance is clear, and the safest path is equally clear: solid waste, solid bag, solid bin.
At madcatman.com, our recommendation is simple: start with the protocol above, pick the bag type that fits your eco goals, and choose a litter type that you and your cat can both live with. A consistent daily habit beats a complicated system every time. Start tonight — your cat (and your nose) will notice the difference by morning.
This guide reflects general best practices and authoritative health agency guidance. Local waste disposal regulations vary — always check your municipality’s specific rules for pet waste. If you are pregnant, immunocompromised, or have health concerns related to Toxoplasma exposure, consult your physician or veterinarian.
Dave King
Cat owner and writer at Mad Cat Man.