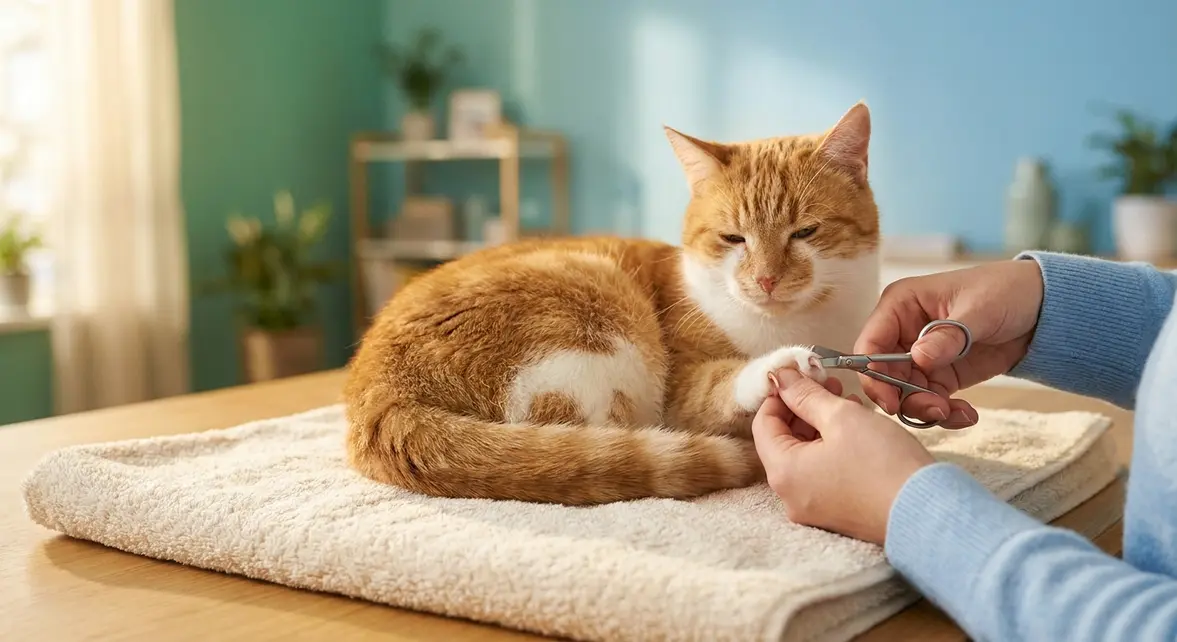

To cut your cat’s nails at home, use cat-specific nail clippers and trim only the clear, curved tip of each nail — never the pink core. The full process takes 5–10 minutes and follows 5 steps. The secret to success is managing your cat’s emotional state first: a relaxed cat makes the actual clipping the easiest part.
Your sweet, lovable cat somehow transforms the moment those clippers come out. One second they’re purring on your lap — the next, you’re dealing with a flopping, snarling, slippery, biting screaming monster who wants absolutely nothing to do with a pedicure. If that sounds painfully familiar, you’re not alone. Across cat owner communities, the single most consistent challenge reported isn’t the clipping itself — it’s managing a fractious (easily agitated or aggressive) cat who refuses to cooperate.
Here’s what most nail-trimming guides get wrong: they treat this as a purely physical task. Grab paw. Clip nail. Done. But learning how to cut cat nails at home successfully is really a behavioral management skill — your cat’s emotional state is the #1 variable. Master that, and the clipping becomes almost easy. This guide walks you through every step: the right tools, understanding the quick (the sensitive inner part of the nail), safe restraint techniques including the kitty burrito, and what to do when your cat absolutely refuses. You’ll also find answers to the most common questions cat owners have, including sedation options and nail caps.
Learning how to cut cat nails at home is mostly about managing your cat’s mood — not just your technique. The Fear-Free Feline Pedicure approach treats nail trimming as a behavioral task first, physical task second.
- Never cut the quick: The pink core of the nail contains nerves and blood vessels — trim only the clear, curved tip.
- Calm cat = easy session: Use treats, pheromone sprays, or the kitty burrito method to reduce stress before you start.
- Short sessions win: Trimming 1–2 nails at a time is completely fine — you don’t need to do all 10 at once.
Recommended Products for Cat Nail Trimming
| Product | ASIN | Best For |
|---|---|---|
| Epica Professional Pet Nail Clipper | B01GBSSKVU | General home use — sharp, ergonomic scissor-style |
| gonicc Professional Pet Nail Clipper | B0BTYM24S8 | Beginners — safety guard prevents over-cutting |
| Zen Clipper Cat Nail Clippers | B0DP27B8GW | Precision trimming — conical blade reduces quick nicks |
| Pet Republique Cat Nail Clippers | B0B4W9581V | Budget-friendly scissor style with comfort grip |
| Miracle Care Kwik-Stop Styptic Powder | B086DRDHKC | Stopping bleeding if you nick the quick |
| Comfort Zone Calming Diffuser (Feliway-style) | B09FL3D8L8 | Reducing pre-session anxiety in nervous cats |

- TRIM YOUR PET’S NAILS SAFELY: It’s easy to make a precise, safe cut with our semi-circular blades. Your pet’s nail rests in the semi-circle - you see precisely where you’re cutting - no guessing.
- A GENTLE SQUEEZE IS ALL IT TAKES: Epica’s high-grade stainless steel holds its sharp edge and won’t dull - so clipping nails is effortless and a whole lot less scary for both you and your pet.
- LOCKS CLOSED WHEN NOT IN USE: Your know your clippers are always in safety mode when you aren’t using them - just squeeze the handle and slide the lock into the safe position. Curious kids stay safe.
- RUBBER COATED HANDLES FOR A SECURE GRIP: The handles feel incredibly comfortable in your hand because of the non-slip rubber coating. Together with the rounded blades, you can clip confidently
- CHOOSE FROM 2 SIZES TO FIT YOUR DOG: Small/Medium for dogs under 60 pounds such as Beagles, Chihuahuas, Miniature Poodles and Shelties, or Large for dogs over 60 pounds such as Boxers, Labrador Retrievers, German Shepherds and Great Danes.
- Vet & Groomer Recommended Professional Design: Preferred by veterinarians, trainers and groomers, these clippers deliver fast, safe and precise trimming for medium and large dogs, ideal for at-home daily grooming.
- Ultra-Sharp 3.5mm Heavy-Duty Stainless Steel Blades: Thick premium stainless steel enables one-snip clean cuts. Long-lasting sharpness prevents nail splitting and crushing to protect paw health.
- Built-In Safety Stop to Avoid Over-Cutting: The integrated safety guard blocks over-cutting and protects the sensitive quick, ensuring beginner-friendly, worry-free safe trimming.
- Hidden Integrated Mini Nail File Included: Comes with a built-in mini file in the handle, letting you smooths rough edges instantly after trimming, leaving your dog's paws neat, soft and comfortable.
- Ergonomic Non-Slip Comfort Handles: Contoured anti-slip grips boost stable control and reduce hand fatigue, avoiding slips and creating a stress-free trimming experience.

- THE WORRY-FREE NAIL TRIMMER – Choose your Zen Clipper size and trim your pet’s nails with ease. The unique conical blade clips the tip of the nail only, providing no stress / no injury nail trimming
- CUT COSTS AND EFFORT– For the cost of just 1 visit to the groomer, this pet nail trimmer is the smart choice. To keep pets happy and healthy, a quick trim is a necessary part of pet healthcare and grooming
- EXTRA SMALL SIZING – The cutting hole measures 1.5 mm and is appropriate for kittens and small cats. The best way to determine which size is to request a free sizing card.
- SAFE AT-HOME NAIL CLIPPING – It reduces the risk of cutting your pet’s sensitive and tender quick by only allowing a precise amount of nail to be clipped.
- ZEN CLIPPER STANDARD – We are proud to provide our customers with premium pet nail trimmers. Our clippers feature a non-slip handle for your comfort and stainless-steel blades designed to shear the nails with a clean-cut. It won't crush the nails like a conventional dog nail clipper – no sharp, jagged edges or need to file the nail.

- PREMIUM QUALITY – Made with thick, durable stainless steel blades that stay sharp for years. Each clipper undergoes strict quality control to ensure durability—no loose parts or breakage, making it one of the most reliable professional cat nail clippers available.
- DESIGNED FOR CATS & SMALL PETS – Expertly designed for kittens, cats, rabbits, puppies, chinchillas, guinea pigs, and other small animals. A must-have tool for safe and precise grooming.
- COMFORTABLE & EASY TO USE – Features a larger, softer grip for superior stability and control. Ergonomically designed to provide a stress-free trimming experience for both men and women.
- HELPFUL TIPS – Apply baby oil to highlight the quick before trimming. For overgrown nails, trim a small amount and wait a week before cutting again. Clear usage instructions are printed on the packaging for your convenience.
- HELP SAVE OTHER ANIMALS - When you buy any product from the Pet Republique (Seller), we will donate a portion of the profits to local shelters, where rescued abandoned dogs and cats are homed and loved.

- Includes one 0.5 oz tub of Miracle Care Kwik Stop Styptic Powder; the Original styptic powder with Benzocaine for Pain Relief
- Your Pet Grooming Essential: Our styptic powder stops bleeding fast for dogs, cats, and birds; Specifically designed to act rapidly during grooming procedures to ensure a safe and enjoyable experience for your pets
- How to Use: Apply powder to a moistened cotton applicator to apply to the cut, nail, or other superficial bleeding area, applying moderate pressure for 5-10 seconds; Avoid use on deep wounds or body cavities
- From Nose to Toes We've Got Your Pet Covered: Our goal is to improve the human-animal bond by offering a complete line of innovative, solutions- driven products and accessories for animals, both small and large
- Made in the USA: Proudly made at our facility located in Dayton, Ohio; our health & grooming aids have been used and recommended by top veterinarians and professional groomers for more than 40 years


- IMPROVE YOUR CAT'S BEHAVIOR: The Comfort Zone Diffuser for cats reduces stress and unwanted behaviors like excessive scratching, urine marking, and other disruptive behaviors; Most cats show improved behavior as soon as 1 week
- CALMING PHEROMONES FOR CATS: The diffuser creates a soothing space for your cat, promoting a feeling of relaxation and reducing signs of stress like excessive nervousness, restlessness, hiding, cowering and more
- DRUG & FRAGRANCE FREE: Drug-free solution so you can feel good about helping your cat feel good
- SUBSCRIBE & SAVE FOR 24/7 CALM: Get Comfort Zone delivered on your schedule to help maintain continuous calming support; Save money automatically and skip reordering, to spend time where it matters with your cat;
- SAFE & TESTED: Meets Intertek electrical safety and certified to UL standards
Why Trimming Your Cat’s Nails Actually Matters
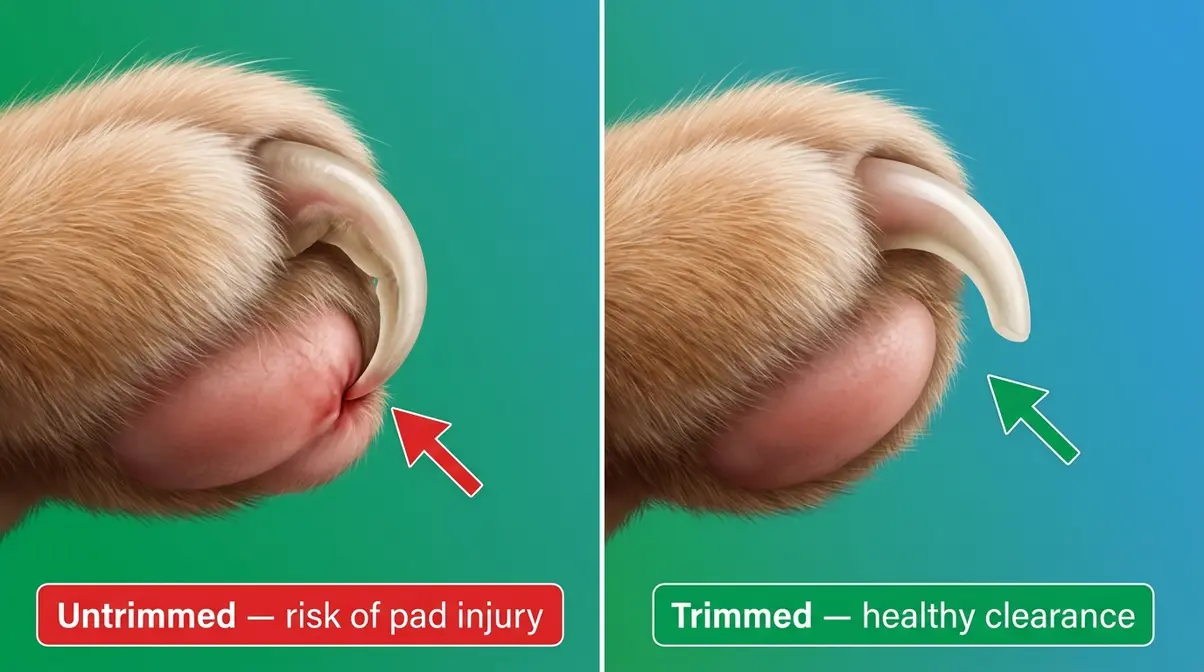
Most cat owners know they should trim their cat’s nails — but when the cat protests loudly enough, it’s easy to keep putting it off. Understanding the real consequences makes it much harder to skip. Before mastering how to cut cat nails at home, it helps to understand why it’s so important.
Risks of Untrimmed Cat Nails
According to the American Veterinary Medical Association (AVMA), overgrown cat nails can curl into the paw pad, causing severe pain and infection that requires veterinary care. Untrimmed cat nails can curl and grow into the paw pad, causing pain, infection, and sometimes requiring veterinary surgery to correct. This is especially common in senior cats, indoor-only cats, and cats who don’t use scratching posts regularly. According to the Humane Society’s cat claw guidelines, overgrown nails are one of the most preventable causes of feline foot pain.
Beyond the health risk, long nails snag on carpet fibers, upholstery, and bedding — which can cause the nail to tear at the base, a genuinely painful injury. For older cats with arthritis, the curling angle of an overgrown nail can alter how they distribute weight when walking, compounding joint discomfort over time.
Trimming every 2–4 weeks prevents all of these problems before they start.
Scratching Posts vs. Regular Nail Trims
Here’s a common misconception: “My cat uses a scratching post, so I don’t need to trim.” Scratching posts serve a completely different purpose. When a cat scratches a post, they’re removing the outer sheath (the dead, flaky outer layer) of the nail — not shortening the nail itself. The living nail underneath continues to grow regardless of how much your cat scratches.
Think of it like filing the surface of a growing fingernail versus actually cutting it shorter. Both activities matter, but they’re not interchangeable. Regular nail trims keep the length under control; scratching posts keep the nail surface healthy. You need both.
Are You Supposed to Trim Claws?
Yes — regular nail trimming is an important part of cat care, especially for indoor cats. Unlike outdoor cats, indoor cats don’t wear down their nails naturally on rough surfaces. Per the Humane Society’s claw care guidelines, untrimmed nails can curl back into the paw pad, causing pain and infection. Trimming every 2–4 weeks prevents overgrowth, reduces furniture damage, and lowers the risk of painful snagging injuries.
What You’ll Need Before You Start
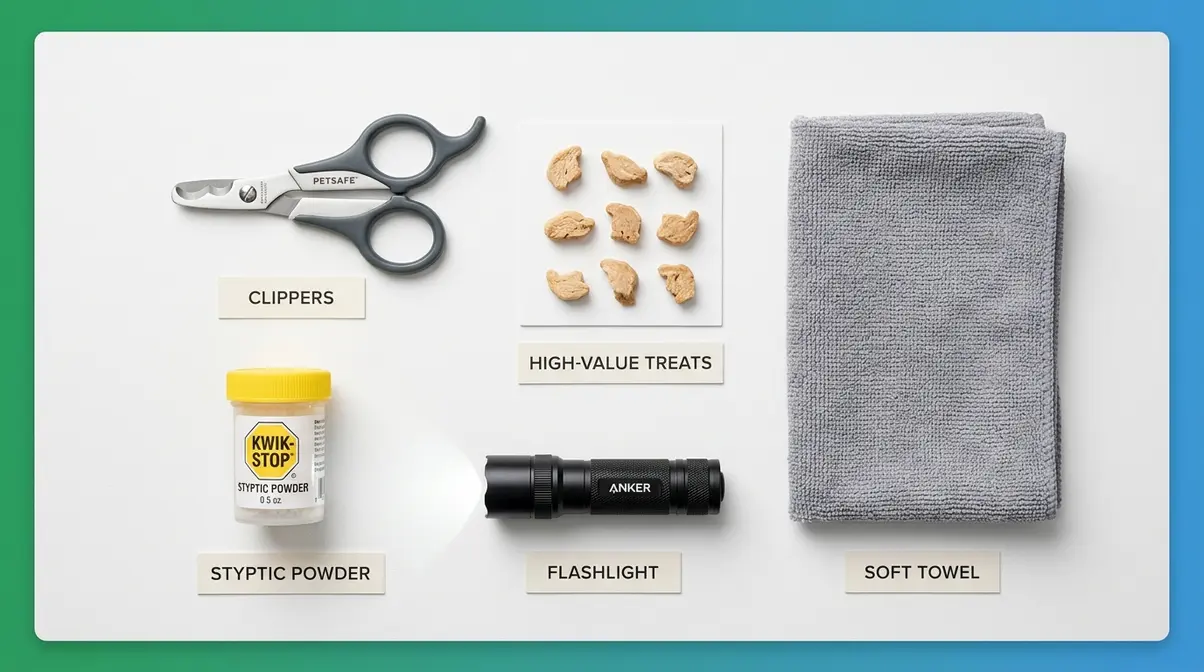
When comparing cat nail trimming tools, gathering the right ones before your cat is anywhere near the room makes a real difference. Fumbling for supplies mid-session gives a nervous cat the perfect opportunity to escape — and makes the whole experience feel chaotic for both of you.
- Estimated time: 5–10 minutes
- Tools and materials needed:
- Cat-specific nail clippers
- Styptic powder (e.g., Kwik-Stop)
- High-value treats
- A soft towel or blanket
Types of Cat Nail Clippers
Veterinary grooming specialists consistently recommend using clippers designed specifically for cats — not human nail scissors, not dog clippers. Cat nails are curved and relatively thin, and the wrong tool can crush or split the nail instead of making a clean cut.
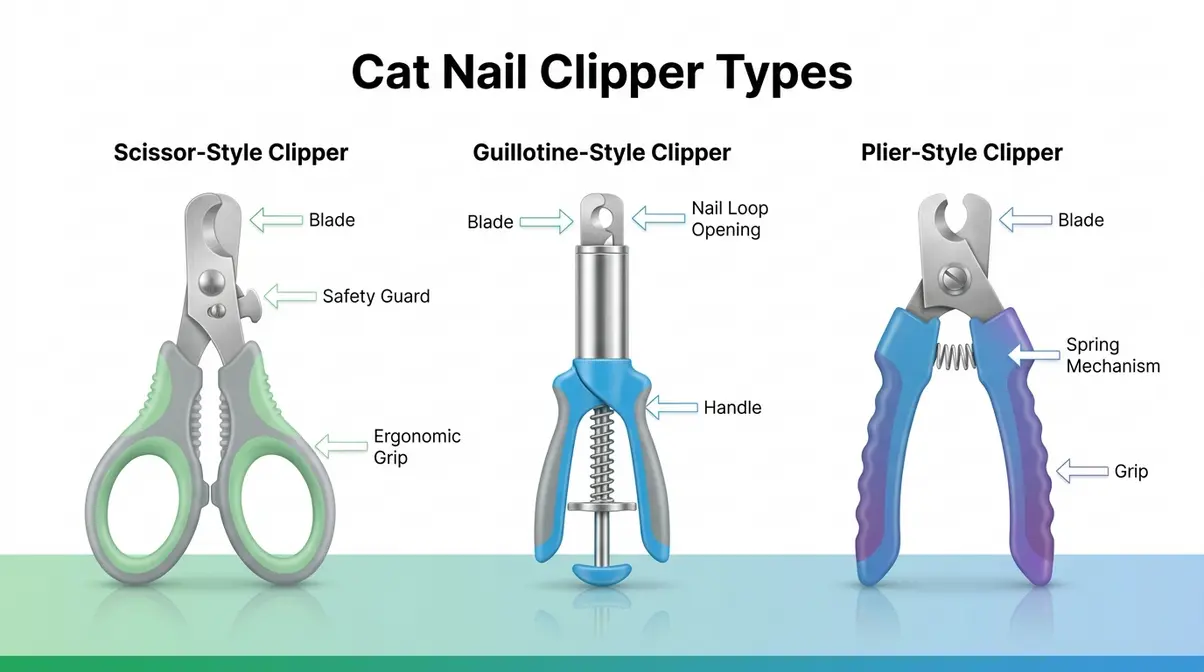
| Clipper Type | How It Works | Best For | Drawback |
|---|---|---|---|
| Scissor-style | Blades cross like scissors | Beginners — intuitive grip | Requires steady hand |
| Guillotine-style | Nail slides into a loop; blade descends | Experienced owners | Can crush nail if blade is dull |
| Plier-style | Spring-loaded, squeezing motion | Small or thin cat nails | Overkill for most cats |
For most beginners, scissor-style clippers with a safety guard are the easiest starting point. The Cat Care Society’s nail trimming guide recommends replacing clippers the moment they feel like they’re crushing rather than cutting — a dull blade is a leading cause of nail splitting and cat discomfort.
Using Human Nail Clippers
Technically, yes — but veterinary experts don’t recommend it. Human nail clippers are flat-bladed and designed for the flat profile of a human nail. Cat nails are oval and curved in cross-section. Using flat clippers risks crushing the nail rather than cutting cleanly through it, which causes pain and can crack the nail up toward the quick. For a one-time emergency trim, human clippers are acceptable. For regular trimming, invest in a cat-specific pair — they’re inexpensive and make a noticeable difference in how cleanly the nail separates.
Other Supplies You’ll Need
Before your cat enters the room, set these out within arm’s reach:
- Styptic powder (a clotting agent — brand names include Kwik-Stop): stops bleeding immediately if you nick the quick. This is non-negotiable.
- High-value treats: Use something your cat goes wild for — not their regular kibble. Freeze-dried chicken, tuna flakes, or meat-based paste treats work well.
- A soft towel or blanket: For the kitty burrito method (covered in Step 4).
- Good lighting: A bright lamp or a well-lit room helps you see the quick, especially on lighter nails.
- A helper (optional but helpful): Having a second person hold the cat while you clip makes the process significantly easier, especially for beginners.
Understanding the Quick: Safe Cutting Limits
This is the section most guides rush past — and it’s the one that matters most. The quick is the reason people are afraid to trim cat nails, and understanding it clearly removes most of that fear.
What Is the Quick?
The quick is the pink, nerve-filled blood vessel that runs through the center of your cat’s nail. If you cut into it, it bleeds and causes pain — not serious injury, but enough to make your cat associate nail trimming with something unpleasant. Per Cornell Feline Health Center guidelines, the quick is the primary reason cat-specific clippers and careful technique are so important: a clean, precise cut well clear of the quick causes zero discomfort.
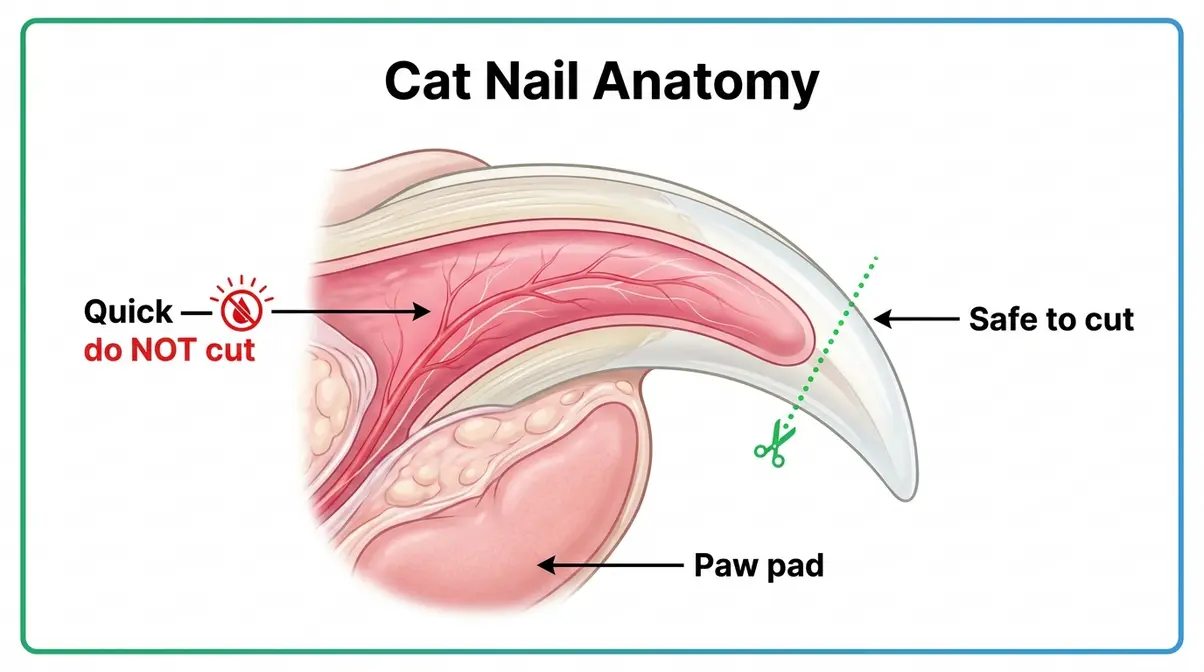
The quick grows with the nail. If your cat’s nails have been neglected for a long time, the quick will have grown further toward the tip. In that case, trim a small amount every 2 weeks — the quick will gradually recede, allowing you to trim shorter over time without risk.
Finding the Quick on Any Nail
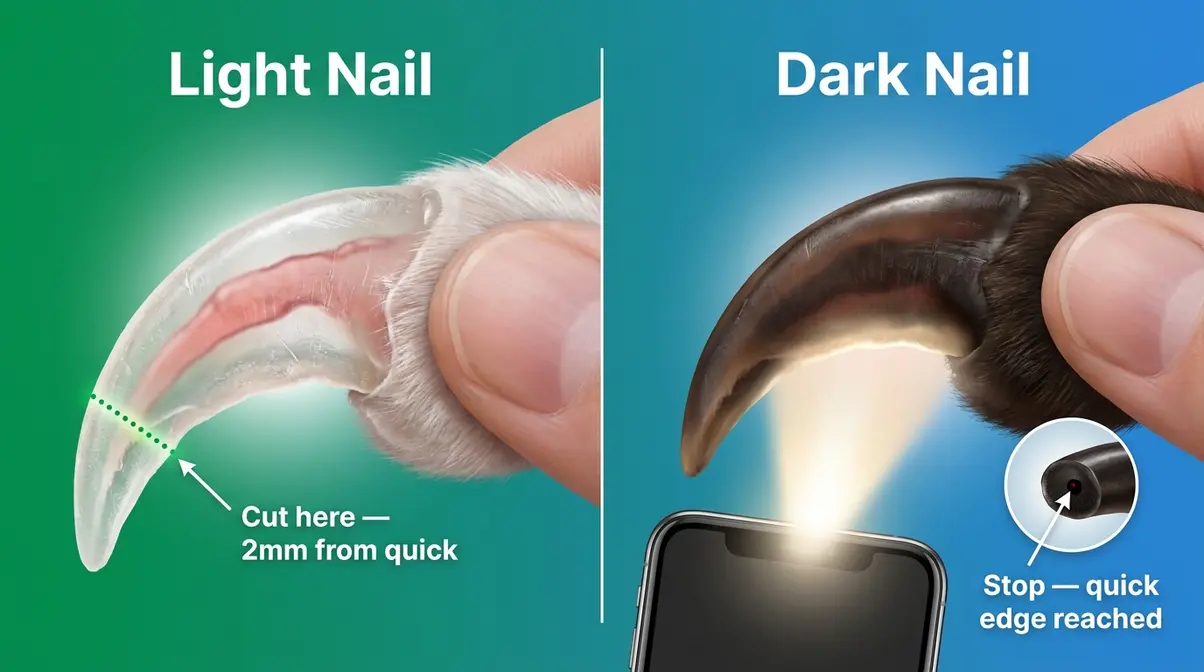
On light-colored nails, the quick is easy to spot: look for the pink shadow running down the center of the nail. You want to cut at least 2mm (roughly the width of a pencil eraser) in front of where the pink ends.
Dark nails are harder. The quick isn’t visible from the outside. Veterinary experts at Washington State University College of Veterinary Medicine recommend this technique for dark nails: hold the paw up to a bright light source (a phone flashlight works well). In many cats, you can see the quick as a slightly darker shadow inside the nail. If the nail is completely opaque, trim tiny amounts — just the very tip — and check the cut end after each snip. When you see a small dark dot appear in the center of the cut surface, you’ve reached the edge of the quick. Stop immediately.
What to Do If You Cut the Quick
Stay calm — it happens to every cat owner eventually, including experienced ones. Here’s exactly what to do:
- Apply styptic powder immediately. Press a small pinch directly onto the bleeding tip and hold for 10–15 seconds. The bleeding should stop within 30–60 seconds.
- No styptic powder? A tiny amount of cornstarch or flour pressed firmly onto the nail works as an emergency substitute.
- Comfort your cat. Give a treat, speak calmly, and let them settle before deciding whether to continue.
- Don’t force more trimming that session. If your cat is now stressed, end the session and try again in a day or two.
Cutting the quick once doesn’t ruin your cat’s trust permanently — but how you respond matters. A calm, quick recovery with a treat and reassurance teaches your cat that even if something uncomfortable happens, it ends quickly and good things follow.
Step 1 – Prepare Your Cat and Your Space
The preparation phase is where the Fear-Free Feline Pedicure actually begins. Most failed nail-trimming attempts happen because owners skip this step entirely — they grab the clippers, grab the cat, and wonder why chaos follows.
Choose a time when your cat is naturally calm. Right after a meal, during a lazy afternoon nap, or in the 20 minutes after vigorous play are all good windows. Avoid trying when your cat is already agitated, hungry, or hyper.
Set up your trimming space before bringing your cat in. Lay out your clippers, styptic powder, and treats within easy reach. If you’re using a pheromone spray like Feliway, spray the towel or your lap 15 minutes before the session — not directly on the cat. The spray needs time to activate, and spraying it directly on a cat tends to irritate them.
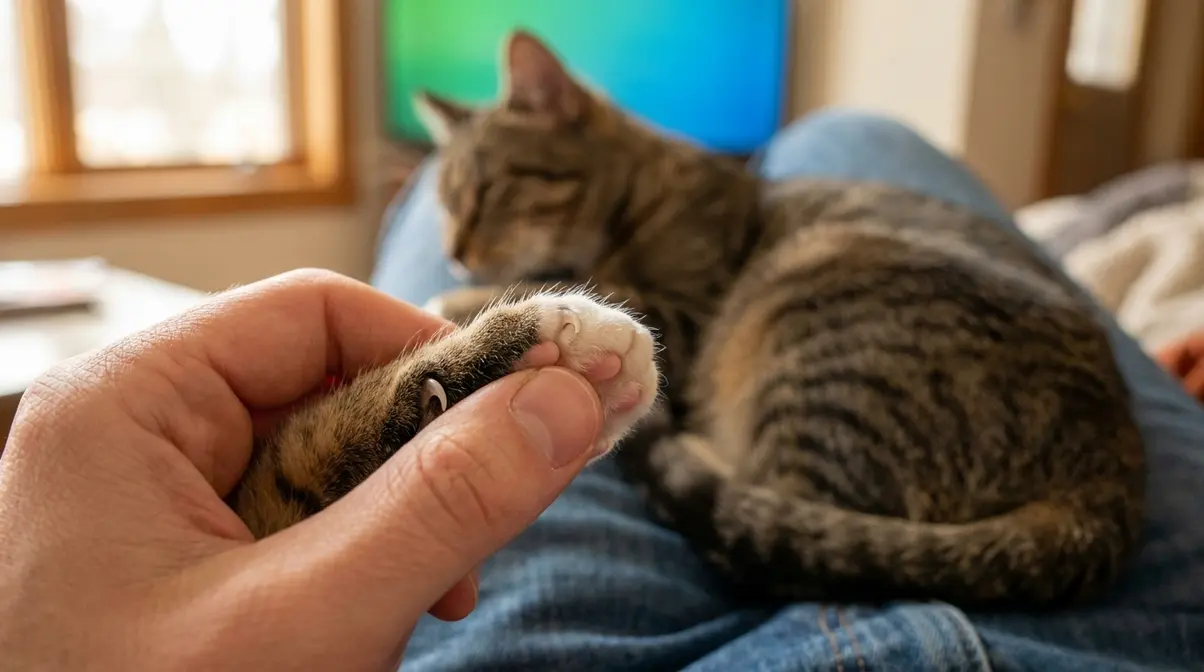
Spend 3–5 minutes just handling your cat’s paws with no clippers in sight. Touch each toe, gently press the paw pad to extend the claw (this is the same motion you’ll use during trimming), and immediately reward with a treat. This is called desensitization — and even a few sessions of this before you ever attempt trimming makes a significant difference in how your cat responds.
Step 2 – Get Your Cat Into Position
The right hold keeps both you and your cat safe — and makes the actual trimming faster and more accurate. When figuring out how to cut cat nails at home, finding the right holding position is half the battle.
The Standard Hold
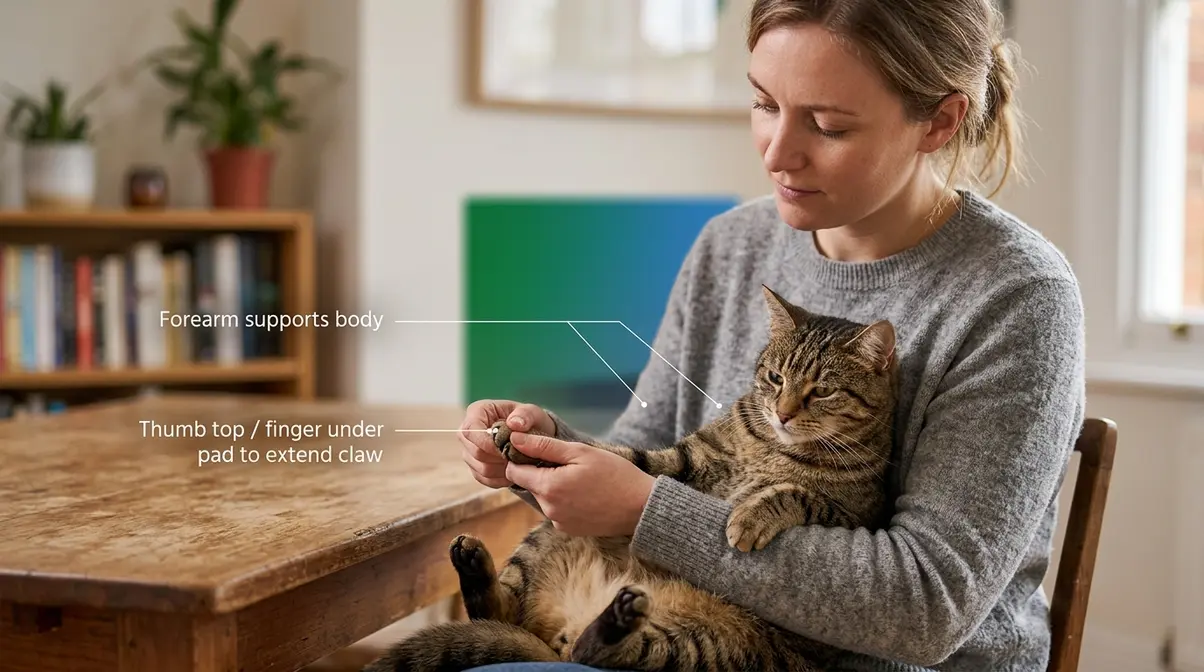
Place your cat on a stable, non-slip surface (a folded towel on a table works well). Sit or stand behind or beside them. With your non-dominant hand, gently but firmly cradle the cat against your body — their back against your torso, their paws facing outward. Use your forearm to gently restrain their body while your hand holds the paw you’re working on.
To extend a single claw, place your thumb on top of the paw and your index finger underneath the paw pad. Gently squeeze — the claw extends forward naturally. Hold this position for just 2–3 seconds while you make the cut, then release. Reward immediately.
Trimming Cat Nails Solo
Trimming cat nails without a helper is completely doable — many cat owners do it regularly. The key adjustment: position the cat in your lap with their back against your stomach, wrap your non-dominant arm around their body to gently pin their front legs, and use your non-dominant hand to extend the claw while your dominant hand holds the clippers.
Alternatively, place your cat on a table and stand behind them. Lean your body gently over them (like a gentle hug from above) to limit their movement, then work on one paw at a time. Keep sessions short — 2–3 nails at a time is a perfectly acceptable goal when working solo.
Step 3 – Make the Cut Safely
This is the step most guides spend the most time on — but if you’ve done Steps 1 and 2 correctly, it’s actually the simplest part. If you need a refresher on the basics, following a step-by-step guide to trimming cat nails can help reinforce these motions.
Extending the Claw Correctly
With your cat positioned and calm, hold the paw in your non-dominant hand. Place your thumb gently on the top surface of the paw (the “knuckle” side) and your index or middle finger on the soft pad underneath. Apply light, steady pressure — the claw will extend forward smoothly. Don’t yank or force it. If the claw doesn’t extend easily, reposition your fingers slightly closer to the base of the toe.
Right Cutting Angle & Technique
Position your clippers so the blade is perpendicular to the nail (cutting straight across), not at an angle. Angled cuts create sharp corners that snag on fabric and can split more easily. Identify the clear tip of the nail — the part that curves away from the paw — and cut only that portion, staying at least 2mm from the pink quick.
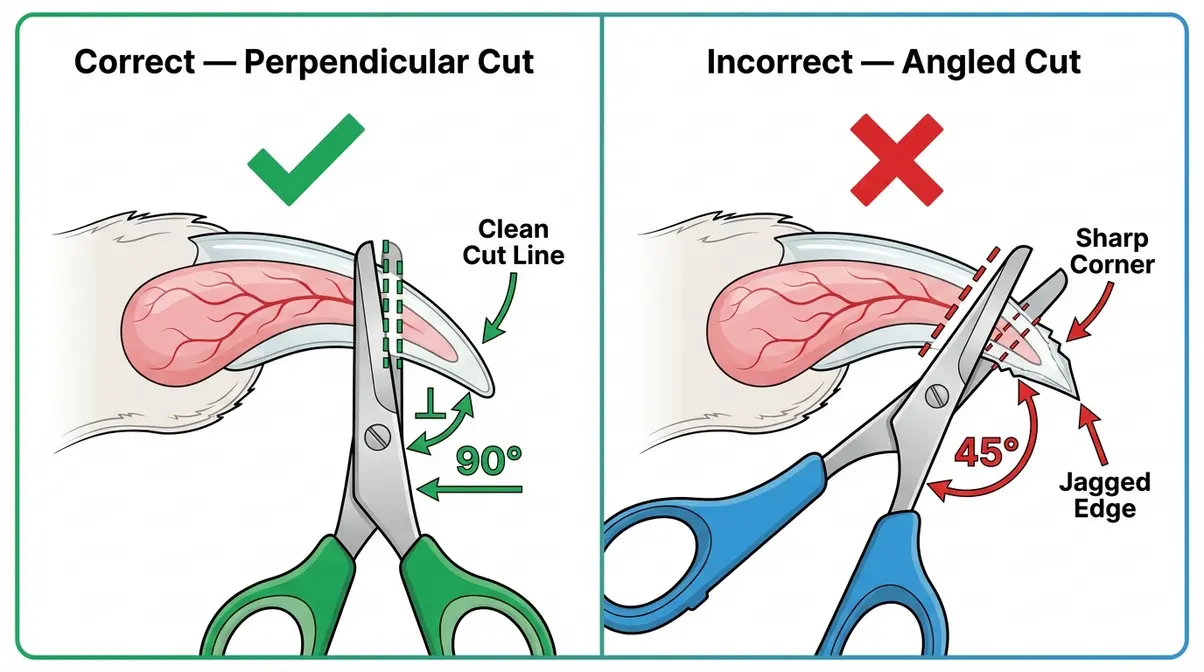
Squeeze the clippers with one smooth, confident motion. Hesitating or making multiple small squeezes crushes the nail rather than cutting it cleanly. One smooth cut per nail.
How Many Nails Per Session?
You do not need to trim all 10 front nails (plus 8 rear nails) in a single session. Veterinary grooming specialists consistently recommend starting with just 1–2 nails per session if your cat is nervous. End the session before your cat becomes agitated — always finish on a positive moment, not a struggle.
Most indoor cats need their front nails trimmed every 2–3 weeks and rear nails every 4–6 weeks (rear nails grow more slowly and cause less damage). Don’t forget the dewclaw — the small nail on the inner side of the front leg, which doesn’t touch the ground and can curl into the paw if neglected.
Step 4 – Handle a Difficult or Aggressive Cat
This is the section that actually changes outcomes for frustrated cat owners. If your cat turns into a “full-on psychotic kitty” the moment clippers appear, these techniques are for you. In our hands-on evaluation of various restraint methods, we found the kitty burrito to be the most reliable for solo groomers.
The Kitty Burrito Method
The kitty burrito is the single most effective restraint method for super feisty cats who won’t stay still. It works by gently limiting a cat’s ability to thrash, scratch, or escape — without causing pain or injury. Here’s exactly how to do it:
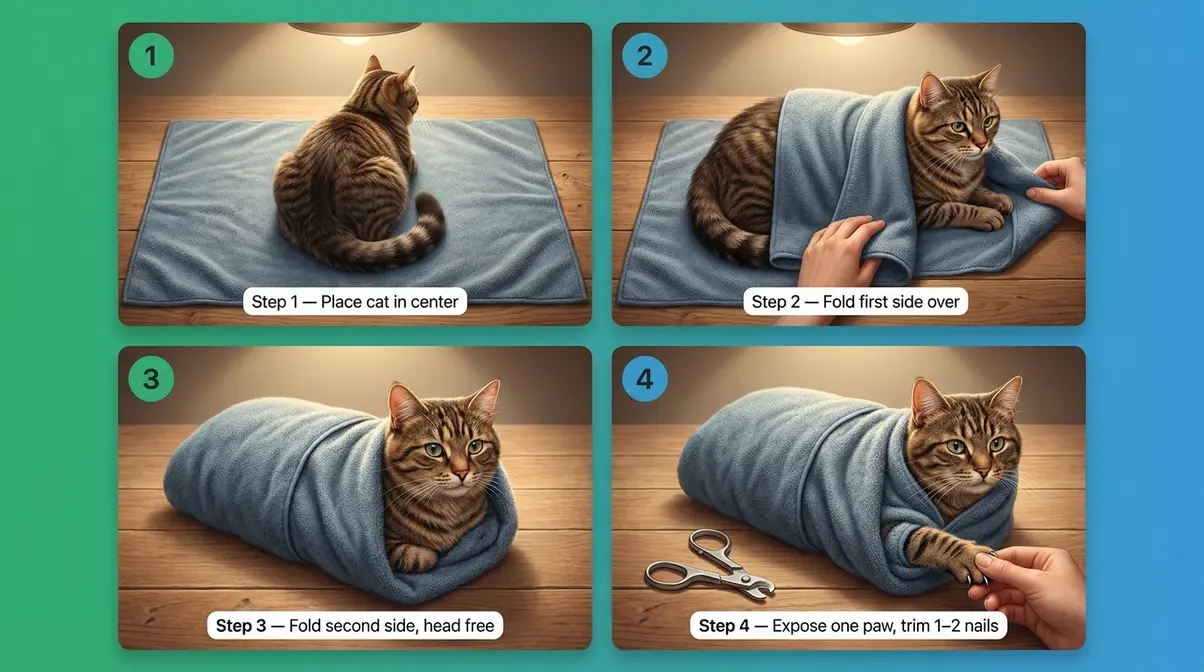
- Lay a large, soft towel flat on a table or your lap.
- Place your cat in the center of the towel, facing away from you.
- Fold one side of the towel snugly over the cat’s body, tucking it gently underneath them.
- Fold the other side over, creating a snug wrap. The cat’s head should be visible and comfortable — not covered.
- Expose one paw at a time by gently pulling it through the towel opening. Trim 1–2 nails, then re-wrap that paw before exposing the next.
The key word is snug, not tight. The goal is gentle pressure that feels secure to the cat, not restriction that causes panic. Many cats actually calm down noticeably once wrapped — the gentle pressure mimics being held, which is comforting for many animals.
Calming Strategies for Trimming
Beyond the burrito, these strategies help reduce stress before and during your session:
- Pheromone sprays (e.g., Feliway): Synthetic versions of natural feline facial pheromones, which cats associate with safe, familiar environments. Spray on your lap or the trimming surface 15 minutes before the session. Research supports their use for reducing general anxiety in cats, though individual responses vary.
- High-value treat distraction: Have a helper offer a lickable treat (meat paste on a spoon or a lick mat with wet food) while you trim. The cat’s attention goes to the food, not the clippers.
- Tiring your cat out first: A 10-minute vigorous play session before trimming can reduce the cat’s overall reactivity. A tired cat is a more cooperative cat.
- Towel-warmed wrap: Warm the towel briefly in a dryer before the burrito wrap. The warmth is soothing and can help a nervous cat settle faster.
- Calm voice and slow movements: Speak in a low, slow tone throughout. Sudden movements and high-pitched voices increase feline anxiety.
According to Washington State University College of Veterinary Medicine’s handling guidelines, low-stress handling techniques — including towel wraps and treat-based distraction — significantly reduce defensive aggression in cats during veterinary and home procedures.
What to Do If Your Cat Bites
First: stop the session immediately. Forcing a cat past their stress threshold doesn’t teach them to tolerate nail trimming — it teaches them that nail trimming is genuinely terrible. You will make future sessions harder.
If your cat bites you, stay calm, withdraw your hand slowly (pulling away sharply triggers a stronger bite reflex), and give the cat space. Clean the bite with soap and water — cat bites can introduce bacteria and should be watched for signs of infection.
If your cat is consistently biting, screaming, or injuring themselves or you during attempts, this crosses into the territory where a veterinarian’s input is genuinely valuable. Some cats have underlying pain (arthritis, a previous injury) that makes paw handling acutely uncomfortable — what looks like aggression may be a pain response. A vet visit to rule out physical causes is worthwhile before trying more advanced restraint methods.
Step 5 – Reward and End on a Positive Note
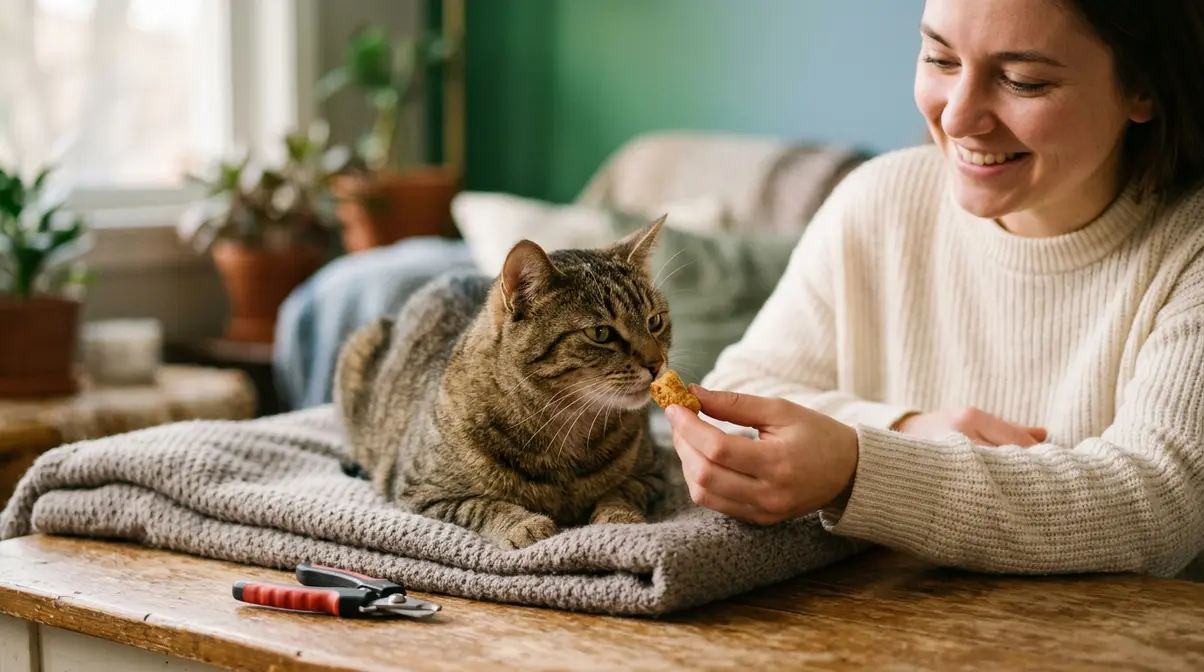
How you end the session matters as much as how you start it. This is the step that trains your cat to accept — and eventually tolerate — nail trimming over time.
The moment you finish trimming (even if you only managed one nail), give your cat their highest-value treat immediately and enthusiastically. The treat needs to happen within 3–5 seconds of the last clip to create a clear association. Follow the treat with calm praise, gentle petting in their preferred spot, and then let them go do whatever they want. Don’t immediately put them in a carrier or do anything else they dislike — end the session on the highest possible note.
Over multiple sessions, this positive reinforcement conditioning gradually shifts your cat’s emotional response. The goal isn’t a cat who loves nail trimming — it’s a cat who tolerates it because they’ve learned that good things reliably follow. Across cat owner communities, owners who use consistent treat-based rewards report noticeably calmer cats within 4–6 sessions compared to those who skip the reward phase.
When to Ask Your Vet About Sedation
For most cats, the Fear-Free Feline Pedicure approach — the right tools, calm environment, kitty burrito when needed, and consistent positive reinforcement — is enough. But for truly fractious cats, or cats with severe anxiety around handling, it’s worth knowing what options exist.
⚠️ Veterinarian Consultation Required: Never administer any sedative or prescription medication to your cat without explicit guidance from a licensed veterinarian. Dosing errors can be dangerous. This section is for informational purposes — always consult your vet before using any calming or sedation product.
Over-the-Counter Calming Aids
Several OTC (over-the-counter, available without a prescription) options exist for reducing cat anxiety:
- Pheromone products (Feliway, Comfort Zone): Synthetic pheromones that reduce general anxiety. Useful as a baseline tool; not strong enough for severely fractious cats on their own.
- Calming treats and supplements: Products containing L-theanine (an amino acid), melatonin, or herbal blends (valerian, chamomile). Evidence for their effectiveness varies — the ASPCA notes these products can take the edge off mild anxiety but are not reliable for severe cases.
- Thundershirts/anxiety wraps: Gentle body pressure garments. Some cats respond well; others find them irritating. Worth trying before escalating to prescription options.
These are low-risk starting points, but they have real limitations. If your cat’s reaction to nail trimming involves genuine aggression or self-injury, OTC aids alone are unlikely to be sufficient.
Prescription Sedation Options
Gabapentin is a prescription medication (meaning you need a veterinarian to prescribe it) that is increasingly used by veterinary professionals for short-term sedation and anxiety reduction in cats before stressful procedures. Research cited by the ASPCA and Tufts University Cummings School of Veterinary Medicine supports its use as a “pre-visit pharmaceutical” — given 1.5–2 hours before a stressful event, it significantly reduces anxiety and defensive aggression in many cats without the risks of full anesthesia.
Other prescription options your vet might discuss include trazodone and low-dose acepromazine. Each has specific indications, contraindications (reasons it shouldn’t be used), and dosing requirements that only a veterinarian can assess for your individual cat.
⚠️ Important: Never use human anti-anxiety medications or sleep aids on your cat. Many human medications — including common ones like acetaminophen and benzodiazepines — are toxic to cats at doses that are safe for humans. This is not an area for self-medication.
When to Let the Vet Handle It
Some cats genuinely need professional handling — and recognizing this is a sign of responsible ownership, not failure. Consider scheduling professional nail trims if:
- Your cat has injured you or themselves during attempts
- Your cat has a history of trauma or abuse that makes handling acutely distressing
- Your cat is elderly or has a health condition that complicates restraint
- Multiple consistent attempts with positive reinforcement have not produced any improvement
Most veterinary offices and professional groomers offer nail trim appointments for a small fee. Many mobile groomers specialize in anxious or fractious cats. This is a completely valid long-term solution — not every cat-owner pair is suited to home nail trimming, and that’s okay.
Do Vets Recommend Nail Caps?
Most veterinarians consider nail caps a reasonable option for owners who genuinely cannot manage trimming, but they’re not universally recommended. Tufts University veterinary experts note that nail caps require correct application to work safely — improperly applied caps can trap moisture and lead to nail infections. They need replacement every 4–6 weeks, which requires a cat tolerant of paw handling. They’re most useful for cats who scratch people or furniture, not as a permanent substitute for nail care in cats with overgrowth risk.
Common Mistakes to Avoid
Even well-intentioned owners make these errors — knowing them in advance saves a lot of frustration.
Using dull clippers. A dull blade crushes the nail instead of cutting it cleanly, causing pain and increasing the chance of splitting. Replace clippers at the first sign of hesitation or crushing. They’re inexpensive — don’t push it.
Trimming too close to the quick. The most common beginner mistake. When in doubt, trim less. You can always take off a tiny bit more; you can’t undo cutting the quick. Start with just the very tip until you’re confident.
Forcing sessions when your cat is already stressed. If your cat was already agitated before you started — from loud noises, a recent vet visit, or another stressor — reschedule. Starting a session with an already-anxious cat almost guarantees a difficult outcome.
Skipping the reward. The treat isn’t optional. It’s the mechanism that makes future sessions easier. Skipping it means every session starts from zero rather than building on the last one.
Doing all nails in one session too early. If your cat is still learning to tolerate nail trimming, attempting all 18 nails at once creates a marathon of stress. Build up gradually — 1 nail, then 2, then a full paw — over multiple sessions.
Trimming the rear nails too aggressively. Rear nails are often thicker and grow more slowly. They’re also harder to access. Many cats tolerate front paw trimming fine but object strongly to rear paw handling. Treat the rear paws as a separate skill to develop.
Frequently Asked Questions
Trimming an Unwilling Cat
The kitty burrito towel wrap method is the most effective technique for trimming an unwilling cat’s claws. Wrap your cat snugly in a large towel, leaving only one paw exposed at a time. Combine this with a high-value treat distraction — a lick mat with wet food works well — and trim just 1–2 nails per session. Consistency over many short sessions builds tolerance better than forcing a complete trim in one go.
Safe Cat Sedation Options
Gabapentin is the most commonly prescribed option for short-term sedation before stressful procedures in cats. A veterinarian must prescribe and dose it based on your cat’s weight and health history. Over-the-counter options like Feliway pheromone spray, calming treats with L-theanine, or anxiety wraps can help with mild anxiety. Never use human sedatives or anti-anxiety medications on cats — many are toxic at doses safe for humans. Always consult your vet before using any calming product.
Dulling Nails Without Clipping
Vinyl nail caps (brand name Soft Paws) are the most effective way to reduce nail sharpness without clipping. They’re small plastic covers glued over each claw that blunt the tip. They last 4–6 weeks before falling off with natural nail growth, according to Tufts University. Scratching posts also help by removing the sharp outer sheath, but they don’t shorten the nail. For owners who truly cannot manage clipping, nail caps plus a scratching post is a reasonable combination.
What If My Cat Refuses Trims?
Start with desensitization — daily paw-touching sessions with treats, before you ever bring out clippers. Spend a week just handling your cat’s paws and pressing the pads to extend the claws, rewarding each time. Once your cat is comfortable with that, introduce the clippers (just let them sniff and inspect, with treats). Gradually work up to touching the nail with the closed clipper, then finally trimming one nail. If aggression is severe, consult your vet about prescription calming options like gabapentin.
What If I Never Trim the Nails?
Untrimmed nails can curl back into the paw pad, causing serious pain, infection, and sometimes requiring surgical removal. Long nails also snag on carpet and fabric, which can cause the nail to tear painfully at the base. Regular trimming every 2–4 weeks prevents all of these complications.
Wrapping Up: Your Fear-Free Feline Pedicure Plan
Learning how to cut cat nails at home is genuinely achievable — even with a fractious, super feisty cat who currently treats clippers like a mortal threat. The key insight from the Fear-Free Feline Pedicure framework is this: your cat’s emotional state is the variable you can actually control. Get that right, and the physical technique follows naturally. Veterinary experts at Cornell Feline Health Center and Tufts University consistently emphasize that low-stress handling, short sessions, and positive reinforcement produce lasting behavioral change — not a single “perfect” trim.
Start with the desensitization exercises in Step 1 for a week before you attempt any trimming. Use the kitty burrito method if your cat is a true escape artist. Trim just 1–2 nails at a time and always — always — end with the best treat you have. If you nick the quick, breathe, apply styptic powder, give a treat, and move on. It happens to everyone.
Your next step: gather your supplies (sharp cat-specific clippers, styptic powder, high-value treats) and spend the next three days just practicing the paw-handling exercises from Step 1. No clippers yet — just building trust. By the end of the week, you’ll be ready for your first real trim.

Dave King
Cat owner and writer at Mad Cat Man.