
Table of Contents
- What You’ll Need Before You Start
- Step 1: Get Your Cat Calm and Ready
- Step 2: Extend the Claw and Locate the Quick
- Step 3: Clip the Tip at a 45-Degree Angle
- Step 4: Reward and Rest — One Paw at a Time
- How to Trim an Angry or Unwilling Cat’s Claws
- What to Do When Things Go Wrong
- Frequently Asked Questions
- Bringing It All Together
This blog post may contain affiliate links. As an Amazon Associate I earn from qualifying purchases.
“My cat is the most dramatic creature alive when I try to trim his claws… I’ve only been able to get two each time I’ve tried and it had to be a two-person job.”
If you are wondering how to trim cat claws at home without a fight, you are not alone — and you are absolutely not doing it wrong.
Overgrown claws don’t just wreck your furniture. They curl inward and can pierce your cat’s paw pad, cause joint pain, and make walking uncomfortable. The longer you wait, the harder the task becomes — for both of you.
In this guide, you’ll learn exactly how to trim cat claws at home safely, step by step — including what to do when your cat absolutely refuses to cooperate. We cover the right tools, the correct technique, the kitty burrito method for unwilling cats, and what to do if something goes wrong.
Learning how to trim cat claws at home takes the right tools, a calm cat, and about 10 minutes — most cats only need a trim every 10–14 days.
- Always avoid the quick — the pink blood vessel inside the claw — by cutting only the white tip
- The Calm-First Method works: desensitize your cat to paw-touching before ever picking up clippers
- The kitty burrito (towel wrap) is the safest restraint for unwilling cats
- Never give your cat Benadryl or sedatives without explicit veterinary guidance
- Styptic powder (or cornstarch) stops bleeding immediately if you nick the quick
What You’ll Need Before You Start
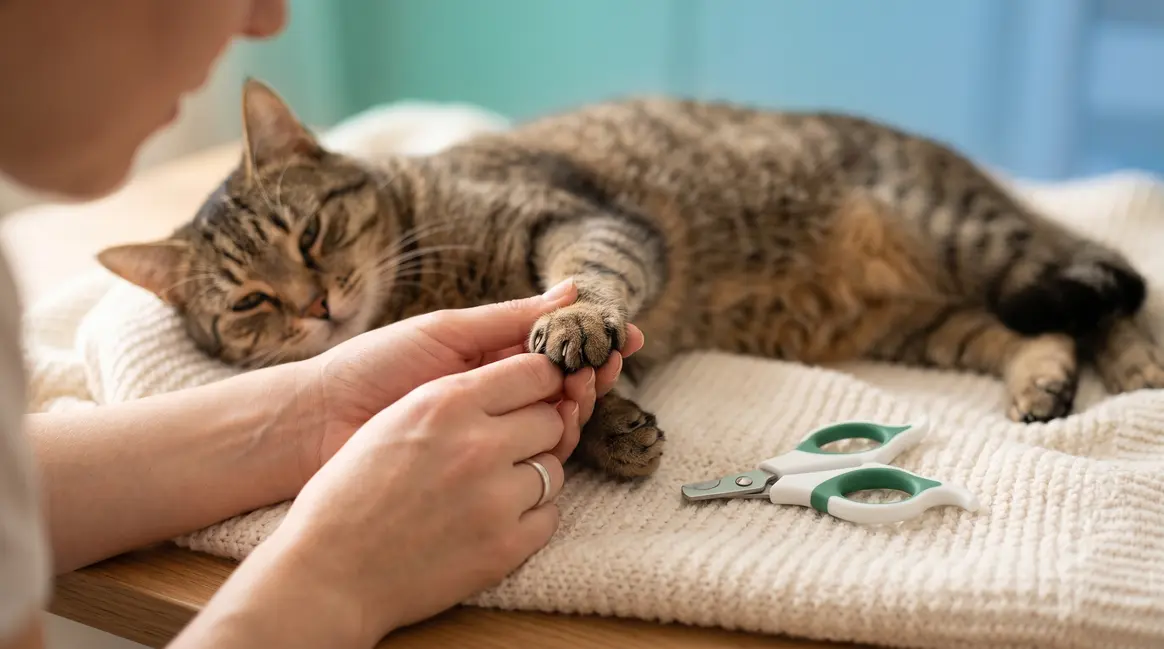
Trimming cat claws at home requires just a few inexpensive items — but using the wrong tools is the most common reason beginners accidentally hurt their cat. The ASPCA grooming guidance advises against trimming all claws in a single session, especially if your cat shows signs of stress — so having everything ready before you start saves time and keeps both of you calmer. Here is exactly what you need.
Estimated Time: 10 minutes
- Tools and Materials:
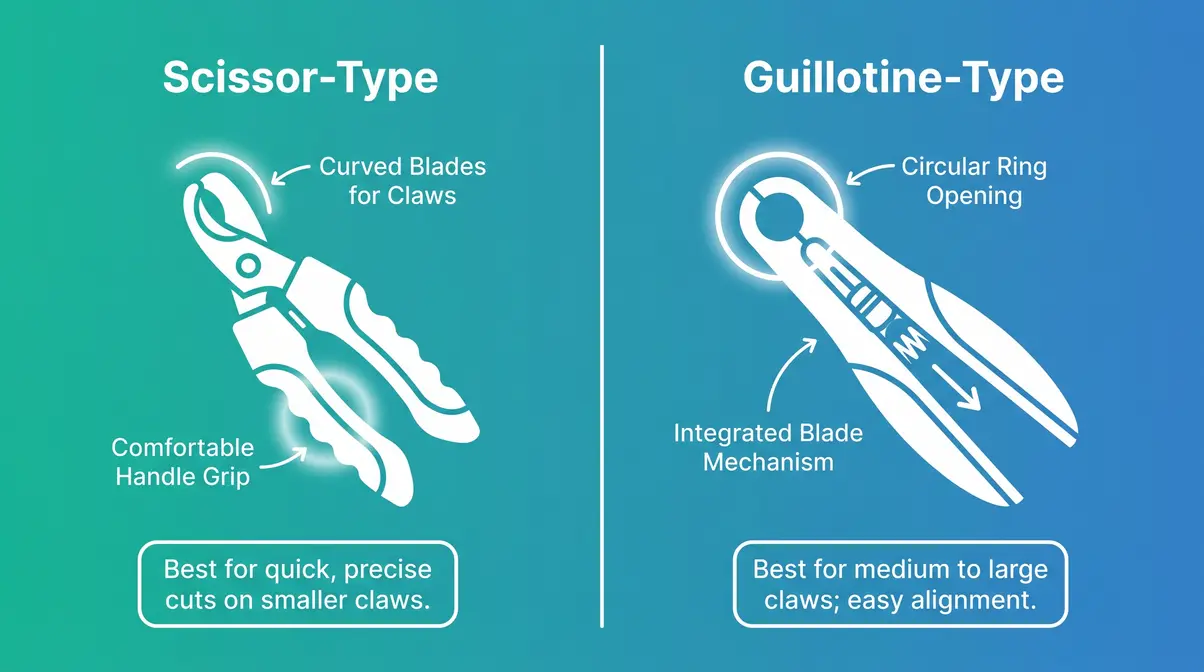
- Cat-specific nail clippers — scissor-type or guillotine-type (do NOT use human nail scissors — they crush rather than cut, which causes pain and splitting). Either type works; choose whichever feels comfortable in your hand.
- Styptic powder — a clotting agent that stops bleeding within seconds if you nick the quick. If you don’t have styptic powder on hand, cornstarch or plain flour work as reliable household alternatives (PetMD).
- High-value treats — tiny, soft, and something your cat goes absolutely wild for (not their everyday kibble). Positive reinforcement is non-negotiable for a stress-free session.
- A towel — for the kitty burrito restraint method, covered later in this guide.
- Good lighting — natural light or a bright lamp. You need to see the quick clearly, especially in lighter-colored claws.
- A quiet room — no loud TVs, no other pets nearby. Calm surroundings are the first step in The Calm-First Method, the approach this entire guide is built on.
Practical tip: Replace your clippers every 6–12 months. Dull blades crush the nail rather than cutting cleanly, which causes a cracking sensation that makes cats more resistant next time.
With your tools ready and your cat’s favorite treats in hand, the first step is making sure your cat is in the right headspace — because timing is everything. Also, check out this step-by-step guide to trimming cat claws for additional visual reference.
Step 1: Get Your Cat Calm and Ready
The single biggest mistake anxious cat owners make is reaching for the clippers before their cat is ready. Timing matters more than technique. A cat that is already alert, overstimulated, or mid-zoomies will squirm and scratch regardless of how careful you are. Veterinary guidance consistently points to environment and timing as the hidden variables beginners overlook.
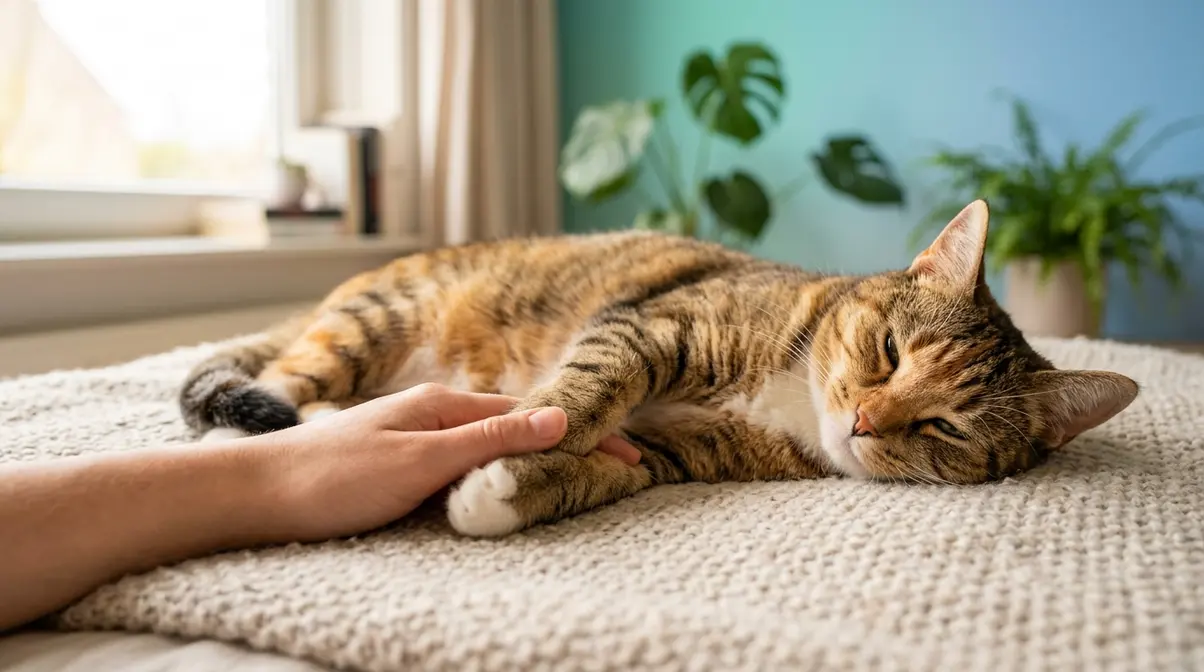
Choose the right moment. Look for a cat that is drowsy, just waking from a nap, or settled in their favorite spot. Right after a meal is often ideal — full cats are calmer cats. Avoid trying to trim claws when your cat is actively playing or has been startled.
Set the scene. Sit on the floor or a low chair with your cat in your lap. Avoid placing them on a high table where they feel exposed and unstable. Turn off the television. Close the door. The fewer distractions, the better.
Start with paw-handling before the clippers ever appear. Gently pick up your cat’s paw and press the toe pad softly to extend one claw. Hold it for one second. Release. Give a treat. Do this three or four times before you even pick up the clippers. UC Davis Animal Welfare Epi Lab research confirms this graduated touch approach — touching legs, then paws, then gently squeezing a toe — reduces resistance significantly before any cutting begins (University of California, 2026).
What you should see: Your cat stays relaxed, or at most shifts slightly. If they pull away sharply or vocalize, stop and try again tomorrow. Never force a session. One calm paw today beats a chaotic full-trim that traumatizes your cat for next time.
Step 2: Extend the Claw and Locate the Quick
Before you clip anything, you need to see exactly what you are cutting. This step is where most beginners feel their heart rate spike — but once you understand the anatomy, it becomes straightforward.
How to extend the claw: Hold your cat’s paw gently in one hand. Place your thumb on top of the paw and your index finger underneath the toe pad. Apply light, steady pressure — the claw will extend naturally. According to Cornell University College of Veterinary Medicine, this paw-pad squeeze technique is the standard method used in veterinary clinics (Cornell University, 2026).
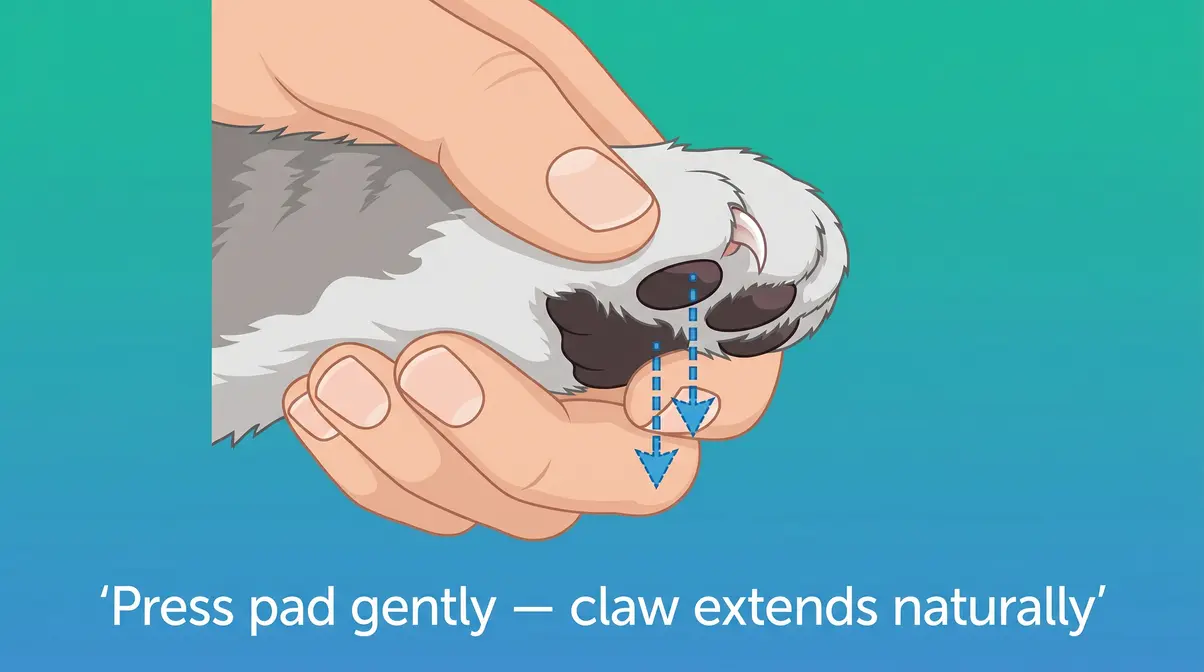
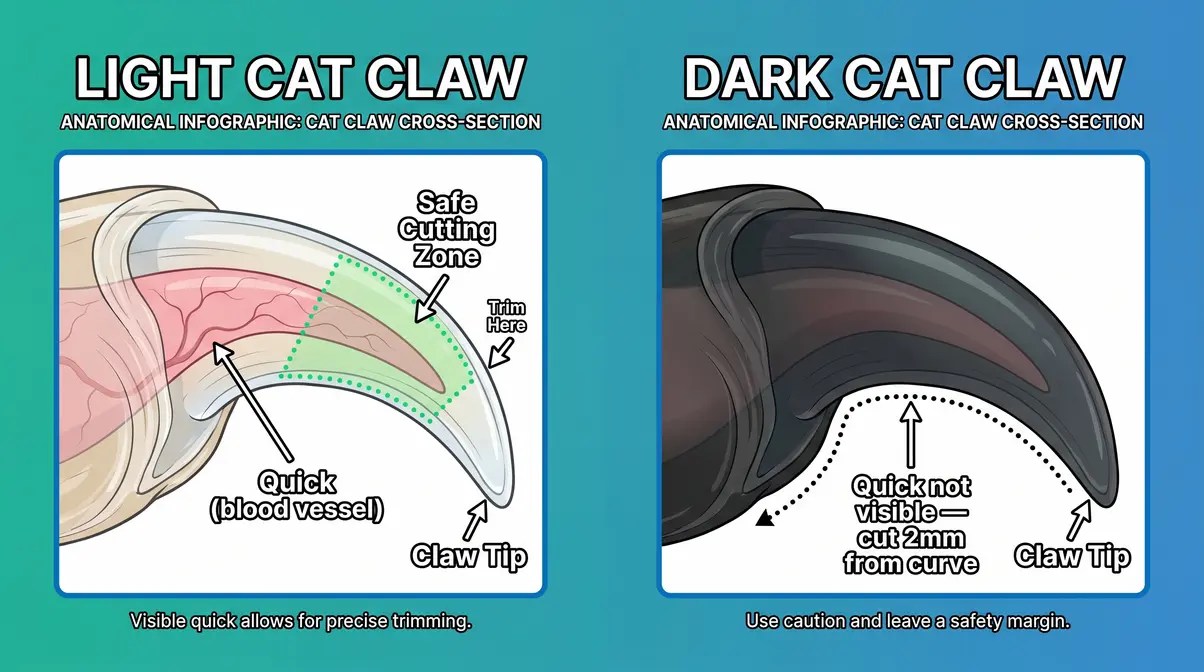
Locating the quick (the pink blood vessel inside the claw): In cats with light or white claws, you will see a pink triangular area inside the nail. That is the quick — the living part of the claw containing blood vessels and nerves. The translucent white tip in front of it is safe to cut.
What about dark or black claws? Here is where it gets trickier. If your cat has dark claws, you cannot see the quick directly. The WSU Veterinary Teaching Hospital recommends cutting approximately 2 millimeters from where the nail begins to curve downward — take several small snips from the tip rather than one large cut (WSU Veterinary Teaching Hospital, 2026). After each small snip on a dark claw, look at the cut surface: if you see a small dark dot appear in the center, you are approaching the quick. Stop immediately.
Don’t forget the dewclaw — the small claw on the inner side of the front legs that doesn’t touch the ground. Because it never wears down naturally, it can curl and grow into the paw pad if left untrimmed. Include it in every session.
What you should see: A clean view of the claw tip and, in light-colored claws, the pink quick clearly visible. You are now ready to cut.
Step 3: Clip the Tip at a 45-Degree Angle
This is the step that feels scary the first time — and becomes second nature by the third session. The key is angle, distance, and confidence. A hesitant, slow squeeze causes more discomfort than a clean, swift clip.
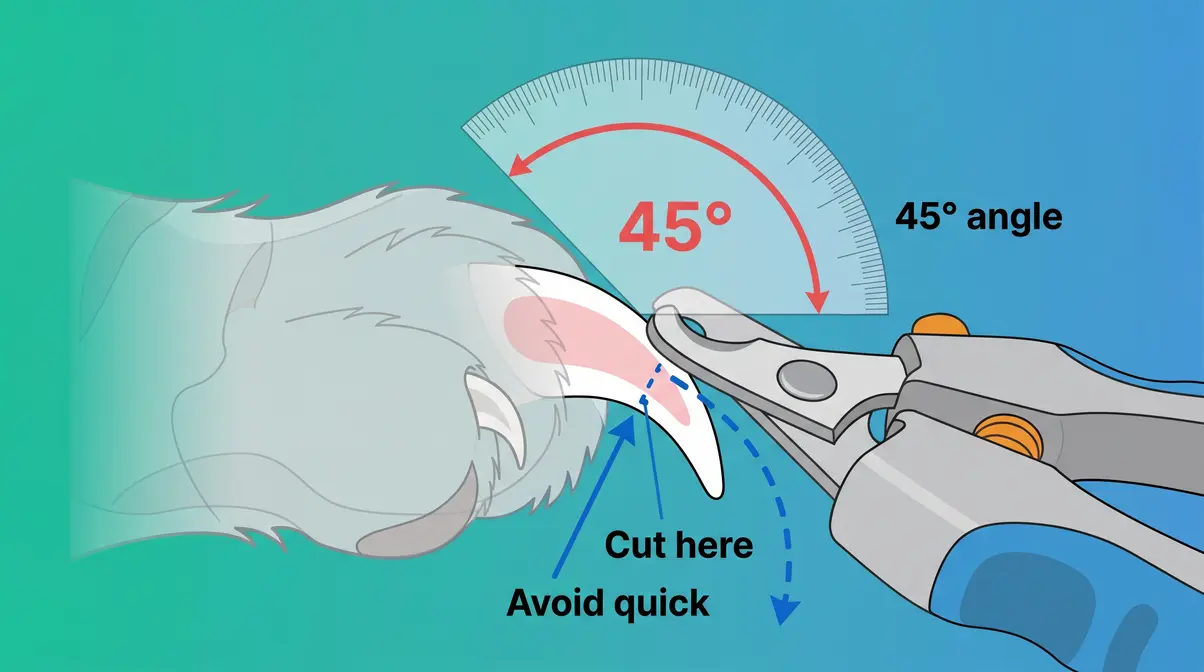
Position your clippers correctly. Hold the clippers perpendicular to the nail — not parallel. The blade should face you, with the stationary ring resting against the underside of the claw. Aim for the white tip, staying at least 2 millimeters away from the pink quick (WSU Veterinary Teaching Hospital, 2026).
Cut at a 45-degree angle, following the natural downward curve of the claw. This angle produces a clean cut and reduces the chance of a jagged edge that snags on fabric. Squeeze the clipper handles firmly and quickly — a slow, tentative squeeze can cause the nail to crack.
What you should see: A clean, smooth cut through the white tip of the claw. No pink visible in the cut surface. No bleeding. Your cat may flinch slightly at the sound of the clip — that’s normal and not a sign of pain.
After the clip: Give a treat immediately. Praise your cat warmly. Then move to the next toe — or stop there if your cat is showing signs of stress (tail flicking, ears flat, trying to pull away). VCA Hospitals guidance reinforces that even one or two claws per session is a genuine win, especially early on.
Optional finishing step: Run a nail file or emery board lightly over the cut tip to smooth any sharp edges. This is particularly helpful if your cat likes to knead blankets or climb on you.
Step 4: Reward and Rest — One Paw at a Time
Here is the truth about cat claw trimming that most guides bury at the bottom: you do not have to trim all 18 claws in one sitting. The Calm-First Method is built on this principle — short, positive sessions beat long, stressful ones every time.
After trimming a claw or two, stop and reward your cat generously. Give two or three small treats, offer gentle petting in their favorite spot, and let them walk away if they choose. A cat that ends a session feeling good will be easier to handle next time. A cat that ends a session feeling trapped will remember it.
The one-paw-per-session approach is completely valid, especially for beginners or cats that are new to the process. Trim the front left paw today. The front right paw tomorrow. Rear paws on day three. Over time, as your cat builds positive associations, you will find you can do more in a single sitting.
Practical tip: Start with the rear paws if your cat is nervous. Rear claws are generally shorter, less sharp, and less threatening to the cat when handled. Building success on the easier paws first creates momentum.
According to PDSA veterinary guidance, most cats need their claws trimmed every 10–14 days to prevent overgrowth. Indoor cats tend to need more frequent trims than outdoor cats, whose claws wear down naturally on rough surfaces. For more guidance on building a regular grooming routine, see our cat grooming schedule guide, or explore our 9-step method for stress-free claw trimming.
What you should see: A cat that walks away calmly and returns to normal behavior within minutes. That is a successful session — even if you only clipped two claws. Consistency over weeks is what transforms a squirming, scratching ordeal into a manageable 10-minute routine.
How to Trim an Angry or Unwilling Cat’s Claws
Some cats turn into small furry tornadoes the moment they see the clippers. If your cat is the “dramatic creature” type — squirming, scratching, vocalizing, or running away the second you sit down — this section is for you. The good news: there are tested, vet-endorsed strategies for exactly this situation.
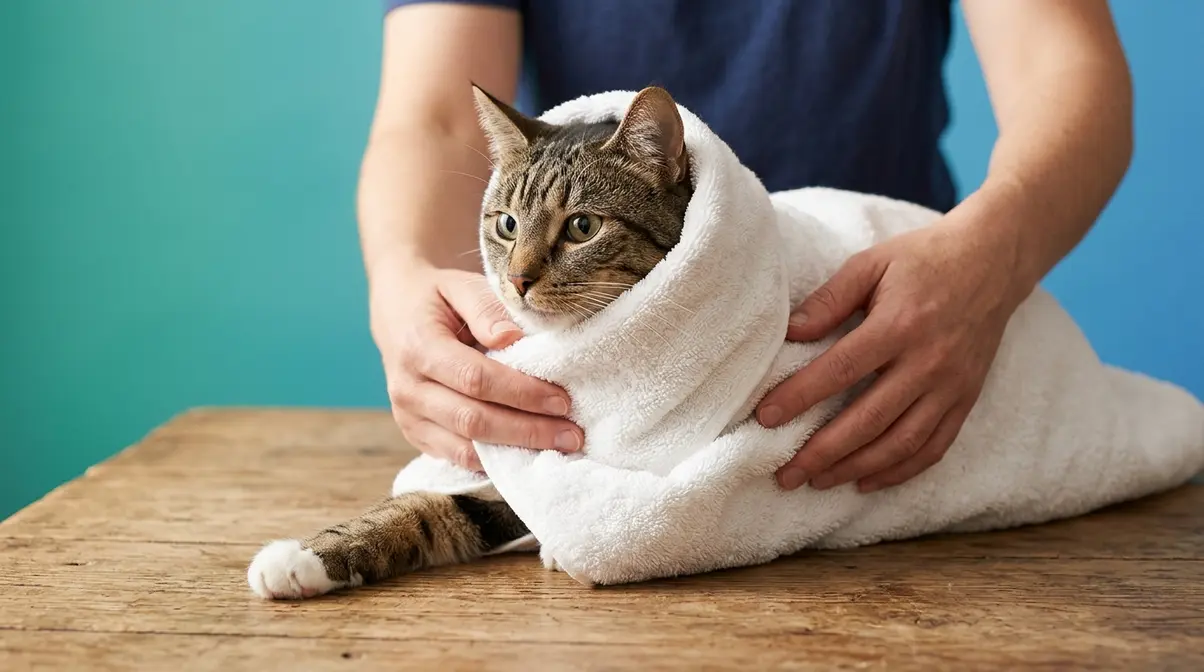
The Kitty Burrito Method
The kitty burrito method is the safest restraint technique for an unwilling cat — and it is far gentler than it sounds. It keeps your cat’s claws contained without causing pain or panic, and it protects you from scratches while you work. West Lake Animal Hospital and veterinary technicians across the country recommend this approach for cats that resist standard lap-trimming.
How to do it:
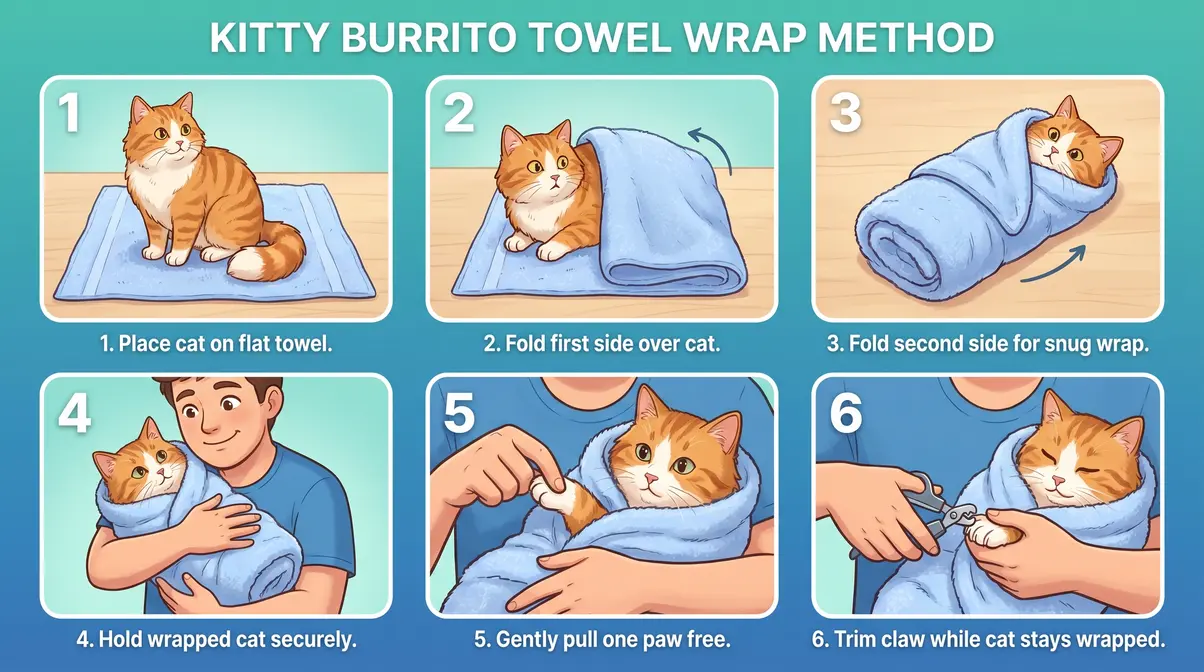
- Lay a large bath towel flat on a table or the floor.
- Place your cat two-thirds of the way onto the towel, with their head toward the far edge and their tail end closest to you.
- Fold one side of the towel over your cat’s body, tucking it snugly underneath them — this wraps the front legs.
- Fold the opposite side over, creating a secure wrap. Your cat’s body should be snug but not compressed.
- Gently hold the wrapped bundle against your body with one arm.
- Pull one paw free from the wrap at a time, trim the claws on that paw, then tuck it back in before moving to the next.
Key rules: Wrap snugly — not tightly. Your cat should be able to breathe comfortably. If your cat panics, unwrap immediately, give them space, and try again another day. Never force the wrap on a cat that is already in a high-stress state. The Humane World for Animals recommends pairing the burrito method with high-value treats to build a positive association over multiple sessions.
What you should see: A cat that is still, or at most mildly grumbling. The towel creates a feeling of security for many cats — similar to swaddling. Some cats actually calm down once wrapped.
Desensitize Your Cat Over Time
The kitty burrito method handles today’s trim. Desensitization handles the next six months of trims — and turns your unwilling cat into a merely unimpressed one. This is the long-game version of The Calm-First Method, and it is backed by research from the UC Davis Animal Welfare Epi Lab, which developed a multi-step desensitization protocol specifically for cats (University of California, 2026).
The desensitization schedule (4 weeks):
- Week 1: Handle your cat’s paws daily during calm moments — no clippers, no trimming. Simply pick up each paw, hold it for a few seconds, and release. Give a treat every time.
- Week 2: Begin pressing the toe pad gently to extend the claw. Hold for one second, release, treat. Do this on two or three toes per session.
- Week 3: Introduce the clippers — but don’t clip anything. Let your cat sniff the clippers. Hold them near a paw. Make the clipping sound near (but not on) the claw. Treat after each exposure.
- Week 4: Clip one or two claws at the end of a paw-handling session. Keep it brief, keep it positive.
This graduated approach works because it teaches your cat that paw-handling predicts treats and praise — not restraint and stress. VCA Hospitals confirms that cats trained with handling exercises show significantly less resistance during grooming procedures (VCA Hospitals, 2026).
Realistic expectation: Some cats desensitize within a month. Others take three months. Both timelines are normal. The goal is steady improvement, not perfection.
How to trim cat claws by yourself?
Doing this alone is genuinely harder — but it is absolutely possible, and millions of cat owners do it every week. The key is positioning, not strength.
The best solo position: Sit on the floor with your legs extended. Place your cat between your thighs, facing away from you, with their back against your stomach. Your legs create a gentle barrier on both sides. This keeps them from spinning around while leaving both your hands free to work.
Alternative: If your cat tolerates it, drape them across your lap on their back — belly up. Many cats are surprisingly calm in this position because it mimics how they rest naturally.
- Practical solo tips:
- Use scissor-type clippers one-handed — they are easier to control solo than guillotine-type.
- Work in short bursts: extend one claw, clip, treat, pause. Repeat.
- If your cat starts to squirm, place your forearm gently across their shoulders (not their neck) to provide mild, calming pressure.
- The kitty burrito method is especially effective solo — once wrapped, your cat has limited movement and you can work with both hands.
According to Chewy’s grooming guidance, solo trimming becomes significantly easier after three to four consistent sessions, as cats learn to anticipate the routine rather than fear it.
What to Do When Things Go Wrong
Even careful, experienced owners occasionally make mistakes. Knowing what to do in the next 60 seconds is what separates a minor incident from a traumatic one — for both of you.
If You Cut the Quick (And It Bleeds)
First: breathe. Cutting the quick — the pink blood vessel inside the claw — is painful for your cat and alarming for you, but it is not a medical emergency. The bleeding almost always stops within five minutes on its own.
What to do immediately:
- Stay calm. Your cat will sense your panic and escalate their own distress.
- Apply styptic powder directly to the bleeding nail tip. Press a small pinch against the claw end and hold for 10–15 seconds. Styptic powder contains a clotting agent that stops bleeding within seconds (PetMD).
- No styptic powder? Apply cornstarch or plain flour instead — press firmly and hold. These household alternatives are effective in a pinch, though styptic powder works faster.
- Do not squeeze the paw — this increases blood flow to the area and slows clotting.
- Let your cat rest in a quiet space for 20–30 minutes before resuming any activity.
What you should see: Bleeding stops within 1–5 minutes. Your cat may lick the paw briefly — this is normal. Monitor the nail over the next 24 hours for swelling or signs of infection (redness, discharge, limping). If bleeding does not stop after 10 minutes of pressure, contact your veterinarian.
Going forward: Cut slightly less next session. Give yourself a larger margin from the quick. One nick does not mean you are bad at this — it means you are learning.
Safe sedation options for nail trims
⚠️ Medical Disclaimer: The information in this section is for educational purposes only and does not constitute veterinary advice. Never administer any medication to your cat without explicit guidance from your veterinarian.
This is the question cat owners search for most desperately — and the one that carries the most risk. So here is the honest, vet-informed answer.
Can you give your cat Benadryl (diphenhydramine) to calm them for nail trims? No — and veterinarians strongly advise against it. Benadryl is not approved for use in cats for sedation, and its effects on cats are unpredictable. In some cats, diphenhydramine causes excitability rather than sedation — the opposite of what you want. Dosing errors can lead to serious side effects including rapid heart rate and breathing problems. Do not attempt this without a veterinarian’s explicit instruction.
What about gabapentin? Gabapentin is a prescription medication that veterinarians do sometimes prescribe for anxious cats before stressful procedures. When dosed correctly under veterinary supervision, it is considered safe and effective for reducing feline anxiety (GoodRx, 2026; Cat Friendly Homes, 2026). Doses for anxiety in cats typically range from 50 to 200 mg, but this varies significantly by individual cat — which is precisely why it requires a prescription and vet oversight.
The bottom line: If your cat’s stress during nail trims is severe enough that you are researching sedation, that is a signal to call your veterinarian — not to reach for the medicine cabinet. Your vet can prescribe an appropriate pre-procedure medication, discuss professional grooming referrals, or assess whether an underlying anxiety issue needs treatment. Consult your veterinarian before administering any medication to your cat. See our guide to finding a cat-friendly veterinarian for help locating a vet experienced with anxious cats.
When to Call a Vet or Groomer
Some situations genuinely call for professional help — and recognizing them is a sign of good judgment, not failure.
- Call your vet or groomer if:
- Your cat becomes aggressive enough to bite or scratch deeply during every trimming attempt
- The claw has grown into the paw pad (you will see redness, swelling, or your cat limping)
- A nail is cracked, broken, or bleeding without any trimming
- Your cat is in visible pain when their paws are touched
Professional groomers who specialize in cats can often complete a full trim in under five minutes using techniques developed over years of practice. Many veterinary clinics also offer nail trim appointments — often for a small fee — that are worth every dollar if your cat’s stress level is making home trimming unsafe. For guidance on finding a qualified groomer, see our cat grooming professional directory.

Frequently Asked Questions
Trimming an unwilling cat’s claws
The most effective approach for an unwilling cat is the kitty burrito method — wrapping your cat snugly in a bath towel to contain all four limbs, then pulling one paw free at a time. Pair the wrap with high-value treats and keep sessions to just two or three claws before stopping. For long-term improvement, the UC Davis Animal Welfare Epi Lab’s desensitization protocol — graduated paw-handling over four weeks before introducing clippers — reduces resistance significantly (University of California, 2026). Forcing a struggling cat risks injury to both of you and makes future sessions harder.
How to cut nails without getting scratched
The kitty burrito towel wrap is the most reliable way to trim cat claws without getting scratched. Wrap your cat snugly in a large bath towel, leaving only one paw exposed at a time. Additionally, choose the right moment — a drowsy cat after a meal is far less likely to scratch than an alert, active one. Starting with the rear paws first reduces risk, as rear claws are shorter and less sharp. The Cornell University College of Veterinary Medicine recommends using the toe-pad squeeze technique to extend claws cleanly, minimizing the time you spend handling each paw (Cornell University, 2026).
Can I give my cat Benadryl for trims?
No — do not give your cat Benadryl (diphenhydramine) without explicit veterinary instruction. Benadryl is not approved for feline sedation and can cause paradoxical excitability in cats — the opposite of the calming effect you want. Dosing errors carry serious health risks. If your cat’s stress level makes nail trimming unsafe, your veterinarian is the right first call. They can prescribe appropriate medications like gabapentin under controlled dosing, or recommend professional grooming as an alternative. Never administer any sedative or antihistamine to your cat without a vet’s explicit guidance.
How often should you trim a cat’s claws?
Most indoor cats need their claws trimmed every 10 to 14 days. This frequency prevents the sharp tips from overgrowing and curling into the paw pad. Outdoor cats may naturally wear down their claws on rough surfaces and require less frequent trimming, but you should still check their paws biweekly to ensure they remain healthy.
What happens if you don’t trim a cat’s claws?
Untrimmed cat claws can overgrow, curl inward, and puncture the paw pad. This causes severe pain, potential infection, and mobility issues for your cat. Additionally, overgrown claws are more likely to snag on carpets or furniture, which can lead to torn nails, bleeding, and further distress for your pet.
Bringing It All Together
For anxious cat owners, figuring out how to trim cat claws at home feels far more daunting than it needs to be. The process becomes manageable — and even routine — when you prioritize calm over speed. Most cats need a trim every 10–14 days, and a single well-executed session of two or three claws beats a chaotic full-trim every time.
The Calm-First Method is the thread running through every step in this guide: choose the right moment, handle paws before picking up clippers, reward generously, and stop before your cat reaches their limit. That consistent, low-pressure approach is what transforms a two-person wrestling match into a solo, 10-minute routine — usually within a few weeks.
Your next step is simple: gather your tools today and spend five minutes handling your cat’s paws without any clippers in sight. Give treats. Build the association. When your cat stays relaxed through paw-handling, you are ready for the clippers. Start with one claw. That is enough for day one.