To bathe a cat that hates water, use the Calm-Capture-Comfort Method: pre-fill two basins with lukewarm water to avoid faucet noise, wrap your cat in a towel to prevent scratching, then wash and rinse quickly using the two-bucket technique. The entire process takes 5–10 minutes. Reward your cat immediately afterward with high-value treats.
“How can you bathe an extremely sensitive cat who hates baths, and will scratch/dig their nails into you while they’re soaking wet after giving them a bath?”
If that question sounds familiar, you’re not alone — and you’re not doing it wrong.
Without the right technique, a bath can turn into a scratching match that leaves you injured and your cat terrified — making every future bath even harder. Learning how to bathe a cat that hates water isn’t just about getting them clean; it’s about not making things worse.
By the end of this guide, you’ll have a step-by-step method — the Calm-Capture-Comfort Method — that keeps both you and your cat safe, even if your cat absolutely hates water. You’ll move through four phases: preparing the space, the towel wrap, the two-bucket wash, and post-bath recovery.
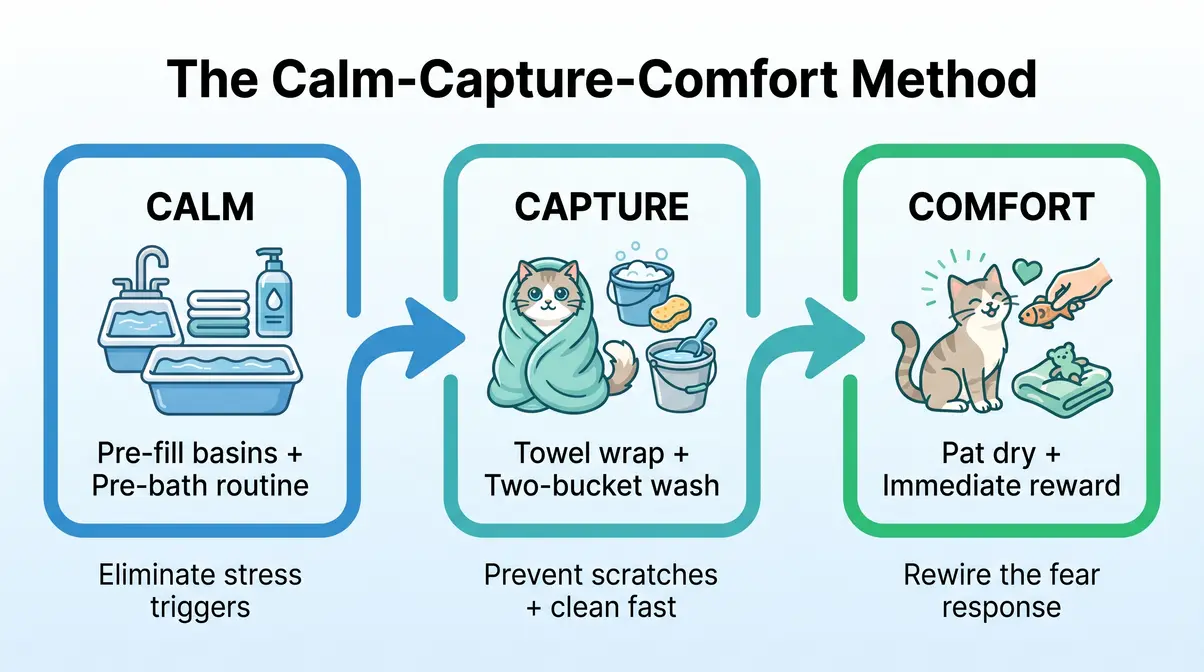
Bathing a cat that hates water is possible — and safe — when you follow the Calm-Capture-Comfort Method before, during, and after the bath.
- Eliminate faucet noise: Pre-fill two basins with lukewarm water — running water is a top trigger for cat panic
- Prevent scratches: The towel wrap (kitty burrito) secures your cat’s paws before the bath begins
- Speed matters: The full wash and rinse should take no more than 5–10 minutes
- Reward immediately: High-value treats given within 30 seconds of drying rewire the fear response over time
- Waterless options exist: Shampoo foam and grooming wipes work for light messes when water isn’t feasible
Why Your Cat Hates Water (And When a Bath Is Necessary)
Domestic cats resist water for two deeply rooted reasons: evolutionary history and sensory disruption. Understanding both explains why most standard bath advice fails — and why the techniques in this guide work where generic tips don’t.
The Science Behind Feline Water Aversion
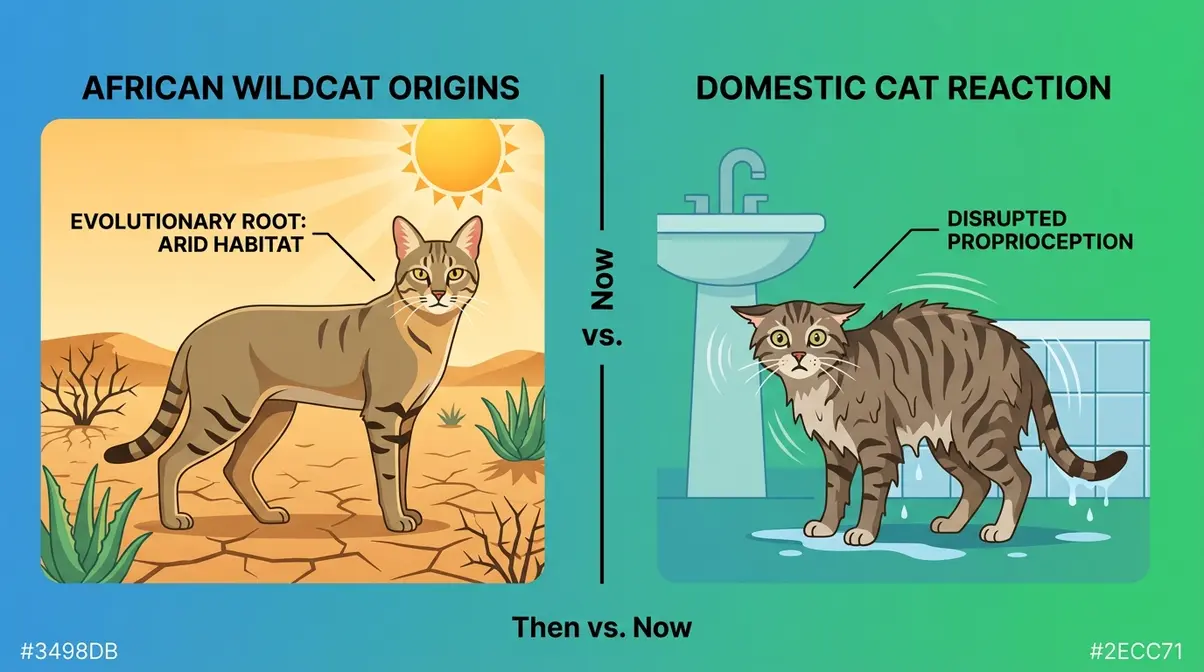
Domestic cats (Felis catus) trace their lineage to African wildcats (Felis lybica), which evolved in arid desert environments where water was rarely encountered. Unlike dogs — many of whom were selectively bred for water-based tasks like retrieving waterfowl — cats were never conditioned to associate water with anything useful or safe. Water simply wasn’t part of their survival toolkit.
When a cat gets wet, a second problem kicks in: sensory disruption. A soaked coat can increase in weight significantly, which alters a cat’s proprioception (the sense of where their own body is in space). For a species that depends on split-second agility for survival, a sudden change in how their body feels is deeply disorienting — even frightening. Imagine if your sense of balance suddenly felt completely wrong. That’s what a wet coat does to a cat.
Then there’s the sound. The steady noise of running water triggers a stress response in many cats before they’re even wet. That’s why the two-bucket method — pre-filled, silent water — removes one of the biggest triggers before the bath even starts. Knowing this, every technique in this guide is designed to address exactly these two triggers.
When Does a Cat Actually Need a Bath?
Most indoor cats are exceptional self-groomers. Cat owners and veterinary professionals consistently report that a healthy adult cat only needs a bath 1–4 times per year — and sometimes not at all — unless they get into something sticky, smelly, or medically problematic (veterinary consensus, ASPCA). You might feel like you’re risking your life every time you try, but with the right approach, nobody gets hurt.
- A bath is genuinely necessary when your cat has:
- A flea infestation requiring medicated shampoo
- Contact with a toxic substance (motor oil, household chemicals, tar)
- Severe sticky or smelly contamination (skunk spray, paint)
- A skin condition or medical issue diagnosed by a vet
- Mobility issues (elderly or obese cats who can no longer self-groom)
A bath is NOT necessary for: normal dirt, mild odor, or routine coat maintenance. For those situations, the waterless alternatives covered later in this guide are a gentler, lower-stress option. Now that you know what’s triggering the panic, let’s make sure you have everything you need before your cat even enters the bathroom.
What You’ll Need Before You Start
Preparation is the entire first phase of the Calm-Capture-Comfort Method. Cat owners consistently report that the most common bath failures happen because something wasn’t ready — a missing towel, a bottle of shampoo left in another room — forcing the owner to let go of the cat mid-bath. That one moment of lost control can set back weeks of trust-building.
Your Pre-Bath Supply Checklist
Gather everything before your cat enters the bathroom. Once you close that door, you should never need to leave.
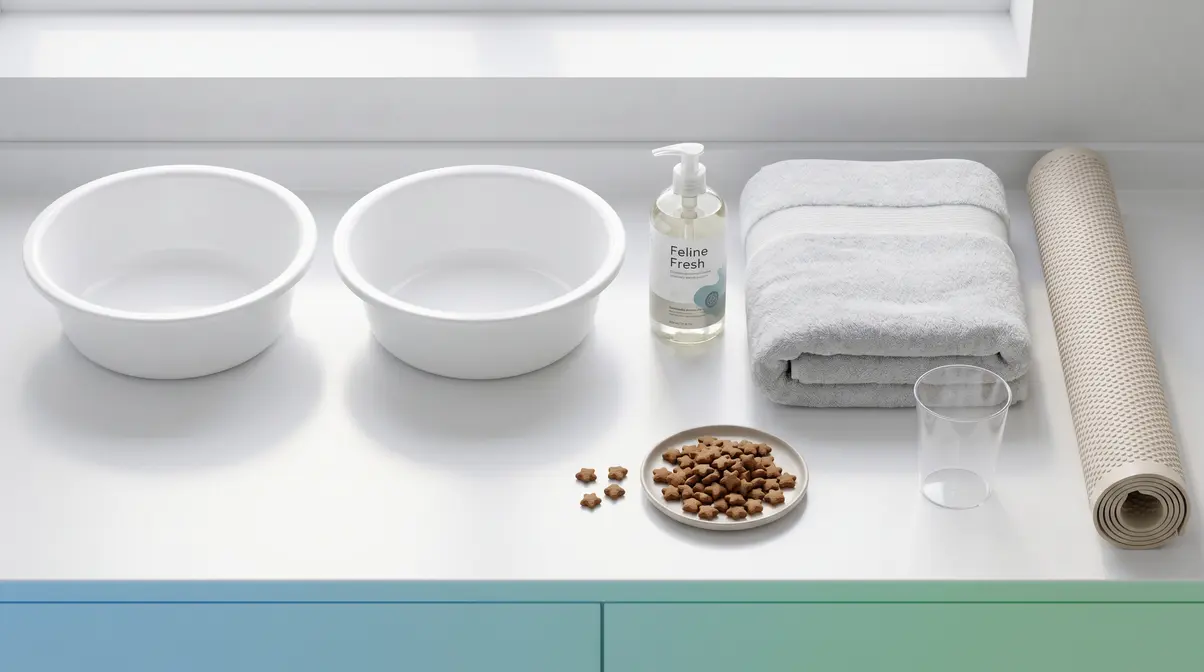
- You’ll need:
- Two plastic basins or buckets — one for washing, one for rinsing (the two-bucket method)
- Cat-specific shampoo — never use human shampoo, which disrupts a cat’s skin pH balance
- A large, thick bath towel (for the kitty burrito wrap) plus one extra for drying
- A non-slip mat — a rubber bath mat or folded towel placed on the sink or tub floor
- A plastic cup or ladle — for pouring water gently over your cat
- High-value treats — something your cat doesn’t get any other time (small pieces of cooked chicken, commercial cat treats)
- Optional: cotton balls — to gently protect ears from water
- Optional: a second person — extremely helpful for first-timers or highly resistant cats
According to Purina’s cat care guidance, having all supplies within arm’s reach before the bath begins is one of the most practical steps an owner can take to keep the experience calm.
Preparing Your Cat the Day Before
The day before the bath is part of the Calm phase — and it’s one step most guides skip entirely.
Trim your cat’s claws. This single step dramatically reduces injury risk. Use cat-specific nail clippers and trim just the sharp tip of each claw. Don’t cut into the pink “quick” (the blood vessel visible inside the nail). If your cat resists nail trimming, do it in short sessions over a few days rather than all at once.
Run a short desensitization session. Bring your cat into the bathroom while everything is dry and quiet. Let them sniff the basins and the towel. Offer a treat. Leave. Repeat this two or three times. Fear Free-certified trainers recommend this kind of gradual exposure because it breaks the association between “bathroom” and “immediate threat” before bath day arrives.
Skip a meal before the bath. A slightly hungry cat is more motivated by treats. Timing the bath 1–2 hours before a scheduled meal makes the reward ritual far more powerful.
Step 1 — Prepare Your Bathroom 30 Minutes Before Bath Time
The Calm phase is about controlling the environment before your cat arrives. A bathroom that is warm, quiet, and set up correctly removes stress triggers that have nothing to do with the water itself.
Set Up a Non-Slip Surface and Pre-Fill Your Containers
Tools/materials needed: Two basins, lukewarm water, non-slip mat, plastic cup. Estimated setup time: ~5 minutes.
- Place your non-slip mat in the sink or tub. A cat that slips and scrambles on a wet surface will panic immediately — the mat prevents this entirely.
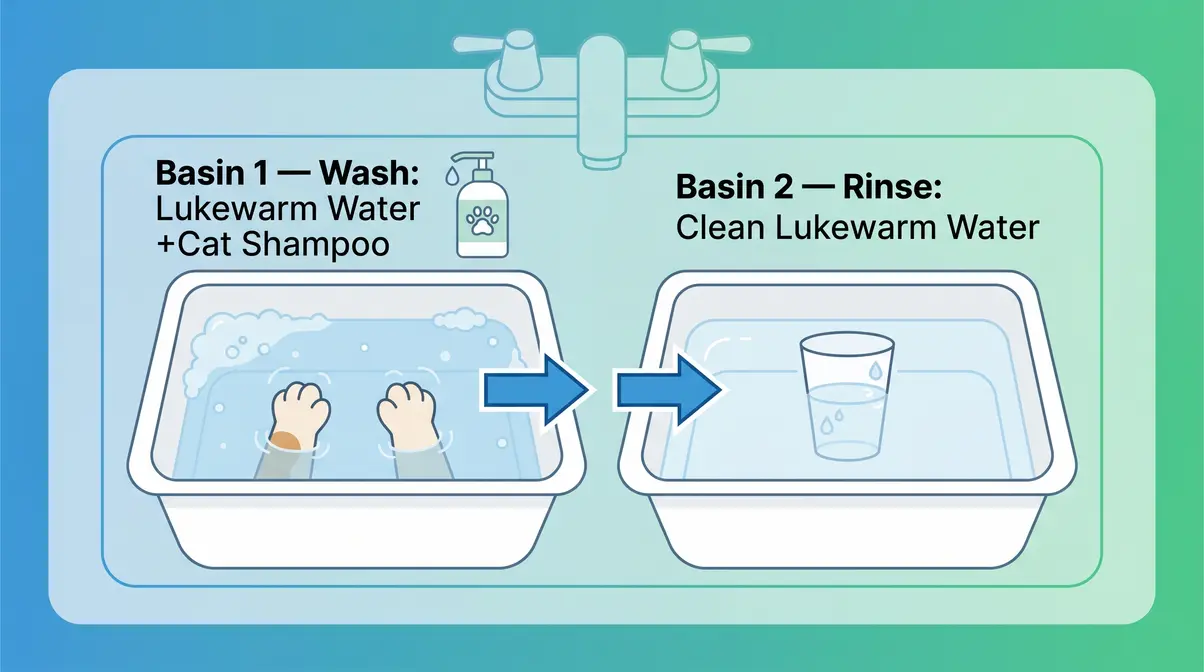
- Fill Basin 1 with 3–4 inches of lukewarm water (around 100–102°F / 38–39°C — close to a cat’s normal body temperature). This is your wash basin. Add the recommended amount of cat shampoo and stir gently.
- Fill Basin 2 with the same amount of clean, lukewarm water. This is your rinse basin — no shampoo.
- Set your plastic cup inside Basin 2 so it’s ready to scoop.
- Close the bathroom door. An escape mid-bath is dangerous — a soaking wet, panicked cat running through your home is both a safety risk and a trust-destroying event.
Pre-filling both basins is the most important step in the entire method. The sound of running water is a primary stress trigger for water-averse cats. By the time your cat enters the room, the water is already silent and waiting.
The Pre-Bath Calming Routine
Estimated time: ~5–10 minutes before bringing your cat in.
- Warm the bathroom. Close the door and run warm water in the shower briefly (not for the bath — just to raise the room temperature). A warm room reduces the shock of being wet.
- Play soft background sound. A low-volume radio or white noise app can mask unexpected sounds from outside the room.
- Bring your cat in calmly. Don’t chase them. Carry them gently, speaking in low, reassuring tones. Sit on the bathroom floor with them for 60 seconds before moving toward the sink or tub.
- Offer one small treat while they’re still dry. This begins the positive association before any water contact happens.
Cat owners consistently report that the pre-bath calming routine — even just 2–3 minutes of quiet sitting — noticeably reduces the intensity of the cat’s resistance during the wash itself. The goal is to help your cat acclimate your pet to the bathroom as a neutral space, not a threat zone.
✅ Checkpoint — Step 1 Complete: Both basins are pre-filled and silent. Non-slip mat is in place. Bathroom door is closed. Your cat has received one treat and is in the room with you. You are ready to move to the towel wrap.
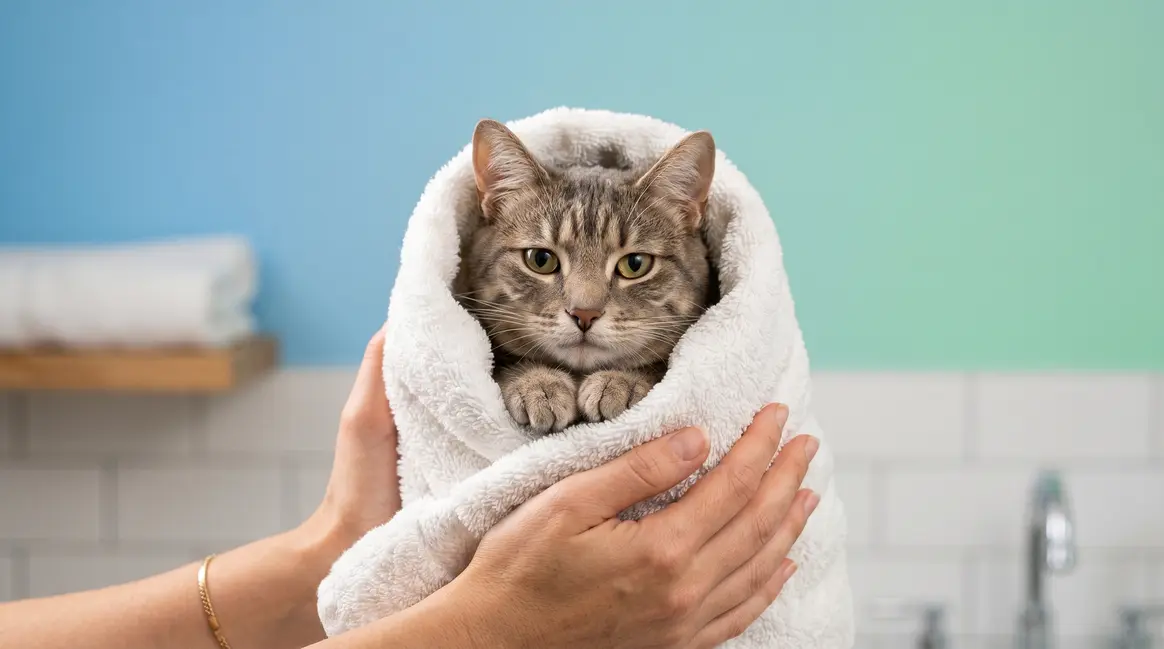
Step 2 — Wrap Your Cat in the Towel (The Kitty Burrito)
This is the Capture phase — the most important step for preventing scratches and keeping your cat from escaping mid-wash. The towel wrap (also called the kitty burrito) is a safe, gentle restraint technique that secures your cat’s paws without causing pain or cutting off circulation.
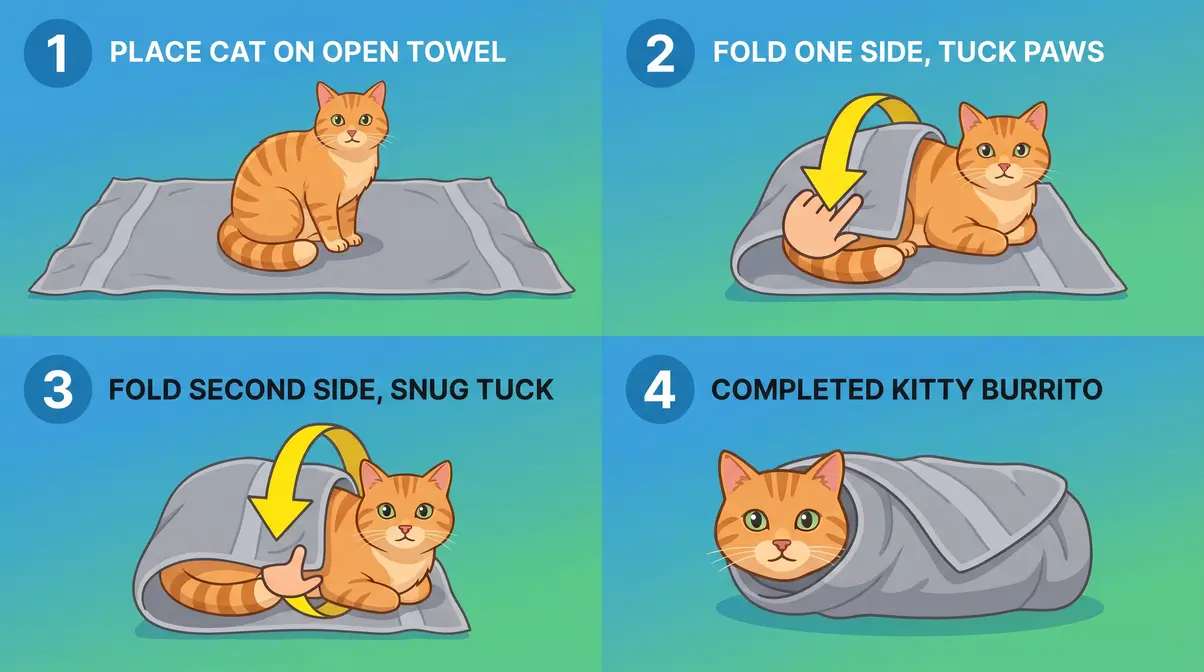
How to Perform the Towel Wrap in 4 Steps
Tools needed: Large, thick bath towel. Estimated time: ~60 seconds once practiced.
- Lay the towel flat on a dry surface (the closed toilet lid or a counter works well). Place your cat in the center.
- Fold one side of the towel over your cat’s body, tucking it snugly under their opposite side. The key is to wrap the front legs against the body — this is what prevents scratching.
- Fold the second side over the top, again tucking snugly. Your cat should look like a burrito with only their head visible.
- Secure the wrap by holding the bundle against your body with one arm. Use your free hand to support the head and neck.
The wrap should be snug enough to prevent the front paws from escaping, but never so tight that it restricts breathing. You should be able to slide two fingers under the towel at chest level. Fear Free-certified grooming professionals recommend this technique specifically because it reduces the cat’s ability to scratch without causing the cat to feel trapped or suffocated.
Important: If your cat is already in a highly agitated state — hissing, growling, or actively biting — do not attempt the wrap. See the Troubleshooting section below.
What to Do If Your Cat Fights the Wrap

Some cats will kick, wriggle, or cry during the wrap. This is normal. Here’s how to respond:
- Stay calm and move slowly. Your cat reads your body language. Tense, fast movements make them more afraid.
- Use your body weight gently. If your cat is pushing out of the wrap, hold the bundle firmly against your torso — your body acts as a second wall.
- Re-wrap if needed. If a paw escapes, set the cat down on the towel and start again. Don’t try to force the paw back in — you’ll get scratched.
- Try a second person. One person holds the cat gently on the surface while the other performs the wrap. This is the single most effective change for a truly tricky-to-control cat.
✅ Checkpoint — Step 2 Complete: Your cat is wrapped with paws secured and only the head visible. You are holding the bundle against your body. You are ready to move to the wash basins.
Step 3 — The Two-Bucket Method (Wash and Rinse)
The two-bucket method is the core of the Capture phase — and the technique that separates this guide from generic advice. Instead of using a running faucet (which adds noise stress) or dunking your cat (which triggers panic), you use two pre-filled, silent basins: one to wet and wash, one to rinse clean. Cat owners who switch to this method consistently report a calmer cat from the very first pour.
Bucket 1 — Wetting and Applying Shampoo
Estimated time for this step: ~2–3 minutes.
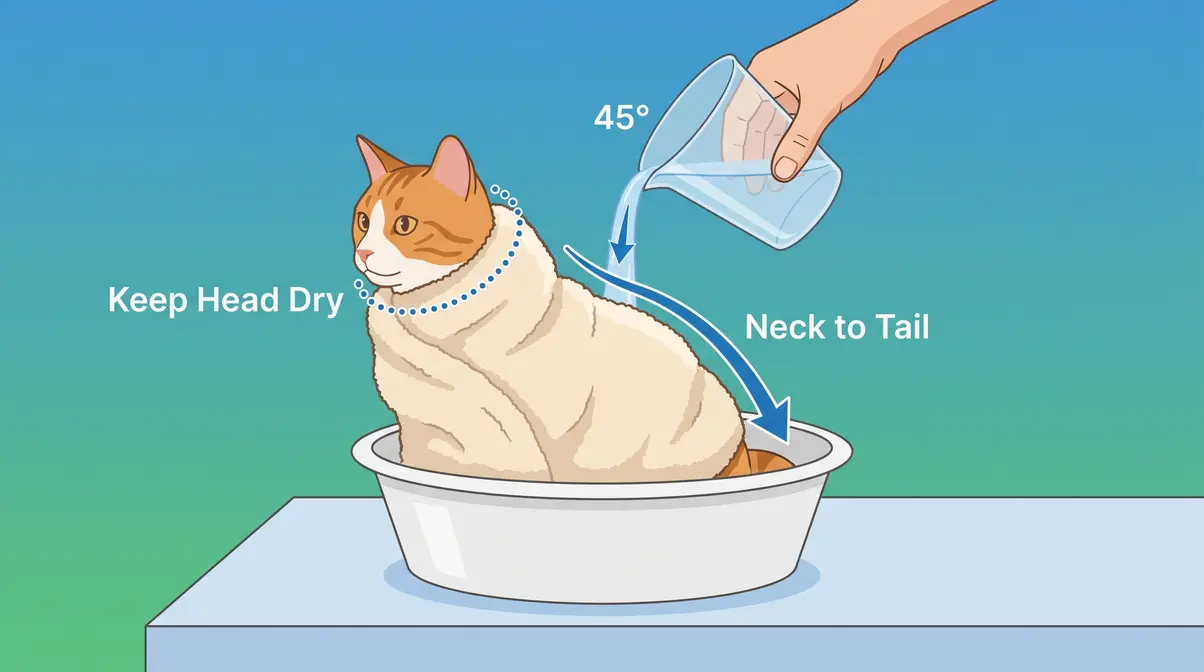
- Unwrap just the head and neck area of the towel, keeping the body and paws secured. You’ll wash the face last and separately with a damp cloth — never pour water directly over a cat’s face.
- Use the plastic cup to scoop water from Basin 1 and pour it slowly over your cat’s back and sides. Start at the neck and work toward the tail. Pour in a slow, steady stream — not a splash.
- Work the shampoo in gently using your fingertips in a circular motion. Focus on the coat rather than the skin. Avoid the face, ears, and eyes entirely.
- Keep talking. Use low, steady, reassuring tones throughout. Your voice is a genuine calming tool — silence can feel threatening to a stressed cat.
According to Adams Pet Care’s flea bath guidance, working quickly and methodically — rather than slowly and hesitantly — actually reduces the cat’s distress, because hesitation prolongs the experience without reducing the stress.
Bucket 2 — Rinsing Completely
Rinsing is where most owners lose control of the bath. The cat is already wet and agitated, and many owners rush or skip thorough rinsing to end the ordeal. This is a mistake: leftover shampoo residue causes skin irritation, which makes the next bath even harder.
- Move your cat to Basin 2 (or keep them in place and use the clean-water cup). Scoop clean water from Basin 2 and pour it over the same areas you washed — neck to tail.
- Rinse until the water running off the coat is completely clear. Run your fingers through the coat as you rinse — you should feel no slippery residue.
- Wipe the face with a separate damp washcloth. Use gentle strokes from the inner eye outward. Never pour water directly on the face.
Keeping Your Cat Calm During the Wash
Behavioral techniques matter as much as physical technique during the wash phase. According to Carroll County Animal Hospital’s bathing guidance, the goal isn’t just to clean the cat — it’s to avoid creating a negative memory that makes every future bath more difficult.
- Work fast, not frantically. A 5–7 minute wash is ideal. Longer exposure increases stress, not cleanliness.
- Avoid eye contact during the wash. Direct eye contact reads as a threat to a stressed cat. Look at the coat, not the face.
- Narrate what you’re doing. “Good job, almost done, just the rinse now.” Your cat doesn’t understand the words, but the steady rhythm of your voice signals safety.
- Never scold or raise your voice. Even if you’re startled by scratching, a sharp sound will escalate the cat’s fear immediately.
✅ Checkpoint — Step 3 Complete: Your cat has been washed and fully rinsed with no shampoo residue remaining. The face has been wiped with a damp cloth. You are ready to move to drying and the reward ritual.
Step 4 — Dry and Reward Your Cat Immediately
This is the Comfort phase — and it’s the phase that determines whether future baths get easier or harder. What you do in the 60 seconds after the bath ends has a direct impact on how your cat stores this experience in memory.
Towel Drying Without Triggering a Panic Response
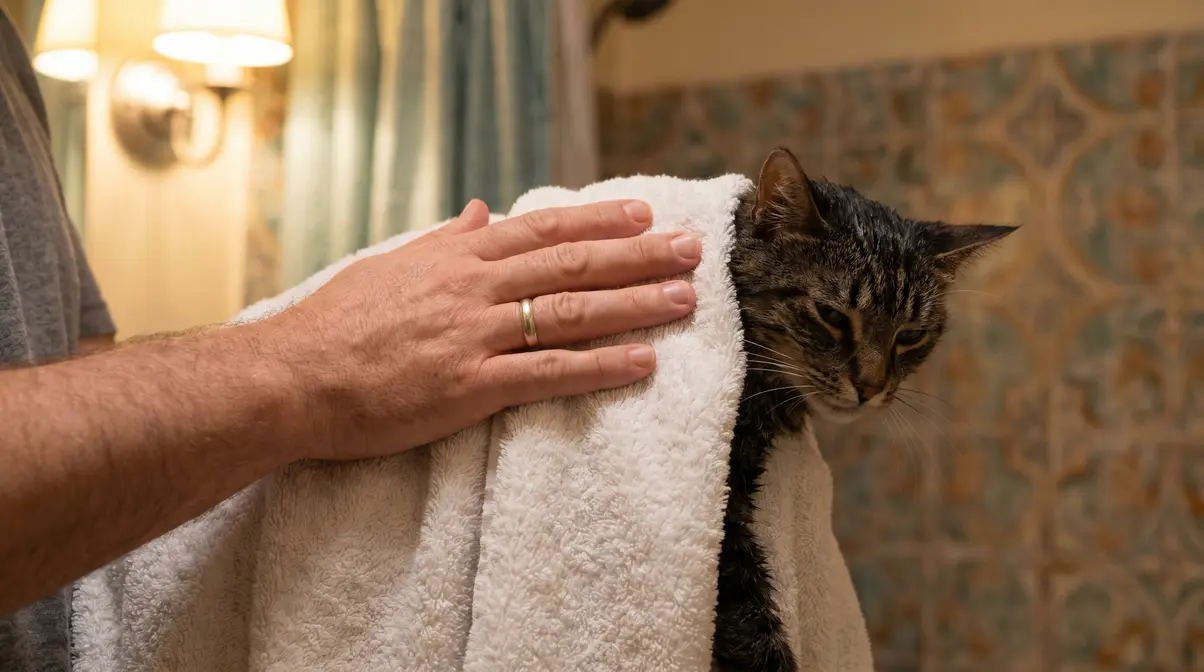
Resist the urge to rub your cat vigorously with the towel. Rubbing creates static, tangles fur, and — most importantly — feels chaotic and threatening to a cat that is already overstimulated.
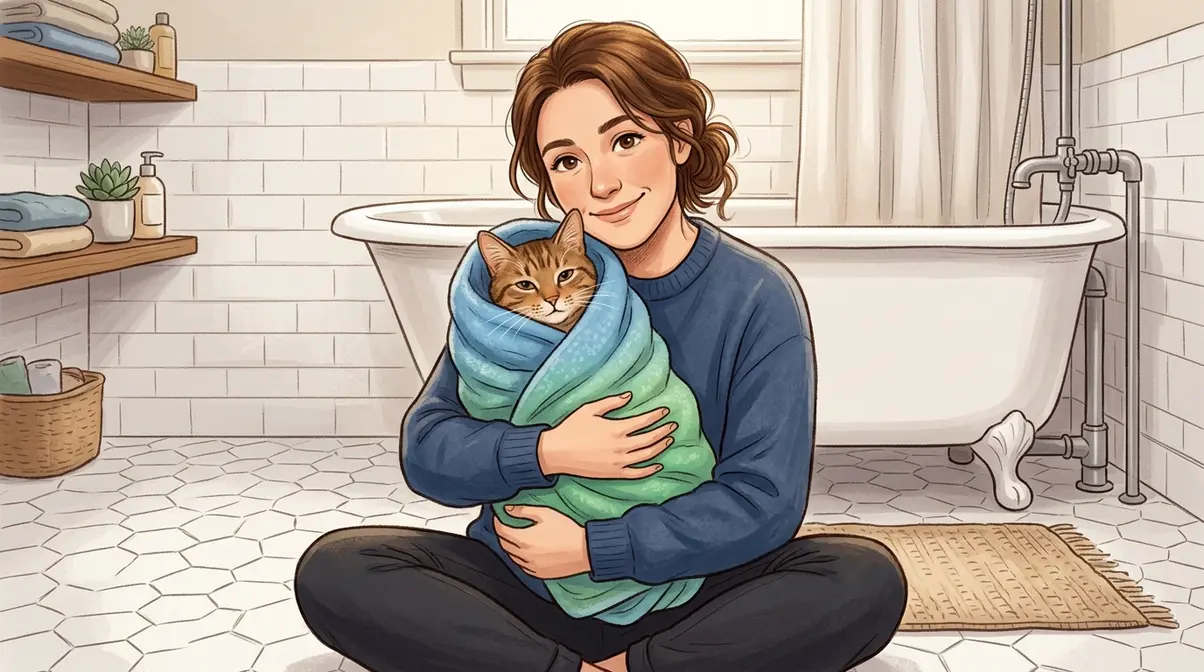
- Wrap your cat loosely in the dry towel (the second one you set aside). Hold them gently against your body.
- Pat and press rather than rub. Press the towel against sections of the coat and hold for a few seconds to absorb water, then move to the next section.
- Work from neck to tail in the same direction as the fur growth.
- Move to a warm, quiet room as soon as the worst of the moisture is absorbed. Let your cat finish drying naturally in a warm space — never use a human hair dryer on high heat, which can cause burns. A pet dryer on the lowest warm setting held at least 12 inches away is acceptable if your cat tolerates it.
The Reward Ritual That Prevents Future Bath Trauma
The reward ritual is the single most underrated step in cat bathing. Most guides mention treats. None explain the behavioral mechanism behind why timing matters so much.
When a cat receives a high-value reward within 30 seconds of a stressful experience ending, the brain begins to associate the end of the stressor with something positive. Over multiple repetitions, this gradually softens the fear response. This is the same principle used by veterinary behaviorists at institutions like Ohio State University’s Veterinary Medical Center, who recommend immediate positive reinforcement as the primary tool for reducing fear-based reactions in cats.
- The ritual:
- The moment towel drying begins, offer the first treat.
- Continue offering small treats every 30–60 seconds during drying.
- Once your cat is in the warm room, offer a larger reward — a small portion of their favorite wet food, a long play session, or extended lap time. Whatever your individual cat values most.
- Stay calm and affectionate. Avoid the temptation to apologize or act overly sorry — anxious human energy re-triggers cat anxiety.
✅ Checkpoint — Step 4 Complete: Your cat has been patted dry, moved to a warm room, and received high-value treats within 30 seconds of the bath ending. The Calm-Capture-Comfort Method is complete.
Giving a Flea Bath to a Cat That Hates Water
A flea bath follows the same structure as a regular bath, with two important adjustments. Flea shampoo requires slightly longer contact time, and the stakes are higher — you need thorough coverage to be effective.
Adjusting the Two-Bucket Method for Flea Shampoo
The two-bucket method works directly for flea baths, but with one modification: after applying flea shampoo, you need to allow it to sit for the contact time specified on the label (typically 3–5 minutes) before rinsing. This is the hardest part of a flea bath with a resistant cat.
- How to manage the contact time:
- Keep your cat wrapped in the towel during the wait. The wrap prevents them from licking the shampoo off their coat.
- Continue offering treats during the wait period.
- Talk continuously in low, reassuring tones.
- Work quickly but thoroughly — start at the neck and create a “flea collar” of lather before moving down the body. This prevents fleas from escaping to the face as the shampoo spreads.
According to Adams Pet Care’s flea bath instructions, starting the shampoo application at the neck is critical — it creates a barrier that prevents fleas from retreating to the head and ears where the shampoo can’t safely reach.
Can You Use Dawn Dish Soap on Cats? The Vet Answer
This is one of the most-searched questions about cat bathing — and the answer is nuanced.
Dawn dish soap can remove fleas by disrupting the surface tension of water and causing fleas to sink and drown. Wildlife rehabilitators have used it for this purpose for decades. However, the PetMD veterinary guidance on cat bathing and veterinary professionals consistently caution that Dawn is not formulated for cats and can strip the natural oils from a cat’s skin and coat, potentially causing dryness, irritation, and flaking with repeated use.
- The vet consensus:
- One-time emergency use (severe flea infestation, no cat shampoo available): Dawn is generally considered safe as a single-use option.
- Repeated use: Not recommended. Use a veterinarian-approved flea shampoo formulated for cats instead.
- Never use on kittens under 8 weeks or cats with open skin wounds, skin conditions, or known sensitivities without explicit veterinary guidance.
Bathing a Kitten or First-Timer: What’s Different
Bathing a kitten — or any cat that has never been bathed before — requires the same four-step framework, but with even greater emphasis on the Calm phase.
Kittens under 8 weeks old should not be bathed at all unless medically necessary, as they cannot regulate their body temperature effectively and are at risk of hypothermia. For kittens 8–12 weeks, keep the bath extremely brief (under 3 minutes), use only a small amount of kitten-safe shampoo, and dry them immediately and thoroughly.
For adult cats being bathed for the first time, the desensitization work the day before (described in the Prerequisites section) is especially important. A first-time adult cat has no reference point for what a bath is — the experience is entirely novel and therefore maximally threatening. Veterinary professionals at Carroll County Animal Hospital recommend introducing first-timers to the bathroom environment over 2–3 days before the bath, and keeping the first bath as short as possible — even if the rinse isn’t perfect — to establish that the experience ends and life continues normally.
The reward ritual is non-negotiable for first-timers. The first bath sets the template for every future bath. Make the ending as positive as possible, and each subsequent bath will be slightly easier.
Waterless Bathing Alternatives When Your Cat Won’t Cooperate
For some cats — particularly those with extreme anxiety, a history of trauma, or medical conditions that make bathing dangerous — waterless alternatives are not a compromise. They are the right choice.
Waterless Shampoo Foam: How to Use It
Waterless shampoo foam is a no-rinse cleaning product designed specifically for cats. It removes light dirt, odor, and surface debris without any water contact.
- How to use it:
- Shake the bottle and dispense a small amount of foam into your palm.
- Work the foam into your cat’s coat using your fingertips, moving in the direction of fur growth.
- Massage gently for 30–60 seconds, focusing on soiled areas.
- Use a dry towel to buff the coat — no rinsing needed.
Waterless shampoo is not effective for flea infestations, toxic substance contact, or heavy soiling. For those situations, a full bath (or professional grooming) is necessary. But for routine freshening between baths, or for cats who genuinely cannot tolerate water, it is a highly practical tool.
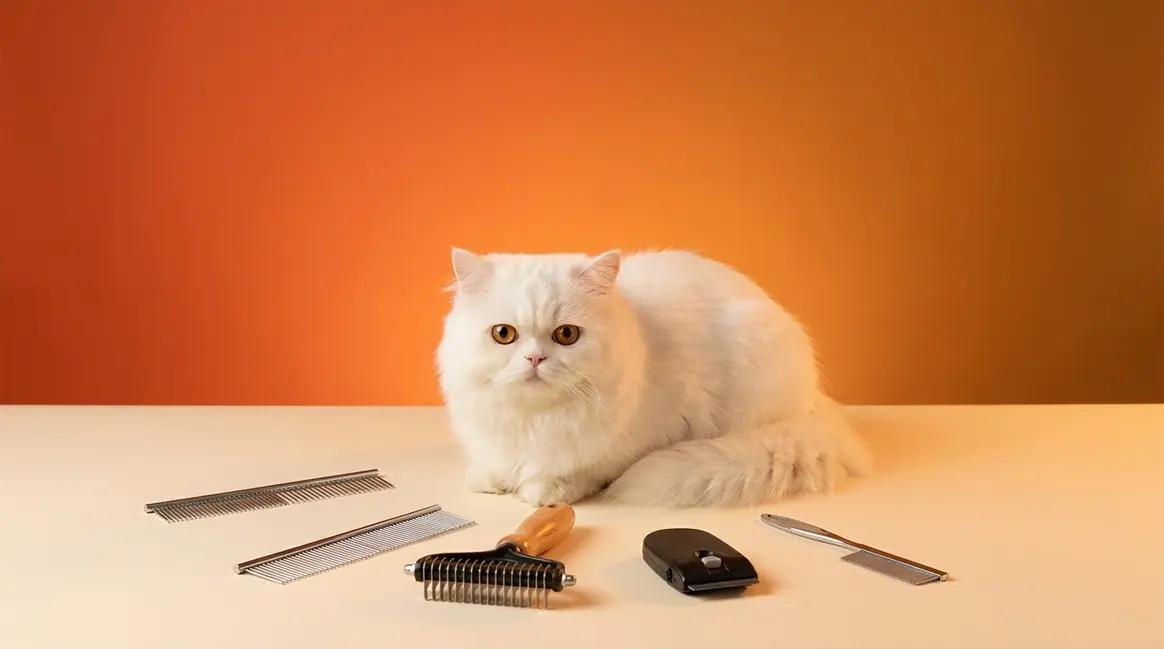
Grooming Wipes and Brushing for Light Cleaning
Pet grooming wipes — pre-moistened, cat-safe wipes — work well for spot cleaning specific areas: paws after outdoor exposure, the area around the tail, or the face after a messy meal. They are gentler than waterless foam for sensitive areas and are accepted by most cats who resist full baths.
Regular brushing complements both options. A thorough brushing session removes loose hair, dander, and surface debris, and distributes natural skin oils through the coat. For many cats with mild cleanliness needs, consistent brushing plus occasional grooming wipes eliminates the need for full baths entirely. According to Carroll County Animal Hospital’s cat care guidance, brushing is one of the most underutilized tools in routine cat care — most owners reach for a bath when a brush would do the job with far less stress.
Troubleshooting: What to Do When Things Go Wrong
Even with careful preparation, baths don’t always go smoothly. Here’s how to handle the most common failure points without losing control of the situation.
Your Cat Escapes the Towel Wrap
This happens. A determined cat can wriggle a paw free even from a well-executed wrap.
What to do: Stop. Set your cat down on the non-slip mat. Do not chase the paw or force it back in. Take a breath, speak calmly, and re-wrap from the beginning. If your cat has fully escaped and is now backed into a corner, give them 30–60 seconds to settle before attempting to pick them up again. Chasing a panicked, wet cat causes injury to both of you.
Prevention: Practice the towel wrap on a dry, calm cat before bath day. Wrap them, give a treat, unwrap. Repeat until they tolerate it without struggling.
Your Cat Bites During the Bath
A bite during bathing is a clear communication: your cat has reached their fear threshold. It is not aggression in the predatory sense — it is a defensive response to feeling trapped and terrified.
What to do immediately: Do not pull away sharply — this causes a deeper puncture. Stay still for a moment, then disengage slowly. If the bite breaks skin, wash the wound immediately with soap and water for at least 5 minutes and monitor for signs of infection. Cat bites carry a high infection risk due to the bacteria in feline saliva — seek medical attention if redness, swelling, or warmth develops within 24 hours.
Prevention: Keep the bath under 5–7 minutes. A cat that bites is usually a cat whose bath has gone on too long.
Your Cat Is Soaking Wet and Won’t Calm Down
A wet, panicked cat running loose in a bathroom is one of the most stressful scenarios in cat bathing. Your instinct will be to catch them — but chasing a panicked cat escalates the situation rapidly.
What to do: Sit down on the floor. Lower your body to their level. Stop moving. Speak in a low, even voice. Most cats will pause their panic within 30–60 seconds when the perceived threat (you) stops advancing. Once they pause, offer a treat by placing it on the floor near them — don’t reach toward them. When they approach the treat, you can gently place a towel over them to begin drying.
When to Stop and Call a Vet or Professional Groomer
DIY bathing is not the right choice for every cat or every situation. Knowing when to stop is as important as knowing how to proceed.
- Stop the bath and call your vet if your cat:
- Is showing signs of extreme distress beyond normal resistance: open-mouth breathing (panting), complete body paralysis from fear, or loss of bladder control
- Has a known heart condition, respiratory problem, or is recovering from surgery or illness
- Has open wounds, severe skin irritation, or a diagnosed skin condition that may be aggravated by water or shampoo
- Has bitten you and broken skin — address your wound first; the bath can wait
- Call a professional groomer if:
- Every bath attempt ends in injury to you, your cat, or both
- Your cat’s coat requires specialized care (matting, long-haired breeds like Persians or Maine Coons with severe tangles)
- Your cat is elderly or has mobility issues that make safe restraint difficult at home
Fear Free-certified groomers are trained specifically to handle anxious and aggressive cats using low-stress handling techniques. Many veterinary clinics also offer grooming services where sedation can be used if medically appropriate — this is a legitimate, humane option for cats whose fear response is severe enough to make bathing a genuine welfare concern.
The goal of the Calm-Capture-Comfort Method is always the cat’s wellbeing first. If home bathing is causing more harm than good, professional help is the right answer — not a failure.
Frequently Asked Questions
How do you bathe an unwilling cat?
Bathing an unwilling cat requires a structured approach, not just patience. Use the Calm-Capture-Comfort Method: pre-fill two silent basins with lukewarm water, wrap your cat in a towel (the kitty burrito technique) to secure their paws, then pour water slowly using a cup rather than a running faucet. Work quickly — the entire wash and rinse should take 5–7 minutes. Reward immediately with high-value treats the moment drying begins. Cats who receive consistent positive reinforcement after baths become progressively less resistant over time (veterinary behavioral consensus).
How do you bathe a cat that has never been bathed before?
A first-time bath should be as brief and calm as possible — even if the result isn’t perfect. In the 2–3 days before the bath, bring your cat into the bathroom while everything is dry and offer treats — this breaks the association between the bathroom and immediate threat. On bath day, keep the wash under 5 minutes. Prioritize a calm ending over thorough cleaning: a cat that finishes its first bath with treats and affection will be significantly easier to bathe the second time. Kittens under 8 weeks should not be bathed unless medically necessary, as they cannot regulate body temperature.
How do you immobilize a cat for a bath?
The safest way to immobilize a cat for bathing is the towel wrap (kitty burrito technique), not physical force. Lay a large towel flat, place your cat in the center, and fold each side snugly over the body so the front paws are secured against the torso. Only the head should remain exposed. The wrap should be firm enough to prevent paw escape, but you should still be able to slide two fingers under the towel at chest level. Never use scruffing (gripping the loose neck skin) as a primary restraint during a bath — it is appropriate for very brief veterinary procedures but causes significant stress over the duration of a full bath.
How can I protect myself from being scratched when bathing my cat?
Trimming your cat’s claws the day before the bath is the single most effective scratch-prevention step. Beyond that, the towel wrap secures the front paws throughout most of the bath, and working quickly (under 7 minutes) reduces the window during which scratching can occur. Wear a long-sleeved shirt for additional skin protection. If your cat is extremely scratch-prone, a second person can hold the wrapped cat while you wash — this keeps both hands occupied and prevents the wrap from loosening. Never wear loose clothing that could catch a claw, and keep your face away from the cat’s head during the bath.
What can I use instead of water to bathe my cat?
Waterless cat shampoo foam is the most effective no-water alternative for light cleaning. Dispense a small amount into your palm, work it through the coat with your fingertips, and buff dry with a towel — no rinsing needed. For spot cleaning, pet grooming wipes work well on paws, the face, and around the tail. Regular brushing removes loose hair, dander, and surface debris and is sufficient for routine coat maintenance between baths. None of these alternatives are appropriate for flea infestations, toxic substance contact, or heavy soiling — those situations require a full bath or professional grooming.
The Calm-Capture-Comfort Method Works — Here’s Your Next Step
Bathing a cat that hates water doesn’t have to end in scratches, tears, and a traumatized cat hiding under the bed for the rest of the day. The Calm-Capture-Comfort Method gives you a clear, three-phase framework: eliminate stress triggers before your cat enters the room, capture cooperation with the towel wrap and two-bucket technique, and comfort with immediate rewards that gradually rewire the fear response. Most indoor cats need only 1–4 baths per year — so each bath you handle well is a meaningful investment in your cat’s long-term trust.
The Calm-Capture-Comfort Method works because it addresses the root causes of water aversion — sensory disruption and noise stress — rather than just pushing through the resistance. When you understand why your cat panics, the techniques stop feeling arbitrary and start feeling logical.
Your next step: trim those claws today. Then gather your two basins, your towel, and your high-value treats. Run a dry bathroom desensitization session tomorrow. By the time bath day arrives, you’ll have done the hardest work already — and so will your cat.
Author Bio: This guide was developed with input from veterinary care resources, Fear Free-certified handling principles, and feedback from cat owners who have successfully used low-stress bathing techniques with resistant cats. For cats with medical conditions, extreme aggression, or severe anxiety, always consult a licensed veterinarian or Fear Free-certified groomer before attempting a home bath.
Dave King
Cat owner and writer at Mad Cat Man.