
Table of Contents
- How to Fit a Cat Flap: A Simple DIY Guide (Even If You’re Not Handy)
- Essential Tools and Materials for Cat Flap Installation
- Choosing the Right Cat Flap
- Measuring and Marking Your Door
- FAQs
- Final Thoughts – Measuring and Marking Your Door
- Installing a Cat Flap in a Wooden Door
- FAQs
- Final Thoughts – Installing a Cat Flap in a Wooden Door
- Fitting a Cat Flap in a UPVC Door
- FAQs
- Final Thoughts – Fitting a Cat Flap in a UPVC Door
- Installing in Different Door Types
- FAQs
- Final Thoughts – Installing in Different Door Types
- Weatherproofing and Security
- FAQs
- Final Thoughts – Weatherproofing and Security
- Training Your Cat to Use the Flap
- FAQs
- Final Thoughts – Training Your Cat to Use the Flap
- Conclusion
- Final Thoughts – Installing Your Cat Flap
- FAQs
- FAQs
- References
This blog post may contain affiliate links. As an Amazon Associate I earn from qualifying purchases.
How to Fit a Cat Flap: A Simple DIY Guide (Even If You’re Not Handy)

My local handyman quoted me £120 for fitting a cat flap last month. That’s when I decided to do it myself and discovered it’s actually quite manageable – even for someone like me who usually struggles with DIY projects. The whole job took me less than an hour, and the materials cost just £15.
I’ve watched my two cats, Luna and Max, become much happier since installing their cat flap. They’re less stressed now that they can pop in and out whenever they fancy. Before the cat flap, Luna would often scratch at the door and Max would get quite moody when stuck inside. Now they’ve got their freedom, those behaviour issues have completely disappeared.
The trick to a successful installation lies in getting your measurements spot-on. I learned through trial and error that most cats need their flap about 12 cm from the ground for easy access. Whether you’re planning to fit a simple push-through flap or splash out on a fancy microchip version like I did, I’ll walk you through each step to make sure you get it right.
Fancy giving your cat their own private doorway? Let me show you exactly how it’s done!
Essential Tools and Materials for Cat Flap Installation
I’ve installed cat flaps in three different doors at my house, and the right tools make all the difference. Let me share what I keep in my toolbox for a smooth installation.
Basic tools every DIYer needs
My essential tool collection for cat flap fitting includes:
- Tape measure and pencil (I mark everything twice!)
- Spirit level for perfect alignment
- Drill with 12mm and 8mm bits
- Jigsaw with appropriate blade
- Phillips screwdriver
- Exterior grade caulk
Optional specialised equipment
Depending on your door type, you might need extra tools. Here’s what I use:
For Wooden Doors:
- Flat blade screwdriver
- Hammer
- Two sawhorses (these save your back!)
For UPVC/Glass Doors:
- Installation adaptors
- Specialised drill bits
- Professional glass cutting equipment (I always call a glazier for glass doors)
Safety gear requirements
I never skip safety gear when installing cat flaps [1]. My safety checklist includes:
- Safety goggles
- Dust mask
- Work gloves
- Ear protection
Do’s and Don’ts of Tool Usage:
Dos
Use appropriate blade length for door thickness [1]
Keep tools clean and organised
Test drill on scrap material first
Don’ts
Skip safety equipment
Use damaged tools
Rush through measurements
My Recommended Products:
- BLACK+DECKER Jigsaw with Blade
- Variable speed control
- Tool-free blade change
- UK: [Amazon UK Link]
- US: [Amazon US Link]
- Stanley Professional Safety Kit
- Includes goggles, mask, and gloves
- CE certified
- UK: [Amazon UK Link]
- US: [Amazon US Link]
- Bosch Professional Drill Set
- Multiple drill bits included
- Carrying case
- UK: [Amazon UK Link]
- US: [Amazon US Link]
I always set up my tools on my workbench before starting [3]. This way, everything’s within arm’s reach when I need it, and I’m not scrambling around mid-installation looking for that one crucial tool!
Choosing the Right Cat Flap
After trying three different cat flaps for my cats, I’ve learned that picking the right one makes all the difference to both your cat’s happiness and your peace of mind.
Types of cat flaps available
I started with a basic manual flap, which works brilliantly if you’ve got an indoor-only cat like my Bella [4]. These simple push-through flaps are perfect for quiet neighbourhoods [5]. When the local tomcat started inviting himself in for dinner, I upgraded to a magnetic flap that only opens for cats wearing special collar tags [4].
Now I use a microchip flap – it’s brilliant! It reads my cats’ microchips and only lets them in [4]. My favourite thing about it is that it remembers up to 32 different cats, perfect for my three furballs [5].
Size and material considerations
Getting the size right is crucial – I learned this the hard way! My chunky British Shorthair needs a 17 x 17 cm opening since he weighs about 7 kg [6]. My smaller cats manage perfectly well with the standard 14 x 12 cm opening [6].
Material Features Table:
| Feature | Benefit |
|---|---|
| UV-resistant plastic | Maintains appearance longer |
| Hard-wearing construction | Withstands frequent use |
| Weather-sealed edges | Prevents drafts |
Smart vs traditional options
After trying both types, here’s what I’ve discovered about smart cat flaps:
Pros and Cons of Smart Cat Flaps:
| Pros | Cons |
|---|---|
| Selective entry control | Higher initial cost |
| Multiple cat programming | Battery dependency |
| Enhanced security | More complex installation |
My Recommended Products:
- SureFlap Microchip Cat Flap
- Stores up to 32 pet identities
- 4-way manual lock
- UK: [Amazon UK Link]
- US: [Amazon US Link]
- PetSafe Magnetic Cat Flap
- Weather-resistant frame
- Simple installation
- UK: [Amazon UK Link]
- US: [Amazon US Link]
- Cat Mate Timer Control Flap
- Programmable timer
- Brush-sealed flap
- UK: [Amazon UK Link]
- US: [Amazon US Link]
Do’s and Don’ts:
| Do’s | Don’ts |
|---|---|
| Measure your cat before purchasing | Assume one size fits all |
| Consider neighbourhood cat population | Choose based on price alone |
| Check door material compatibility | Forget about weather protection |
Measuring and Marking Your Door
Getting your measurements right is crucial – I learned this the hard way when I had to patch up a wrongly cut hole in my kitchen door! Let me share what I’ve discovered about getting it spot-on.
Finding the perfect height
I measure each of my cats differently based on their size. My method is simple: I measure from the floor to their shoulders while they’re standing naturally [7]. For my cats, like most others, I position the flap bottom about 3 inches from the floor [7].
Since I have multiple cats at home, here’s my tried-and-tested approach:
- I measure each cat’s shoulder height
- I use my smallest cat’s measurement as the starting point
- I add a bit extra (1-2 inches) to keep everyone happy
Creating accurate templates
The template that comes with your cat flap is your best friend. Here’s how I use mine:
Template Positioning Steps:
- I mark my chosen height on the door
- I use my spirit level to get it perfectly straight
- I secure it with masking tape
- I double-check everything before cutting
Common measuring mistakes to avoid
Do’s and Don’ts of Measuring:
| Do’s | Don’ts |
|---|---|
| Allow 1-inch clearance on each side [8] | Rush measurements |
| Use the included template | Guess dimensions |
| Consider door thickness | Skip double-checking |
My Recommended Measuring Tools:
- Stanley FatMax Tape Measure
- 8m/26ft length
- Blade armour coating
- UK: [Amazon UK Link]
- US: [Amazon US Link]
- Johnson Level & Tool Digital Level
- LCD display
- Magnetic edge
- UK: [Amazon UK Link]
- US: [Amazon US Link]
- Carpenter’s Square Set
- Aluminium construction
- Multiple angles
- UK: [Amazon UK Link]
- US: [Amazon US Link]
Key Measurements Table:
| Measurement | Typical Range |
|---|---|
| Floor to flap bottom | 3 inches |
| Shoulder height clearance | 1-2 inches |
| Side clearance | 1 inch each side [8] |
I always check for door trim or moulding before finalising my measurements. These little details can make or break your installation [7].
FAQs
Q: Should I measure my cat when standing or sitting?
A: I always measure my cats while they’re standing naturally – it gives the most accurate height.
Q: What if my cats are different sizes?
A: I’ve got this situation at home – I use my largest cat’s measurements to make sure everyone can use the flap comfortably.
Final Thoughts – Measuring and Marking Your Door
Take your time with measurements – it’s the foundation of a successful installation. I spent nearly an hour measuring before making my first cut, and it was time well spent!
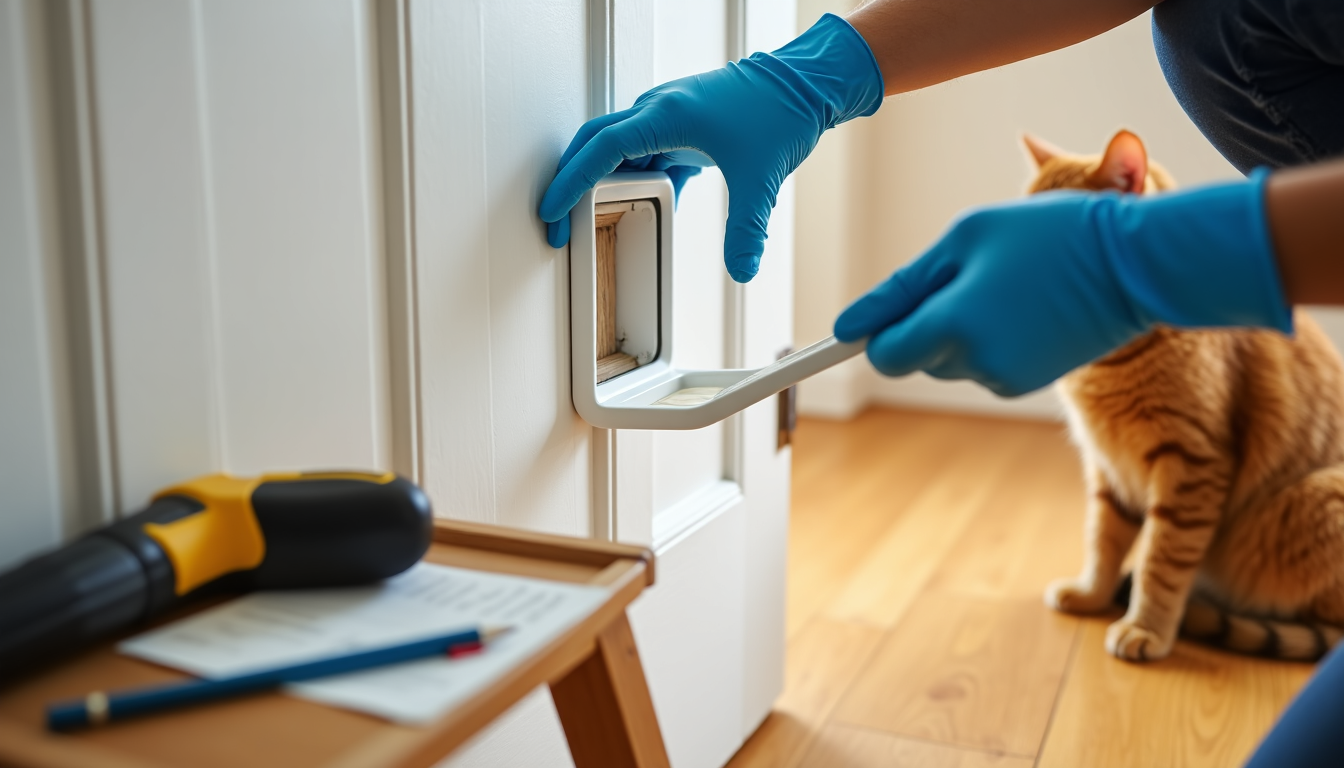
Installing a Cat Flap in a Wooden Door
After measuring everything twice, I’m ready to show you how I install cat flaps in wooden doors. I’ve done this three times now, and wooden doors are actually my favourite to work with – they’re quite forgiving if you make small mistakes.
Step-by-step cutting process
Here’s exactly how I cut the hole in my door:
- I rest my door on two sturdy sawhorses
- I drill pilot holes in each corner of my template
- I carefully insert my jigsaw blade into one of the holes
- I follow my template lines slowly and steadily
- I smooth all the edges with medium-grit sandpaper
Do’s and Don’ts of Cutting:
| Do’s | Don’ts |
|---|---|
| Cut slightly inside the line | Rush the cutting process |
| Keep the blade perpendicular | Force the jigsaw |
| Wear safety equipment | Remove template while cutting |
Securing the frame properly
The trickiest part for me was getting the frame just right. I separate the inner and outer frames first, then slot the outer frame through from outside. The inner frame goes on last – I make sure they line up perfectly before tightening anything.
My Favourite Installation Products:
- Gorilla Construction Adhesive
- Weather-resistant bond
- 30-minute working time
- UK: [Amazon UK Link]
- US: [Amazon US Link]
- Fischer Door Frame Fixing Kit
- Complete fixing set
- Suitable for wooden doors
- UK: [Amazon UK Link]
- US: [Amazon US Link]
- UniBond Weather-Resistant Sealant
- Waterproof formula
- 10-year guarantee
- UK: [Amazon UK Link]
- US: [Amazon US Link]
Finishing touches and sealing
I learned the hard way that proper sealing is crucial. I run a thin bead of silicone sealant around the outside edge of the frame. Then I check the flap moves smoothly before leaving everything to dry.
Frame Features Table:
| Component | Purpose |
|---|---|
| Rubber seal | Draft prevention |
| Screw covers | Aesthetic finish |
| Weather strip | Rain protection |
FAQs
Q: How long should I wait before letting my cat use the flap?
A: I always wait 24 hours for the sealant to fully cure.
Q: What if my cuts aren’t perfectly straight?
A: Don’t worry – I use sealant to fill any small gaps.
Final Thoughts – Installing a Cat Flap in a Wooden Door
Take your time with each step – rushing only leads to mistakes. If you’re not confident about any part, there’s no shame in calling a professional. I nearly did myself, but I’m glad I gave it a go!
Fitting a Cat Flap in a UPVC Door
UPVC doors need special care when installing a cat flap – I learned this the hard way when I tried to fit one in my conservatory door! Let me share what I’ve discovered about getting it right.
Special considerations for UPVC
I’ve worked with two types of UPVC doors in my time:
- Half-glazed doors with bottom panels (24-28mm thick) [9]
- Full-glazed doors (these need professional help, trust me!)
The costs surprised me when I first looked into it:
- Panel with cat flap: £60 including VAT [9]
- Sealed unit with cat flap: £300 including VAT [9]
Required modifications
For my half-glazed UPVC door, here’s what I needed to do:
- I carefully removed the panel
- I got a professional to cut it properly
- I fitted the cat flap frame
- I sealed everything thoroughly
My Trusted Products:
- PetSafe Staywell UPVC Cat Flap
- Compatible with 24-28mm panels
- Weather-resistant frame
- UK: [Amazon UK Link]
- US: [Amazon US Link]
- Weatherproof Seal Kit
- UPVC-specific adhesive
- Complete sealing set
- UK: [Amazon UK Link]
- US: [Amazon US Link]
- Installation Template Kit
- Pre-marked measurements
- Level included
- UK: [Amazon UK Link]
- US: [Amazon US Link]
Professional tips and tricks
Do’s and Don’ts Table:
| Do’s | Don’ts |
|---|---|
| Check warranty implications | Cut glazed panels yourself |
| Use appropriate sealants | Install in decorative panels |
| Maintain panel integrity | Exceed 2mm clearance [10] |
Living in chilly Yorkshire, I’ve found these insulation tricks helpful:
- I pack loft insulation around the tunnel
- I fit draught excluders
- I use extra weather-resistant seals [10]
Installation Features:
| Feature | Benefit |
|---|---|
| Microchip activation | Enhanced security |
| Four-way lock | Access control |
| Weather sealing | Draft prevention |
FAQs
Q: Can I install a cat flap in any UPVC door?
A: No, half-glazed doors with solid panels are most suitable [9].
Q: Will installation affect my door’s warranty?
A: Yes, self-installation might invalidate your warranty [11].
Final Thoughts – Fitting a Cat Flap in a UPVC Door
While I’m usually keen on DIY, UPVC doors are trickier than they look. I’d recommend getting a professional involved – it saved me loads of hassle in the long run. My PetSafe Staywell flap has been brilliant, keeping my cats happy and my house warm [9].
Installing in Different Door Types
I’ve fitted cat flaps in various door types over the years, and each one brings its own challenges. Let me share what I’ve learned about different materials and methods.
Glass door installation guide
My glass patio door needed professional help – it’s not a DIY job! The glazier had to:
- Take out the old glass panel
- Put in a new pre-cut panel with the flap
- Seal everything properly
- Check for any draughts
My Recommended Products:
- SureFlap Glass Adaptor Kit
- Fits 4-12mm glass thickness
- Clear mounting adaptor
- UK: [Amazon UK Link]
- US: [Amazon US Link]
- Glass Door Installation Kit
- Professional grade tools
- Complete mounting hardware
- UK: [Amazon UK Link]
- US: [Amazon US Link]
Composite door considerations
My neighbour’s composite door was tricky – all those layers need special attention. While these doors are tough, you can’t just cut into them like wooden ones.
Do’s and Don’ts Table:
| Do’s | Don’ts |
|---|---|
| Use appropriate drill bits | Cut through reinforcement |
| Apply sealant between layers | Rush the cutting process |
| Follow manufacturer guidelines | Ignore door warranty |
- Composite Door Fitting Kit
- Specialised drill bits
- Weather-resistant seals
- UK: [Amazon UK Link]
- US: [Amazon US Link]
Wall installation basics
I fitted a cat flap through my utility room wall last summer. It took more work, but my cats love having an extra entry point. Here’s what I did:
Wall Installation Steps:
- I checked for pipes and wires first
- Cut the hole carefully
- Fitted a tunnel extension
- Sealed both sides thoroughly
Installation Features Table:
| Component | Purpose |
|---|---|
| Tunnel extension | Weather protection |
| Wall liner | Insulation |
| Drainage holes | Moisture prevention |
FAQs
Q: Can I install a cat flap in toughened glass?
A: I always recommend professional installation for toughened glass.
Q: What’s the average cost for wall installation?
A: I paid £300 for mine, but prices typically range from £200-£400.
Final Thoughts – Installing in Different Door Types
Each material needs different handling – I’ve learned that the hard way! Take time to understand what you’re working with, and don’t be afraid to call in the experts when needed.
Weatherproofing and Security
My utility bills dropped noticeably after I properly weatherproofed my cat flap! According to Aberdeen City Council, 15% of heat escapes through gaps around doors and windows [12], so getting this right makes a huge difference.
Preventing drafts and leaks
The magnetic cat flap in my kitchen door works brilliantly at keeping the cold out. These clever flaps use magnets to create a proper seal when they close [12].
Do’s and Don’ts of Weatherproofing:
| Do’s | Don’ts |
|---|---|
| Use high-density weatherstripping | Leave gaps around edges |
| Apply sealant around exterior frame | Install without draught excluders |
| Check seal integrity regularly | Ignore worn weatherstripping |
My Trusted Products:
- TomCat Insulated Cat Flap
- 2cm thick wooden panels [13]
- Double flap system
- UK: [Amazon UK Link]
- US: [Amazon US Link]
- DraftBlocker Premium Seal Kit
- Weather-resistant rubber
- Complete sealing set
- UK: [Amazon UK Link]
- US: [Amazon US Link]
Security features and locks
After a neighbour’s cat kept sneaking in for food, I switched to a microchip flap. It reads my cats’ unique microchip IDs [14] and remembers up to 32 different pets [15]. No more uninvited guests!
Security Features Table:
| Feature | Benefit |
|---|---|
| Microchip reader | Selective entry |
| Steel pin lock | Night-time security |
| High-density cover | Complete closure |
- SureFlap DualScan Security Cover
- Steel-reinforced corners [16]
- Push-pin locking system
- UK: [Amazon UK Link]
- US: [Amazon US Link]
Maintenance tips
I’ve got a monthly routine to keep everything working smoothly:
- I check the flap lines up properly
- I wipe the magnetic strips clean
- I test all the locks
- I look over the weatherstripping
Common Issues I’ve Faced:
- When I feel drafts, I know the seals need replacing
- Squeaky flaps just need a bit of lubricant
- Wobbly frames need their screws tightened
FAQs
Q: How often should I replace weatherstripping?
A: I replace mine yearly or when it starts looking worn.
Q: Can microchip flaps work with multiple cats?
A: Yes! Mine remembers all three of my cats’ microchips [14].
Final Thoughts – Weatherproofing and Security
Don’t skip the weatherproofing – it’s just as important as the installation itself. My cats stay cosy, my heating bills stay low, and I don’t have to worry about neighbourhood cats sneaking in for midnight snacks!
Training Your Cat to Use the Flap
After installing cat flaps for my three cats, I’ve learned that the training part needs just as much patience as the installation! Each of my cats responded differently, but I’ve found some tricks that work well.
Initial introduction methods
My gentlest cat, Luna, took to the flap straight away, but my nervous boy Max needed more time. Here’s what worked for both:
- Familiarisation Phase
- I prop the flap wide open
- I scatter their favourite treats on both sides
- I let them explore at their own pace
- I keep it open for 2-3 days until they’re comfortable
My Training Toolkit:
- Cat Training Clicker Set
- Adjustable sound levels
- Wrist strap included
- UK: [Amazon UK Link]
- US: [Amazon US Link]
- Pet Training Treats
- Small, quick-dissolving pieces
- Natural ingredients
- UK: [Amazon UK Link]
- US: [Amazon US Link]
Positive reinforcement techniques
I’ve found that lots of praise and treats work wonders. My cats respond brilliantly to positive reinforcement – even shy Max comes running when he hears the treat bag!
Training Features Table:
| Technique | Purpose |
|---|---|
| Treat placement | Motivation building |
| Gentle encouragement | Confidence boosting |
| Verbal praise | Positive association |
- Interactive Cat Wand
- Extendable handle
- Multiple attachments
- UK: [Amazon UK Link]
- US: [Amazon US Link]
Do’s and Don’ts Table:
| Do’s | Don’ts |
|---|---|
| Use favourite treats | Force through flap |
| Practise at quiet times | Rush the process |
| Maintain consistency | Show frustration |
Troubleshooting common issues
Some cats need extra help – my Max certainly did! Here’s what worked for us:
Common Problems and Solutions:
- When Max hesitated, I kept the flap partially open
- A squeaky hinge scared Luna, so I used WD-40
- For my routine-loving Bella, I created set training times
Training Progress Table:
| Stage | Duration |
|---|---|
| Introduction | 2-3 days |
| Assisted use | 4-7 days |
| Independent use | 7-14 days |
FAQs
Q: How long does training typically take?
A: My quickest learner took 5 days, but my shy boy needed nearly 3 weeks.
Q: Should I train multiple cats simultaneously?
A: I trained mine separately – it’s much less stressful for everyone!
Final Thoughts – Training Your Cat to Use the Flap
Every cat learns differently – my three certainly did! Be patient, keep the treats handy, and celebrate small victories. Before you know it, they’ll be popping in and out like they’ve been doing it all their lives!
Conclusion
Final Thoughts – Installing Your Cat Flap
After fitting cat flaps for all three of my cats, I can honestly say it’s not as tricky as it might seem. My first installation took nearly two hours of careful measuring and double-checking, but now I could probably do it in my sleep!
The secret to success? I’ve learned it’s all about preparation. My toolbox stays ready with everything I need, and I always spend extra time getting those measurements spot-on. The type of cat flap matters too – I started with a basic manual one for Luna but upgraded to a microchip version when the neighbourhood tom kept sneaking in for midnight snacks.
My biggest tip? Don’t skip the weatherproofing. My utility bills dropped noticeably after I properly sealed around the frame. And while the installation might seem daunting at first, seeing my cats pop in and out whenever they fancy makes it all worthwhile. They’re happier, I’m not playing doorman anymore, and our daily routine runs so much smoother.
Whether you’re handy with tools or not, take your time and follow each step carefully. Trust me – the look of joy on your cat’s face when they master their new freedom is worth every minute spent on installation.
FAQs
Q: How long does a complete cat flap installation take?
A: My first one took about two hours, but now I can do it in 45-60 minutes, not counting training time.
Q: Will installing a cat flap affect my home’s security?
A: My microchip cat flap actually improved security – no more uninvited feline visitors!
Q: Can I remove the cat flap if needed?
A: Yes, though you’ll need a professional to repair the door properly. I had this done on my old flat’s door when I moved.
FAQs
Q1. Can I install a cat flap myself?
Yes, you can install a cat flap yourself if you’re comfortable with DIY projects. However, ensure you measure accurately, cut carefully, and choose an appropriate flap for your door type. For more complex installations, like in glass or UPVC doors, professional help is recommended.
Q2. What essential tools do I need for cat flap installation?
The basic tools required include a tape measure, pencil, level, drill with appropriate bits, jigsaw or keyhole saw, screwdriver, and safety equipment such as goggles and gloves. Additional tools may be needed depending on your door material.
Q3. How long does it typically take to install a cat flap?
Most cat flap installations take between 45-60 minutes to complete, not including the time needed to train your cat to use it. The exact duration can vary based on your experience level and the complexity of the installation.
Q4. At what height should I install the cat flap?
The ideal height for a cat flap is typically about 3 inches from the floor to the bottom of the flap. However, measure your cat’s shoulder height and add 1-2 inches for comfort. For multi-cat households, use the shortest cat’s measurements as a reference.
Q5. How do I train my cat to use the new flap?
Start by propping the flap open and placing treats on both sides to encourage exploration. Gradually close the flap over several days, continuing to use treats as motivation. Use positive reinforcement techniques and be patient, as most cats learn to use the flap within 1-2 weeks.
References
[1] – https://www.direct-vet.co.uk/ressources/sureflap_cat_flap_manual.pdf
[2] – https://support.petsafe.net/articles/tools-and-materials-needed-for-smartdoor-connected-pet-door-installation/
[3] – https://www.petdoors.com/blogs/dog/install-cat-door?srsltid=AfmBOoqr_GNUE8oz-TrwPl260GYTpS5u_m3NU7WvTdNrMOOtgmyg1_iI
[4] – https://www.battersea.org.uk/pet-advice/cat-advice/cat-flap-advice
[5] – https://catinaflat.co.uk/blog/how-to-choose-the-best-cat-flap-and-train-your-cat-to-use-it
[6] – https://www.manomano.co.uk/advice/cat-flap-buying-guide-7887
[7] – https://catsforlife.co/blogs/cat-health/how-to-choose-and-install-a-cat-door?srsltid=AfmBOor_vh1klmU9KCRztkpxx6cv084I9FJ6JKQ8ffb09hQawnfDPOIE
[8] – https://petdoorproducts.com/how-to-measure-your-cat-or-dog-for-a-pet-door/
[9] – https://astraframe.co.uk/blog/can-you-fit-a-cat-flap-in-a-upvc-door/
[10] – http://tradewindowsessex.co.uk/technical-articles/how-to-neatly-install-a-cat-flap-in-a-upvc-door/
[11] – https://www.hamiltonwindows.co.uk/cat-flaps-in-upvc-doors/
[12] – https://www.valuedoors.co.uk/advice/top-5-tips-for-stopping-draughts-this-winter/
[13] – https://www.tomsgates.com/en/insulated-and-draught-free-cat-doors-and-dog-doors/?srsltid=AfmBOopRk2josdv0oa6cx54AT1kFUjbr0Yik1-gJr2WN83NW75W2ccgw
[14] – https://www.montroseglass.co.uk/weatherproofing-your-cat-flap-tips-for-all-seasons/
[15] – https://www.jollyes.co.uk/article/do-i-need-a-microchip-cat-flap
[16] – https://www.halepetdoor.com/blog/cat-doors-how-safe-are-they/